Workflows
Draw a recurring task once on a canvas — one trigger, optional conditions, one or more actions — so the same steps run the same way each time.
Compliance work is full of small steps that are easy to miss: a policy falls due for review, evidence (the proof that a control works) nears its expiry date, a vendor's status changes and nobody is told. A workflow records what should happen in one of those cases, and its run history shows an auditor how the task actually gets done.
A workflow runs when somebody selects Run in the editor or
Run Now
in the row menu, or when the run API is called. The other trigger types —
schedules, an inbound webhook, entity status changes, evidence nearing
expiry — can be drawn, configured and saved, but nothing in Aegis dispatches
them yet. Plan on a person starting the run until that changes.
Who uses it
-
Viewer and
Contributor can search the
list, open a workflow and read its runs. They see neither
ImportnorCreate Workflow, and the row menu offers onlyEdit— that opens the editor, but the server refuses every save, test and run. - Manager and Admin can also create, import, duplicate, edit, validate, export, activate, run and delete.
Two switches sit above the roles: the WORKFLOWS module must be
provisioned, or the page is unreachable; and the
Workflow Automation licence feature (Professional and above) must
be present, or the list stays readable but the create and import buttons are
gone.
What's on this screen
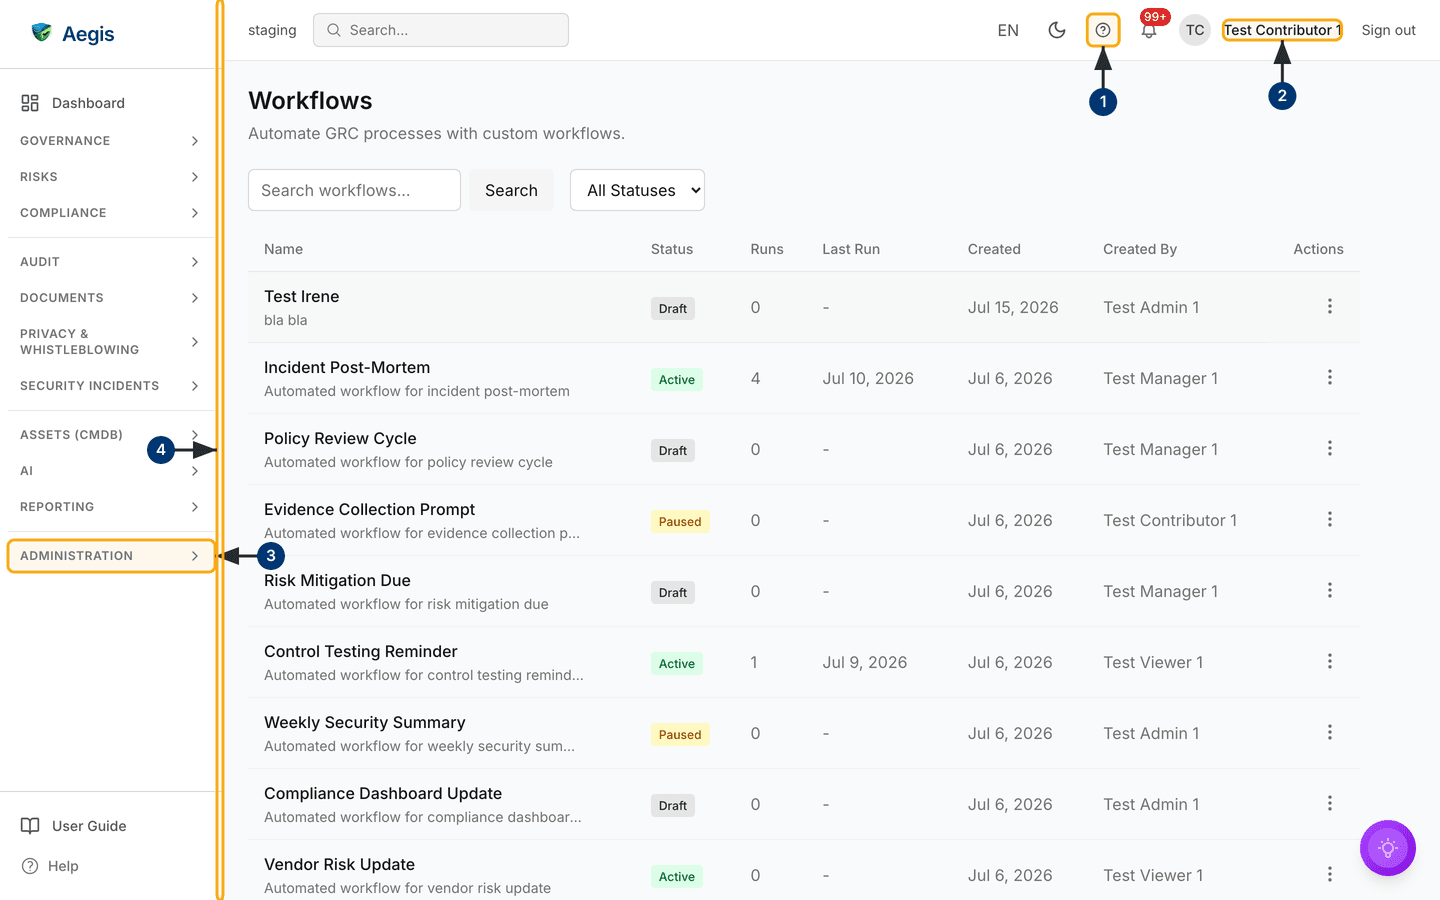
The header carries the title Workflows and the line
Automate GRC processes with custom workflows. On a Manager or Admin
account, Import and Create Workflow sit at its right;
the screenshot below was captured on a Contributor account, so that corner is
empty. Beneath it is a filter bar: a box reading
Search workflows..., a Search button, and a status
dropdown starting on All Statuses.
The table lists every workflow in the organisation, twenty to a page.
Name is a link with the description in grey beneath it;
Status is a coloured chip — Draft,
Active and Paused all appear in the capture.
Runs and Last Run stay at 0 and
- until a workflow has run. Created and
Created By record the origin, and Actions, the last
column, holds a three-dot menu. Selecting a row anywhere else opens that
workflow in the editor. Below the table sit Showing 1 to 20 of …,
Previous and Next. If nothing matches, the table gives
way to No workflows match your search criteria. — or to
No workflows created yet. Create your first workflow to get started.
when there are none at all.
Opening the workflow list
- Select the question mark in the top bar to open this guide inside Aegis, at the chapter for the screen you were on.
- Check the account name at the top right. Your role decides whether the create and import buttons appear at all.
-
In the left menu, open the
ADMINISTRATIONgroup and chooseWorkflows. The list at/automation/workflowsloads;/automationon its own redirects here. - If the menu crowds the table, drag the divider between menu and page to narrow it. The width is remembered for your next visit.
Finding a workflow
-
Type part of a name or description into
Search workflows.... The table reloads as you type, filtered to workflows whose name or description matches;Searchor Enter runs the same search and returns you to page one. Empty the box to bring the full list back. -
Pick a status in the dropdown, which applies as soon as you choose it, then
page through with
NextandPrevious.
What the statuses mean
| Status | Behaviour |
|---|---|
Draft |
Being built. It cannot be run; Run stays unavailable.
|
Active |
Ready to run. Run in the editor becomes available and
Run Now appears in the row menu.
|
Paused |
Temporarily off. Neither Run nor
Run Now is offered.
|
Archived |
Retired but kept, with its history intact. Nothing moves back out again. |
Creating a workflow
These steps need Manager or Admin. Select Create Workflow at the
top right of the list. Creating is a full page, not a popup:
Create New Workflow opens at
/automation/workflows/new with a breadcrumb back to
Workflows. An account without the create permission that types the
address in is sent to /unauthorized instead.
-
Decide where to start.
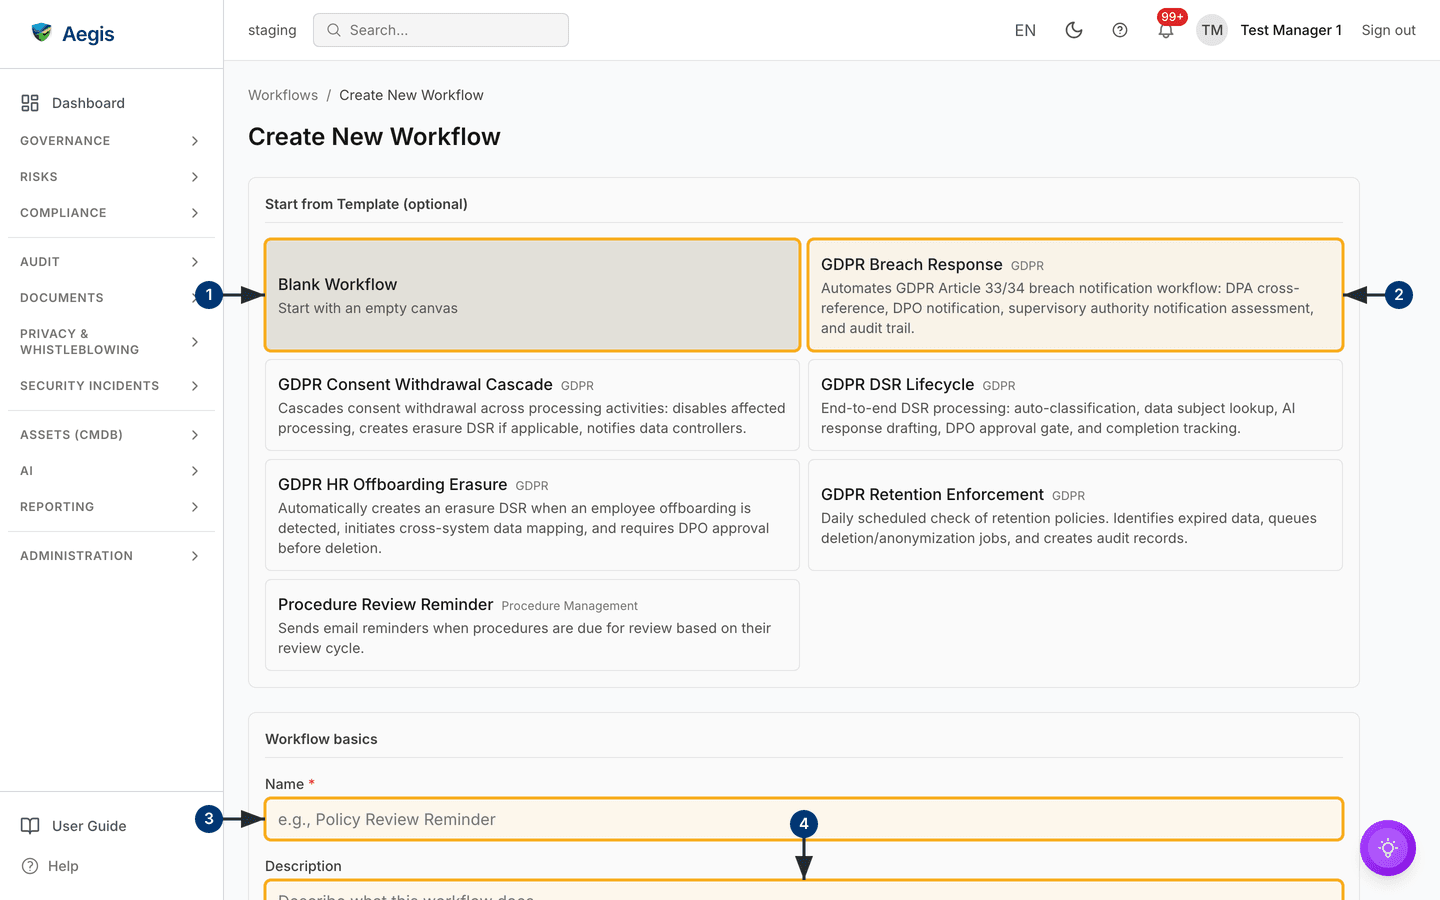
Blank Workflow—Start with an empty canvas— comes preselected, outlined in navy underStart from Template (optional). Keep it to draw everything yourself. -
Or select one of the published templates beside it — the capture shows the
six seeded ones, five GDPR flows such as
GDPR Breach ResponseplusProcedure Review Reminder. Choosing one fills in the name and description below, unless you typed them first. With no templates published, this section is absent. -
Under
Workflow basics, fill inName, the only required field — leaving it blank brings upName is requiredwhen you submit. -
Add a
Descriptionto help colleagues recognise the workflow in the list. It is optional. -
Scroll to the foot of the form — below the edge of the capture — and select
Create Workflow(it readsCreating…while it saves). Aegis stores the workflow inDraftand opens the editor.Cancelbeside it returns to the list without saving.
Inside the editor
Across the top is the toolbar: a back arrow to Back to Workflows,
the workflow name (select it to rename it in place), the status chip, and an
indicator reading Saving... or Unsaved changes. At its
right sit Save, Export, Test and
Run. While the design is incomplete, a red count such as
2 errors appears beside them; select it to read the
Validation Errors list.
Down the left is Node Library with three collapsible groups —
Triggers, Actions and Logic. The canvas
fills the middle. The right panel follows your selection: with a node selected
it is Node Configuration; with none it shows
Workflow Details (description, node and connection counts, last
updated) above Recent Runs.
Building the logic
-
Open
Triggersand drag one onto the canvas:Manual, the two schedules,Webhook received, an entity status change (policy, risk, vendor or control), orEvidence expiring soon. A node card appears where you dropped it. Each workflow needs exactly one trigger. -
Select that node. The right panel becomes
Node ConfigurationwithLabel,Type,IDand aTrigger Typedropdown, followed by the fields that type needs — such asCron expressionandTimezone, orDays before expiry. -
Drag an action across from
Actions:Send Email,Send Webhook,Send Teams Message,Send Notification; a status-setter for a policy, risk, vendor, control or procedure; orAssign Owner,Create Audit Log,Enqueue JobandApproval Gate. Configure it from itsAction Typedropdown and the fields below. - Join them: drag from the handle on the right of the trigger to the one on the left of the action. A line is drawn and the connection count goes up.
-
Add
ConditionorDelayfromLogicwhere you need a branch or a pause. A condition has two outgoing handles, yes and no, and both must lead somewhere before the workflow validates. -
To remove a node, use the delete control on the node or in
Node Configuration; both askDelete Nodefirst. Delete or Backspace on a selected node skips the confirmation.
Edits are written about two seconds after you stop, with
Saving... in the toolbar meanwhile. Wait for that to clear
before closing the tab — a pending change is lost.
Text fields take placeholders in double braces, such as
{{trigger.entity.name}}. A value the run does not hold stays in
the message as typed, so read the first real run rather than assuming it
resolved.
Testing before you activate
-
Select
Test(unavailable while the toolbar shows a red error count — clear those first). Aegis checks the structure and returnsValidation PassedorValidation Failedwith a count of errors and warnings. -
Read the list under
Errors. The usual ones areWorkflow must have exactly one TRIGGER node,Nodes not reachable from trigger, a condition missing a branch, and required fields left blank. -
Use the link beside an error to jump to the node it names, fix it, then
select
Re-run Test. Warnings are listed separately and do not block activation.
Test validates structure and configuration only. It sends no
email, calls no webhook and changes no record, and cannot prove your
condition matches real data. For that, activate the workflow and read the
first real run.
Activating, pausing and archiving
-
Select the status chip beside the workflow name. The menu lists only the
moves the current status allows —
Activate,Pause,Set to Draft,Archive. -
Choose
Activate. While validation errors remain it readsFix validation errors first; otherwise the chip turns green and the workflow becomes runnable. -
Select
Runin the toolbar to start an active workflow. On anything else it stays disabled and readsWorkflow must be active to run.
Watching what ran
-
With no node selected, read
Recent Runsin the right panel: each entry showsPENDING,RUNNING,COMPLETED,FAILEDorCANCELLED, when it was queued and how long it took — orNo runs yet. -
Select a run to open
Run Details: identifier, duration, times, what triggered it, any error message, andNode Executionslisting each node with its input and output — where you learn which branch a condition took. -
Select
Re-run Workflowthere to trigger it again after a fix.
Row actions, export and import
The three-dot menu on each row offers Edit; Duplicate,
which opens a Draft copy named after the original with
(Copy) appended; Run Now, on active workflows only;
and Delete, which asks for confirmation. Only entries your role
allows appear. Export in the editor toolbar offers the workflow as
JSON to Copy to Clipboard or Download;
Import on the list page takes that file, or pasted JSON, back as a
new Draft.
Tips and limits
-
Prefer
ArchivetoDeletewhen an auditor may ask later. An archived workflow keeps its runs; a deleted one leaves the list with no way back. - Where the order of several steps matters, use one workflow with branches — nothing sequences one workflow after another.
-
An active workflow with no runs at all has never been started; someone has
to select
RunorRun Now. -
Send Teams Messageneeds an incoming-webhook address in itsWebhook URLfield. There is no Slack action in the library. - This module has no AI assistance. A workflow does what a person drew on the canvas, which is what makes it defensible in an audit.
Where this connects
- Policies, Procedures, Evidence, Risks and Vendors — the records a workflow's actions read and set.
- Connectors and Webhooks — how outbound mail and HTTP calls leave Aegis.
- Automatic incident rules — rule-based automation for incidents, separate from this canvas.
- Roles overview and Audit log — who may do what, and who changed a workflow.