Policies
Policies state how your organisation works and what it commits to — this chapter walks through drafting one, setting its review cycle, routing it for approval and keeping it under review.
A policy is a written statement of intent: this is what we do, and what staff and auditors can hold us to. The module carries one through its whole life — draft, review, approval, re-review, retirement — and writes every status change to the audit log. It records that work; it does not make the organisation compliant on its own.
Who uses it
-
Viewer — read the register,
open a policy, run
Review Triage (AI)andExport to Word. NoCreate Policy, no editing or lifecycle controls. - Contributor — create and edit policies, run the AI writing aids, set required readers, link evidence, and move a policy through every step except approval.
-
Manager and
Admin — all of that, plus
Approveand delete; see What each role can do.
The screenshots here were taken as a
Contributor, so
Approve and delete are absent.
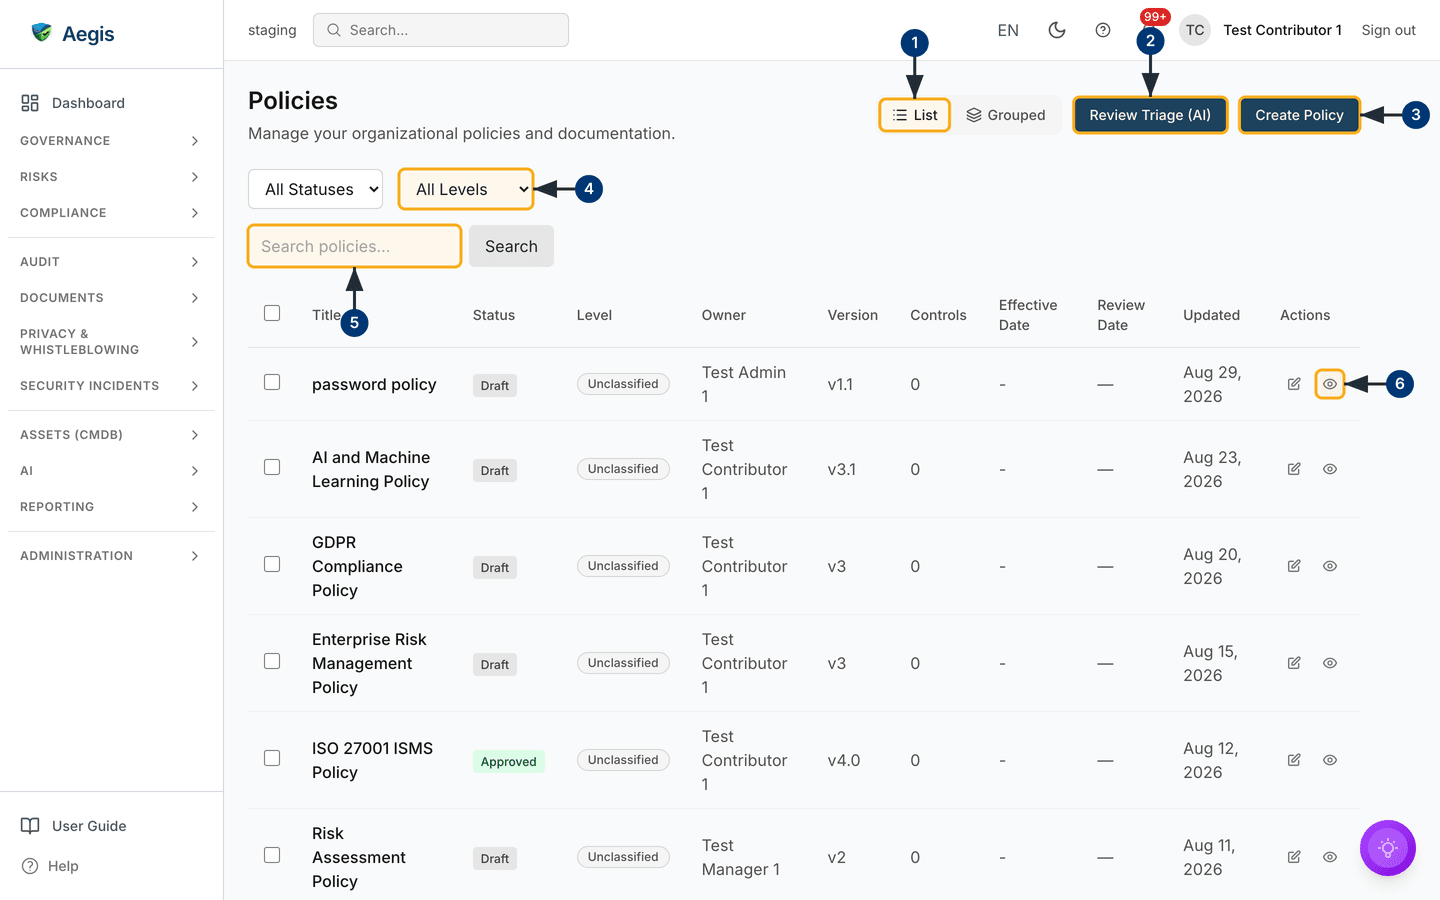
What's on this screen
Open Policies from the Compliance group in the
left sidebar; the register opens at /policies. The header carries
the title and three controls: a List / Grouped view
toggle, Review Triage (AI), and the navy
Create Policy button. Below sit the All Statuses and
All Levels dropdowns, then a Search policies… box with
its Search button.
The table lists every policy — Title,
Status (a coloured badge — grey Draft, green
Approved), Level, Owner,
Version, Controls mapped, and the effective,
review and updated dates. Each row begins with a tick-box and ends with a pencil
and an eye under Actions.
-
Choose how the register is drawn:
Listis the flat table shown here;Groupedredraws it with one section per governance level. -
Select
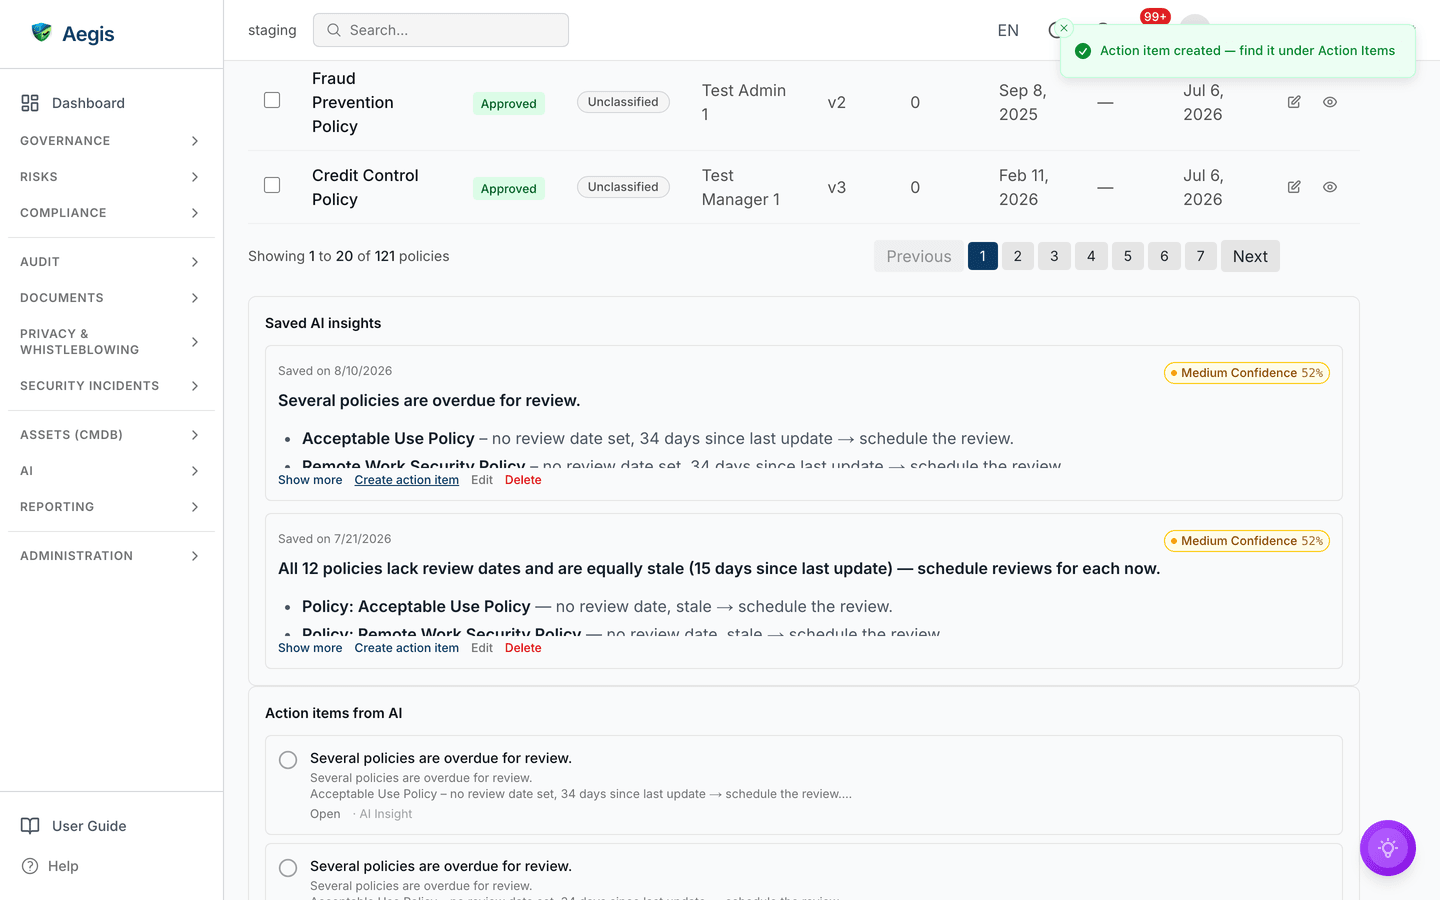
Review Triage (AI)to have Aegis rank policies and procedures by review date and narrate a plan — the ranking comes from the dates, not the model. Saved briefings collect below the table. -
Select
Create Policy. The Create New Policy dialog opens over the page — covered next. -
Narrow the register with
All Levels, marked here, orAll Statusesbeside it; the rows reload to matches only. Approvers also getPending My Approvalin the status list. -
Type part of a title into
Search policies…and selectSearch. The table filters to matches. -
On any row, select the eye to open the policy on its
Document information & detailstab, or the pencil to open it straight onContent. The title is a link to the sameDocument information & detailstab.
Creating a policy
The dialog is split into Policy Details and
Timeline & Review, with Cancel and
Create Policy
fixed to the foot as you scroll.
- Enter a
Policy Title. Required, as the red asterisk shows. -
Write the
Policy Content. The grey# Purpose/# Scope/# Policy Statementoutline is placeholder text that vanishes as you type (or the box opens pre-filled from your company document template, where one is set). Markdown is supported. Also required. -
Set the
Level— the governance level theGroupedview groups by. It starts atUnclassified; the other choices areStrategic,TacticalandOperational. -
Under Timeline & Review, set an optional
Effective Date. Below the edge of this capture sit aReview Dateand theReview Cyclepresets, described under Changing a policy's details. -
Select
Create Policy. The policy is saved as aDraftand the register refreshes.Cancelor the × discards what you typed.
Level, dates and review cycle carry defaults — capture the draft while it is
fresh and refine everything later through Edit details.
The policy's own page
A policy opens at /policies/[id]. The header shows the title,
status badge, version and last-updated date; a status line on the right reads
Ready between AI jobs. Under it runs the toolbar — seven icon
buttons, each named in its tooltip — then the tab strip:
Document information & details, Content,
AI Enhance, Translations,
Version history, Controls and Evidences.
The AI Enhance tab is present only because an enhancement has been
run on this policy; an Improve Writing tab appears the same way
after that aid runs. The first tab opens with an
Edit details button, the DETAILS,
DATES and Approval History cards, a collapsible
Changes since last approved version panel and
Required Readers.
-
Select
Edit(the pencil) to change the body in place — on aDraftonly; otherwise its tooltip reads "Policy must be in Draft status to edit content." -
The two violet buttons beside it are the writing aids, on drafts only:
Improve Writingrewrites for grammar, clarity and tone;AI Enhanceproposes further compliant detail. Each result lands on its own tab as suggestions you apply or dismiss. The navy button after them is the lifecycle action —Submit for Reviewon a draft. -
Select
Export to Wordto download the policy as a.docx.Upload Word/PDFsends an edited file back into the draft — it first shows what would change, for you to confirm or cancel.Helpexplains the toolbar. -
Select
Edit detailsto change the title, level, dates and review cycle: the cards are replaced in place by a form — covered next. For the level alone,Classifyin theDETAILScard sets it without opening the form. -
Expand
Changes since last approved versionto see what has moved — useful when writing a change summary. -
Under Required Readers, tick
Everyone must read this policy, or pickRequired rolesand named people throughSearch users…, then selectSave Required Readers.
![A policy's Document information & details tab — /policies/[id].](assets/figures/policy-detail@1x.png)
Changing a policy's details
Edit details replaces the three cards with a form on the same page
— there is no dialog. The heading reads Edit policy details,
with the reminder "The policy text is edited on the Content tab" underneath.
Cancel and Save changes sit at the foot of the form,
below the edge of this capture. While the form is open the address bar reads
/policies/[id]?tab=details&edit=1, so the editor can be linked
to directly.
-
Change the
Policy Title— the one field the form insists on: emptying it and saving returns "Title is required". -
Set the
Level—Unclassified,Strategic,TacticalorOperational; the hint spells out what each means. -
Set the
Effective Date— blank means the policy takes effect on approval. -
Set the
Review Date— when the policy is next due for review. It is the dateReview Triage (AI)ranks on, and this is the one place to move it. -
Pick a
Review Cyclepreset —Monthly(30 days),Quarterly(90, markedRecommended),Bi-annual(180),Annual(365) orCustom cycle. The create form offers the same presets.
![Editing a policy's details in place — /policies/[id]?tab=details&edit=1.](assets/figures/policy-details-edit@1x.png)
Finish with Save changes at the foot of the form. A "Policy details
updated" toast confirms it and the cards return with the new values;
Cancel discards what you typed. Unlike the body, details can be
edited at any status — an approved policy need not return to
Draft for a new review date.
The approval lifecycle
A policy carries one status at a time, shown as a badge wherever it appears.
| Status | What it means | What the toolbar offers |
|---|---|---|
Draft |
Being written. Not binding. | Submit for Review |
In Review |
Waiting on an approver. |
Approve for
Manager and above;
Return to Draft for editors
|
Partially Approved |
Some, not all, steps of a multi-approver chain have signed off (only where that chain is switched on for your tenant). | Nothing — the remaining approvers act in the approval-chain panel |
Approved |
The current binding version. | Revise and Retire Policy |
Retired |
No longer in force, kept for the record. | Reactivate |
In exports and audit-log entries these read as Draft,
InReview, PartiallyApproved, Approved and
Retired. Revise is the way to change an approved
policy: it asks for a change summary, snapshots the text into
Version history and returns the policy to Draft; each
submission and approval lands in Approval History.
Neither editing nor approval advances the Review Date, and
Review Triage (AI) ranks on that stored date. A policy whose
review you have completed keeps reading as overdue until you open
Edit details and set the next date yourself.
Linking evidence and discussing a policy
The Evidences tab ties a policy to
evidence (documents that show a control
works), held in Evidence. Below the tab strip — on
whichever tab is open — sits a Collaboration section carrying
the policy's comments and review requests.
-
Select
Evidences, the last tab. The panel header readsLINKED EVIDENCEwith the count in brackets. -
Select
AI search evidenceto have Aegis propose items from your library that appear to support this policy — you review each suggestion and decide. -
Or select
+ Link Evidenceto search the library and pick items yourself. - Until something is linked, the panel reads "No evidence linked yet." — as below.
-
Scroll to Collaboration to read existing comments and add
your own in the
Write a comment…box.
![The Evidences tab, with no evidence linked yet — /policies/[id].](assets/figures/policy-evidences-tab@1x.png)
The AI assist
Policies has five AI aids: Review Triage (AI) on the register,
Improve Writing and AI Enhance on a draft,
AI search evidence on the Evidences tab, and the
upload preview's summary of what a file would change. Each output is a
suggestion: a person reads it, edits it and decides — nothing is approved,
published or linked without that decision. Where AI is switched off for your
tenant, the buttons are absent and every task still works by hand.
Tips and limits
-
Row tick-boxes reveal a bulk-action bar with
Change StatusandExport; a Manager or above also getsDelete policy. PreferRetire Policyto deletion for anything ever in force. - Titles need not be unique — tell duplicates apart by owner or version.
-
Review Triage (AI)reads up to 200 policies and 200 procedures per run and skips retired ones — on a larger register its plan is a sample, not the whole picture. -
To change an approved policy's text, use
Revisefirst —Edit, the writing aids andUpload Word/PDFwork on aDraftonly. -
Controls you lack the role for are hidden, not shown and refused: no
Create Policymeans Viewer, noApprovemeans below Manager. - Required readers records who must read a policy; it does not chase them. Plan reminders through Action items.
Where this connects
A policy maps to controls through its Controls tab, feeding the
coverage in Compliance frameworks and
Control mapping. The step-by-step
how belongs in Procedures; the proof it
is followed lives in Evidence. A policy can treat a
risk, comments work as in
Collaboration, and every status change reaches
the Audit log.