Scenario: onboarding and assessing a new vendor
Follow one person, end to end, as she adds a new cloud provider to the register, sends it a security questionnaire, runs an AI investigation, turns a finding into a tracked risk, and links the proof an auditor will ask for.
Third-party risk — the chance that a supplier's weakness becomes yours — is a named requirement in ISO 27001 (an information-security standard), NIS2 (a European cybersecurity law) and DORA (a European financial-sector resilience law). This chapter is one journey across four modules: Vendors, Questionnaires, Risks and Evidence. It follows Aisha, a Contributor, as she onboards a provider called "DataNest" — from a blank row to a finding she can defend in an audit. Each module's own chapter carries the full detail; this one shows the order the work happens in.
Who can do this
The whole journey is within reach of a
Contributor: adding vendors,
sending questionnaires, running the AI investigation, raising risks and linking
evidence. A Viewer can read the
register and open a vendor's detail page, but the Add Vendor button
is not rendered for them, and the three row action icons are replaced by a
single view-details icon. Deleting a vendor — including the bulk
Delete — is reserved for a
Manager or
Admin, and so is unlinking evidence
from a vendor. Changing status in bulk needs update rights, which a Contributor
has. The full matrix is in
What each role can do.
What's on this screen
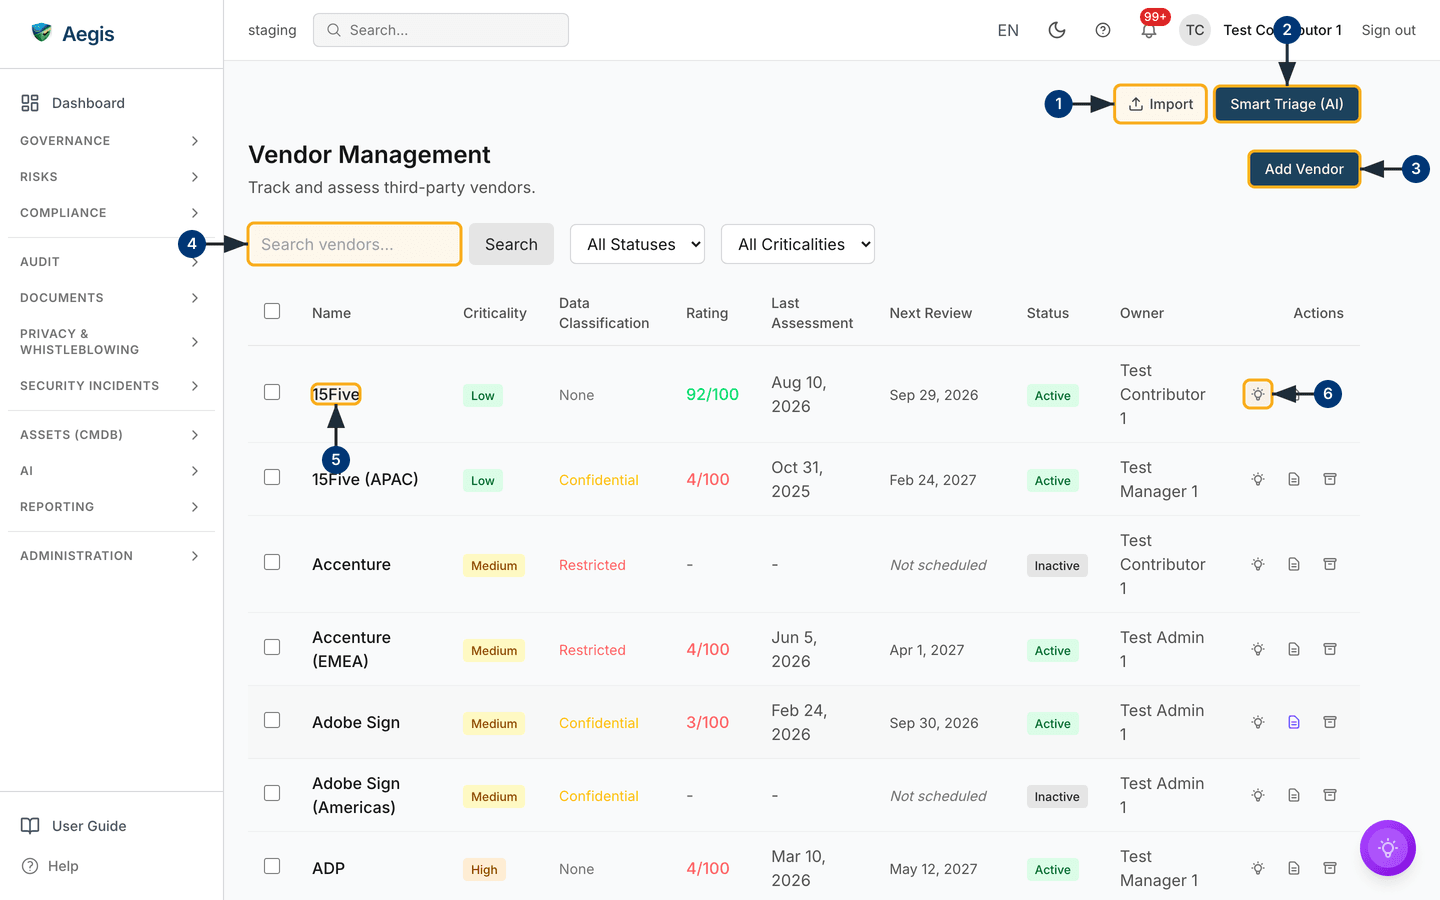
The journey starts at /vendors, reached from the
RISKS group in the left sidebar. Two buttons sit above the page
title on the right: Import and the blue
Smart Triage (AI). Below them the heading reads
Vendor Management with the subtitle "Track and assess
third-party vendors.", and the dark Add Vendor
button sits on the right, level with that heading. Next comes the filter bar — a
Search vendors… box with its own Search button, then
two dropdowns, All Statuses and All Criticalities.
The table beneath has a select checkbox on every row, then the columns
Name, Criticality, Data Classification,
Rating, Last Assessment, Next Review,
Status, Owner and Actions. The suppliers
in the capture are real names, several of them with regional variants — 15Five
and 15Five (APAC), Accenture and Accenture (EMEA), Adobe Sign and Adobe Sign
(Americas), ADP — at Low, Medium and
High criticality. Ratings run from a green 92/100 down
to red single-figure scores, and a supplier nobody has assessed shows a dash
under both Rating and Last Assessment, with
Not scheduled in grey italics under Next Review.
Status is a badge — green Active or grey
Inactive in this capture — and Owner names the person
who holds the relationship. Each row ends with three icons under
Actions: a lightbulb (AI investigation), a document (send
questionnaire) and a box (archive).
Ticking row checkboxes reveals a bulk bar, and what it offers depends on your
rights: each action is hidden from anyone without the matching permission. A
Contributor such as Aisha sees
only Change Status; Delete and
Export need delete and export rights respectively and do not appear
for her at all. Below the part the screenshot shows, the page continues with a
portfolio report card, a concentration-risk map, and panels for saved AI
briefings and action items.
Stage 1 — Get your bearings on the register
Before adding anything, Aisha takes stock of what is already there. These six controls are the ones she returns to throughout the journey.
-
Bring in an existing list with
Import. TheImport vendorsdialog opens: download the template, fill it in, upload it, and selectValidatebefore committing. A summary reports how many rows are valid and how many carry errors; only clean rows are created. -
Ask for a ranked starting point with
Smart Triage (AI). TheVendor Portfolio Smart Triagepanel opens; selectingRun Smart Triagestreams a briefing on the active vendors most in need of reassessment. Aegis computes the order — criticality, overdue review, never assessed, then rating — and the AI narrates it rather than inventing one. It reads your active vendors only and changes nothing. -
Start the new record with
Add Vendor. TheAdd New Vendordialog opens over the table. This is where Stage 2 begins. -
Find a row with the search box. Type part of a name into
Search vendors…and selectSearch; the table reloads filtered to matching names. The two dropdowns beside it narrow the list by status and by criticality. - Open a supplier by selecting its name. The name is a link to that vendor's detail page, which holds the rating panel, the assessment history, linked risks and linked evidence.
- Use the row action icons for assessment work. The lightbulb starts an AI investigation of that supplier, the document icon opens the questionnaire dialog, and the box archives the vendor after a confirmation. All three appear for a Contributor and above.
Stage 2 — Add DataNest to the register
-
Open the create dialog. Aisha selects
Add Vendor. TheAdd New Vendordialog opens with three required fields and an optional company details section. -
Fill in the three required fields. She types "DataNest"
into
Vendor Name, setsCriticalitytoHighbecause the provider will hold sensitive data, and setsData ClassificationtoRestricted. Both dropdowns carry a line of help text underneath — "How critical is this vendor to your operations?" and "What level of data does this vendor have access to?" — and both default to the lowest tier until you change them. -
Add the company details you have. The optional
Company detailssection takes master data — registration number, category, address, country, phone, currency,Annual spend— plus anIn scope for supplier assessmentcheckbox. Anything left blank can be filled in later from the vendor's detail page. -
Save. She selects
Add Vendorin the dialog footer. The dialog closes, the table refreshes, and DataNest appears with a dash underRatingandNot scheduledunderNext Review.
The two tiering fields she set in step 2 are the ones the rest of the journey keys off:
| Field | Values | What it drives |
|---|---|---|
Criticality |
Low, Medium, High,
Critical
|
Triage order, the default review interval when you schedule one, and how heavily the risk score weights this supplier |
Data Classification |
None, Internal, Confidential,
Restricted
|
Which questionnaire is appropriate, and whether GDPR obligations such as a data processing agreement apply |
Status |
Active, Inactive |
Whether the vendor is counted in the portfolio metrics and considered by Smart Triage |
Aegis does not invent a score for a new supplier. Until an assessment exists
the register shows a dash, and Smart Triage ranks the vendor high precisely
because it has never been assessed. Next Review fills in once a
review is scheduled from the detail page; when that date passes, the cell
turns red and gains an (Overdue) marker.
Stage 3 — Send a security questionnaire
-
Open the questionnaire dialog. On DataNest's row, Aisha
selects the document icon under
Actions.Send Assessment Questionnaireopens, with "Sending to:" and the vendor's name at the top. -
Choose a template. Four are built in:
Basic Security Assessment,Comprehensive Security Review,GDPR Data ProcessingandSOC 2 Readiness. Each shows a one-line description; for aHigh-criticality provider she picks the comprehensive review. -
Add the recipient and a note. She types DataNest's contact
address into
Recipient Email— the address is format-checked, and a malformed one is rejected — and adds a line underCustom Message (Optional)explaining the deadline. -
Send it. She selects
Send Questionnaire. Aegis records a placeholder assessment against DataNest, queues the email to the address entered, and recalculates the vendor's risk score. "Questionnaire sent successfully!" appears and the dialog closes after a moment.
Sending is automated; receiving is not. When the supplier replies, nothing files itself against the vendor row — record what came back as evidence linked to the vendor (Stage 6), as a risk (Stage 5), or both. The separate Questionnaires module, where licensed and syncing from a connected source, tracks questionnaires in their own right; it is not populated by this row action.
Stage 4 — Run the AI investigation
-
Start it from the row. Aisha selects the lightbulb icon.
AI Vendor Investigationopens with the vendor's name as its subtitle and lists what it will analyse: risk factors from criticality and data classification, compliance gaps across GDPR, NIS2 and security standards, data processing agreement status, assessment history and trend, and recommendations. -
Select
Start Investigationand wait. The panel narrates six steps while it searches external sources for breach history, certifications and security incidents, then combines those with DataNest's internal record. It usually takes 30 to 90 seconds. -
Read it, then decide what to keep. Nothing is written to
the vendor on the AI's own authority. The finished report offers Copy,
Export to DOCX or PDF,
Save as recordagainst this vendor,Create action item, and a run-again option. Aisha saves the report to DataNest and raises an action item for the one thing that needs chasing.
Between the questionnaire and the investigation, a real gap surfaces: DataNest cannot show that it tests its backups. That finding is what becomes a tracked risk next.
Stage 5 — Turn the finding into a tracked risk
-
Create the risk. Aisha opens
Risks and selects
New risk (guided), the wizard that walks the whole record in one pass — from a methodology template through describing, scoring and treating the risk to a final review step. (The quickerAdd Riskdialog on the table records the same title, description, category, impact and likelihood, but skips the template, the appetite check and the treatment sign-off.) She describes the exposure — "DataNest cannot evidence backup testing" — and chooses a category. - Score it. She picks a likelihood level, then an impact level for each dimension her methodology defines; Aegis aggregates those into one overall impact. The score step then shows the inherent score and its band, marks that cell on the methodology matrix, and says whether the risk sits within or above the appetite set for its category. How the score is derived depends on the methodology — either likelihood multiplied by impact, or a value read from the matrix.
- Treat it, then set the review date. The treatment step records how she plans to handle the exposure, and asks for a sign-off tick where the score band demands one. The final step takes a next-review date. There is no owner field in the wizard: the risk is owned by whoever creates it, and reassigning it happens afterwards on the risk's own page. The supplier weakness is now a managed item with an owner and a date against it.
A vendor's detail page has a Linked Risks panel, and it reads
the vendor field on the risk record. No form in the Risks module writes that
field today, so a risk you raise in the interface will not appear there —
the panel keeps reading "No risks are attributed to this vendor yet." What
the risk screens do offer is the governance-links panel on a risk's detail
view, which can link that risk to a vendor, a control or an evidence item —
a separate link, held separately, and not the one the vendor panel reads.
Until the two meet, keep the connection legible in the risk's own
description and in the evidence you link in Stage 6.
Stage 6 — Link the evidence for the audit trail
-
Open the vendor's detail page. Aisha selects DataNest's
name. The page opens with a breadcrumb back to the register, the vendor's
name and status badge, then the current rating panel and, in the side
column, details, statistics and dates. Assessments, evidence and
Linked Risksfollow below. -
Link the proof. In the evidence panel she selects
+ Link Evidence, searches the Evidence library for the questionnaire result and DataNest's security certificate, and attaches both. Only evidence not already tied to a vendor appears in that search.Bulk Importbeside it takes several records at once. Removing a link again needs Manager rights or above, so the unlink icon is not shown to Aisha. -
Set the review cadence. From the header she selects
Schedule review. TheSchedule vendor reviewdialog asks for aReview interval (days); leaving it empty derives the interval from the vendor's criticality. Confirming fillsNext Reviewon the register.Download reportbeside it streams a PDF due-diligence report — profile, risk, data flows, security standards, agreements and linked evidence in one document.
With that, most of the chain is on the page for an auditor to follow: the vendor, its assessments, the evidence behind the due diligence you carried out, and the audit-log entries for each step. The risk is the one hop you still have to point to by hand, for the reason given above.
The AI assist
AI appears at three points in this journey and decides nothing at any of them.
Smart Triage (AI) narrates a ranking Aegis computed itself, over
your active vendors only. The investigation searches public sources and reads
the internal record, then hands you a report you choose to keep, export or
discard. Where AI drafts questionnaire answers, it attaches a confidence score
and waits for a person to accept or reject each one. Every run is metered
against your tenant's AI credits.
Tips and limits
-
Ratingis a single current figure, not an average. Recording an assessment sets it to that assessment's score; sending a questionnaire instead recalculates it from the vendor's own attributes. Older assessments stay in the history on the detail page, so read the trend there rather than the one number. - The investigation favours well-known providers. For a small or private supplier it may return little of substance. In that case, record your own due-diligence checks as evidence and link them to the vendor.
-
SOC 2 Readinessis a questionnaire template, not a framework. You can send it, file the answers, and store a supplier's certificate as evidence. A built-in SOC 2 compliance framework is on the roadmap, not shipped. - DORA keeps its own registry. If your tenant has DORA enabled, its third-party-provider registry is separate from this general vendor register. Organisations subject to DORA often maintain both.
-
Overdue reviews are shown, not necessarily pushed. An
overdue
Next Reviewappears in red with an(Overdue)marker; whether anyone is also notified depends on how notifications are configured for your tenant. - Import creates, it does not merge. Re-importing a list you have already loaded produces duplicate vendors rather than updating the originals.
-
Archiving is reversible; deleting is not. The box icon sets
the vendor to
Inactive, and it stays readable under theAll Statusesfilter. BulkChange Statusbrings it back. BulkDeleteremoves it, and needs Manager rights or above.
Where this connects
Each module here has its own chapter: Vendors, Questionnaires, Risks and Evidence. Action items raised from an AI report are tracked in Action items, and every create, archive and send is written to the Audit log. For who may do what, see What each role can do; for the audit that draws on the evidence linked in Stage 6, see Scenario: preparing for an external audit.