Risks
The risk register is where your organisation records what could go wrong, scores it, decides what to do about it, and keeps a history an auditor can follow.
A risk is something that could harm your
operations, assets or compliance position before it turns into an incident. You
give each one an owner, a review date and a treatment decision, and drive it to
a settled state; changes are written to the audit log. The register sits in the
Risks group of the left menu, at /risks, and each
risk has its own page at /risks/{id}.
Who uses it
Everyone signed in can read the register. A
Viewer sees the list, the charts
and the detail pages, but the create, import, treatment and status controls are
hidden rather than shown and refused; the read-only AI actions —
Smart Triage (AI) and the acceptance Review (AI) —
stay available. A
Contributor adds risks,
imports a spreadsheet, records treatment and residual figures, changes status
and runs the AI assists that write to a risk. A
Manager also deletes risks, singly
or in bulk, and maintains what the register depends on: the methodologies (which
carry the severity bands), the risk templates, the appetite and the groupings.
An Admin has all of that plus the
wider organisation settings. Risk categories are not edited from a screen here.
How risks are scored
Aegis stores the inherent score —
impact × likelihood, before treatment — and works out the band
name at display time, so changing the bands relabels risks you already hold.
Both scales run 1–5, impact Minimal to Critical and
likelihood Rare to Almost Certain, giving 1 to 25.
Beside it sits the residual score: what
remains after treatment. The bands come from your default risk methodology; the
legend on the detail page in the capture reads:
| Score | Band |
|---|---|
| 20–25 | Very high |
| 15–19 | Critical |
| 10–14 | High |
| 5–9 | Medium |
| 1–4 | Low |
A badge reads Unknown when the row has no score to place in a
band — the inherent score was never worked out for that risk. Open the risk
and check its impact and likelihood; rows loaded before scoring was recorded
are the usual cause.
What's on this screen
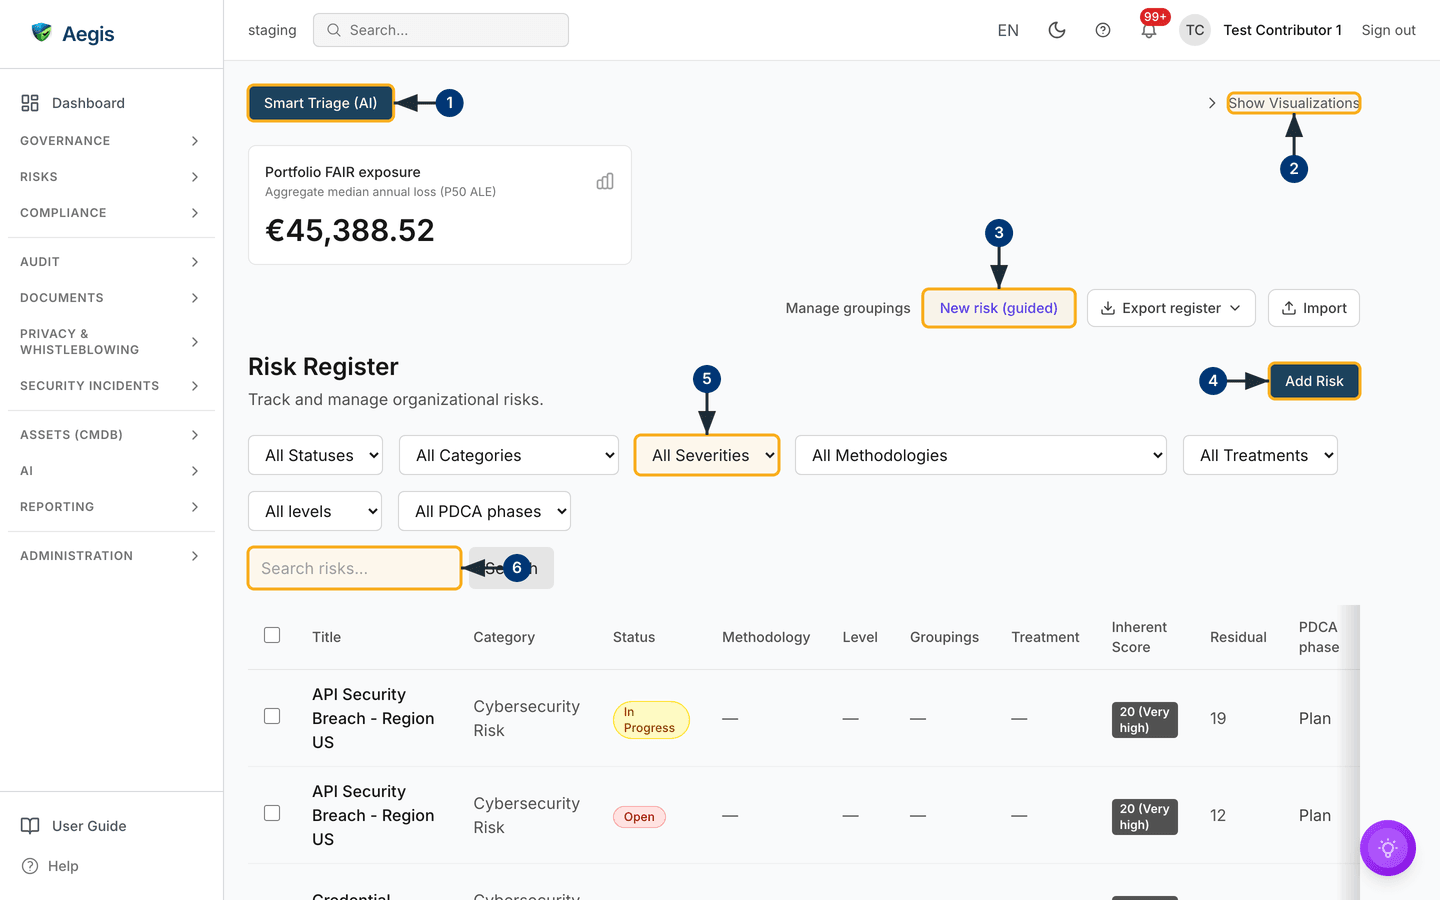
A toolbar sits above everything: Smart Triage (AI) on the left, a
Show Visualizations toggle on the right. The charts are collapsed
in the capture, so the table appears sooner; opening them reveals a five-by-five
heatmap and a risks-by-category chart. Below sits the
Portfolio FAIR exposure card with an aggregate median annual
loss figure (P50 ALE) — €45,388.52 here — then a right-aligned row
of register-wide actions (Manage groupings,
New risk (guided), Export register,
Import) and the page header Risk Register, with
Add Risk at the far right.
The filter bar runs over two rows — All Statuses,
All Categories, All Severities,
All Methodologies, All Treatments, then
All levels and All PDCA phases — above a
Search risks… box with its own Search button. The
table has a select-all checkbox and, reading across: Title,
Category, Status (a coloured chip —
Accepted and In Progress in the capture),
Methodology, Level, Groupings,
Treatment, Inherent Score (the number with its band,
such as 20 (Very high)), Residual and
PDCA phase. An unset value shows an em dash — in the capture that
is every visible row from Methodology to Treatment.
The table scrolls sideways, faded edges marking more to come: action progress,
links, owner, next review and the row actions sit beyond the right edge. Ticking
row checkboxes raises a bulk bar with Delete,
Change Status and Export.
Finding and opening a risk
-
Select
Smart Triage (AI)to open the triage panel. It ranks your open and in-progress risks and explains the order; nothing on a risk changes. -
Select
Show Visualizationsto expand the heatmap and the category chart. The label becomesHide Visualizations, and selecting a populated heatmap cell opens a small list of the risks in that cell, each a link to its page. -
Select
New risk (guided)for the seven-step wizard covered next; the register refreshes once the risk is created. -
Select
Add Riskfor the shorter form instead — title, description, category, governance level, grouping, impact, likelihood, treatment and a review date, with a score preview that updates as you set the scales. -
Choose a band under
All Severitiesto narrow the table. The choice is written into the page address, so a filtered view can be shared by copying the URL; the other dropdowns work the same way. -
Type into Search risks… and select
Searchto match on the title or the description. Select a title in the table, or the eye icon at the end of the row, to open that risk at/risks/{id}.
Creating a risk with the guided wizard
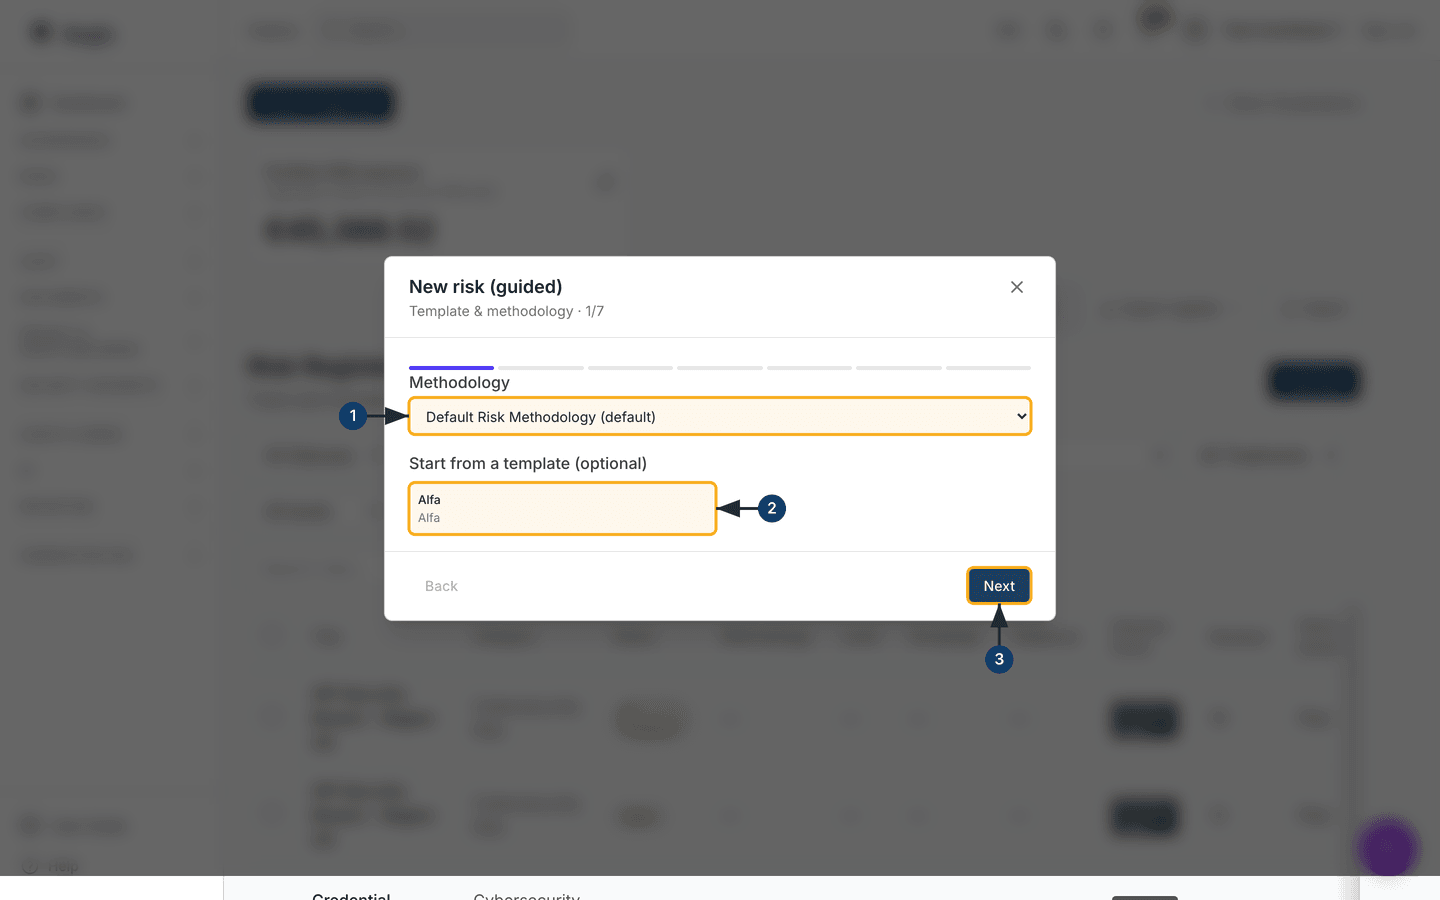
New risk (guided) opens a seven-step dialog. Its subtitle names the
current step and position — Template & methodology · 1/7 in the
capture — above a seven-segment progress bar; the footer holds
Back and Next.
-
Choose a
Methodology. The list holds those configured for your organisation, one marked(default)—Default Risk Methodology (default)here. It sets the impact dimensions you score later and the treatments permitted per band. -
Optionally select a card under
Start from a template (optional) to pre-fill the risk; the
capture offers one,
Alfa. With no templates, the step says so and you build the risk from scratch. -
Select
Nextto move on to Describe.Backis inactive on this first step, and from hereNextstays inactive until the step's required fields are filled.
The remaining six steps
-
Describe asks for the
Risk title, which is required, and aDescription. -
Characterise takes the
Category— also required — and, if the methodology defines any, the threat actors or sources behind the risk. - Assess takes the likelihood and the impact for each dimension the methodology defines, aggregating those into one overall impact as you go.
- Score states the inherent score and its band against your configured risk appetite — “Within appetite”, or “Above appetite … treatment expected” — and the methodology matrix below highlights the cell you have landed in.
-
Treatment takes one choice or
Decide later. A chosen treatment needs aRationale; one the methodology forbids for that band is refused with an explanation, and one that needs authorisation shows a sign-off tick box. -
Review & own takes the
Next review dateand notes that you own the risk unless it is reassigned later. SelectCreate riskand it appears in the table.
Importing and exporting the register
-
Select
Import, thenDownload templateto getrisk-import-template.xlsx. Fill it in outside Aegis. -
Attach the completed file —
.xlsxor.csv— and selectValidate. Aegis reports how many rows are valid and lists each problem by row number, without writing anything. -
Select
Import n valid row(s)to create them; only rows with no errors are created. The dialog reports how many risks were created and the register refreshes behind it. -
For the other direction, select
Export registerand chooseExport as ExcelorExport as CSV; the export honours the filters currently applied. For a hand-picked set, tick the rows and useExporton the bulk bar, which downloads a CSV of only those risks.
Working on a risk: the detail page
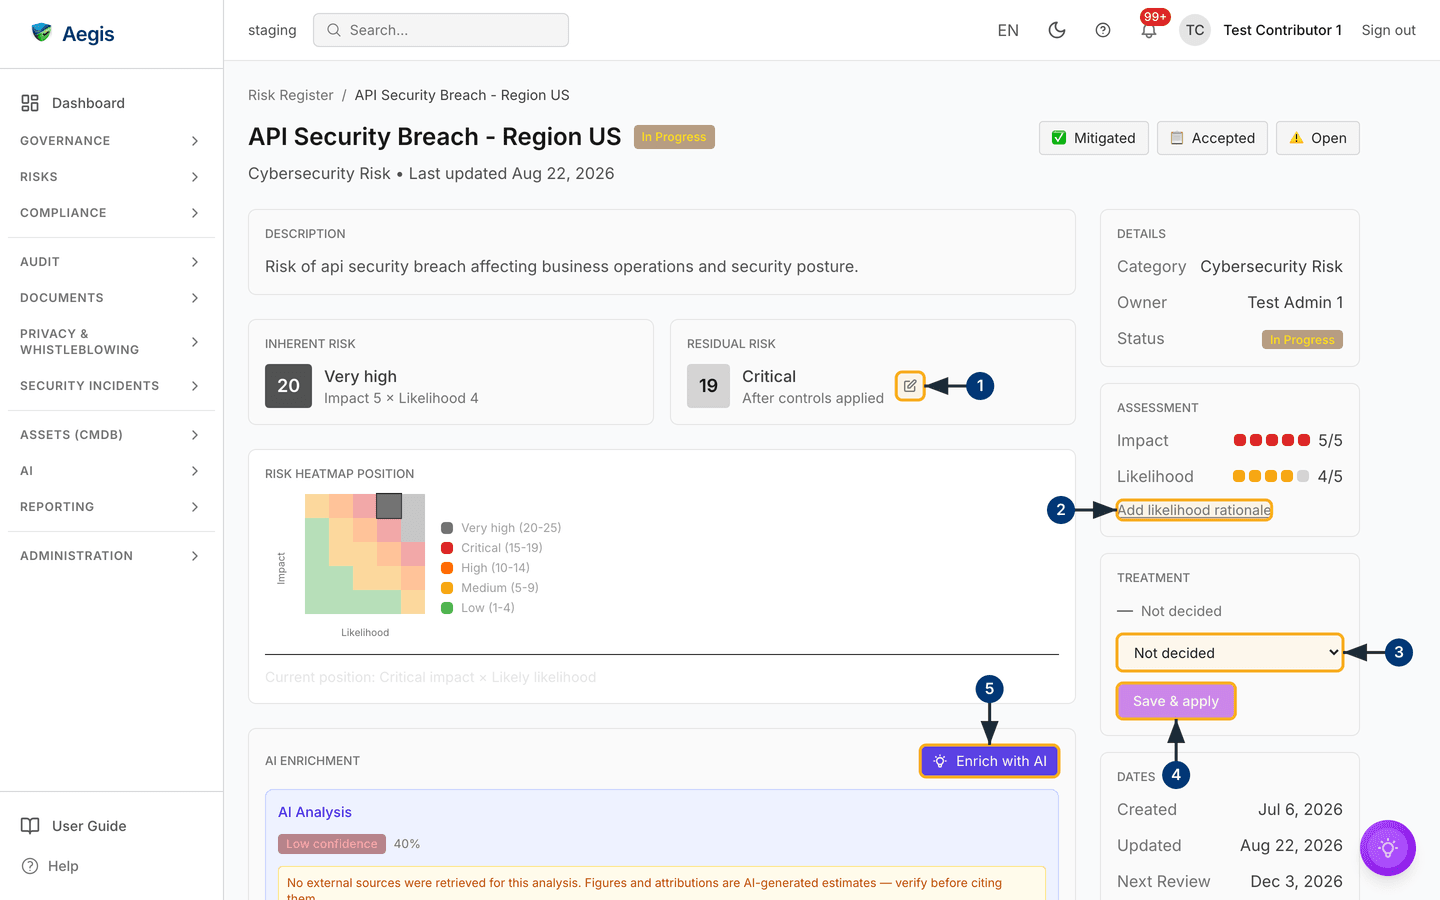
All treatment work happens on the risk's own page; there is no edit dialog. A
breadcrumb leads back to Risk Register, and the title line
carries the status chip, with the valid next statuses as buttons on the right —
Open and In Progress for the accepted risk in the
capture. The left column runs Description, then
Inherent Risk and Residual Risk side by side
(each a score and band, with the Impact 4 × Likelihood 5 arithmetic
under the inherent one), Risk heatmap position with its band
legend, AI Enrichment, the
AI treatment plan button, and below those the CVE links, the linked
items and the mitigating actions. The right column stacks
Details, Assessment (impact and likelihood as
dot scales), Treatment, Acceptance and
Dates.
-
In Residual Risk, select the pencil to pin a figure by
hand. A number field opens, hinted
1 tothe inherent score; type the figure and selectSave. The card and the register'sResidualcolumn update. Aegis otherwise derives residual from the reductions on implemented mitigating actions, so pin a figure only where your judgement differs from what those actions model. -
Select
Add likelihood rationaleunder Assessment to say why this likelihood was chosen. A text box opens; once saved, the link becomes an edit control. The dot scales themselves are read-only here. -
In Treatment, open the dropdown and choose
Accept,Mitigate,Transfer,InsureorAvoid— a risk with no decision readsNot decided, as in the capture. A Justification box appears and must be filled in. -
Select
Save & apply. The badge above the dropdown changes to the chosen treatment and the justification is stored with it. Nothing is saved until you select it. -
Select
Enrich with AIfor an analysis. It arrives with a confidence badge —Very Low confidencein the capture — and, where no external sources were retrieved, a note that the figures are AI-generated estimates to check before citing them. -
In Acceptance — a card that appears only once a risk has
been accepted — select
Review (AI)to have Aegis comment on the recorded justification and review date; the pencil beside it edits both by hand. Where the acceptance predates this record-keeping, the card says no details were recorded and asks for a formal re-accept, as in the capture.
Treatment and residual are separate records: the dropdown says
how you will handle the risk, residual
what exposure remains. With no implemented mitigating
actions and nothing pinned by hand, residual equals the inherent score — so
a Residual matching the inherent number means the treatment
work has not been captured yet.
Status, acceptance and exceptions
A risk moves through four statuses: Open (no treatment under way),
InProgress (treatment started), Mitigated (treatment
complete, residual exposure acceptable) and Accepted (your
organisation has decided to live with it). The buttons offer only the valid
moves — from Open you can reach In Progress or
Accepted, but not Mitigated directly; from
Accepted, as in the capture, you can reopen or restart treatment.
Accepting is a formal act: Aegis asks for a justification and, optionally, a
date by which the acceptance must be re-reviewed, then lists the risk on the
exceptions register with who accepted it
and when, and flags that review when it falls due.
The AI assists
Four AI features touch this module, all advisory. Smart Triage ranks the top ten of your open and in-progress risks by severity, overdue review and residual exposure, then narrates that order: Aegis computes the ranking and the model may not reorder it. Enrich with AI returns threat context, related CVEs, suggested mitigations and control recommendations. AI treatment plan proposes new mitigating actions, each with an estimated likelihood or impact reduction; creating one is a separate step you take. Review (AI) comments on an acceptance justification and its review date. None of these change a risk's status, score or treatment on their own, and the two briefings leave a trace only if you save them as a record — a person reviews the output and decides.
Tips and limits
- Impact and likelihood are set when the risk is created. The detail page shows them but has no control to change them, so plan the assessment at creation time.
- The visualisations cover the whole filtered register up to a cap of 5,000 risks, highest score first. Past that, a notice above the charts says how many are shown out of the total, so a sample is never presented as the whole picture. Filter to focus them.
-
Levelis the governance altitude —Strategic,TacticalorOperational;Groupingsholds values such as business unit or department.Manage groupingsleads to the types behind that column; the values must exist before you can assign them. - Deleting a risk (Managers and above) asks for confirmation. It is a soft delete: the risk leaves the register, the row is kept for the audit trail, and the policies, evidence and controls it was linked to are untouched.
Where this connects
Risks are treated using Policies and proven with Evidence, linked through controls in Compliance frameworks. The sources behind a risk live in Threat actors, accepted risks in the Exceptions register, follow-up work in Action items, and supply-chain risk in Vendors. When a risk materialises, record it in Incidents — the incident response scenario follows one from register to report.