GDPR
One workspace for your data-protection records: subject requests, processing activities, impact assessments, processor agreements, transfers, retention and consent.
GDPR (the European Union's data-protection law) places record-keeping duties on
any organisation that handles personal data. This module gathers that work under
one
GDPR entry in the sidebar. It does not replace your legal team's
judgement; it gives you the records and the audit trail to show a
supervisory authority (your data-protection
regulator) that you are accountable.
This chapter is the module reference. For the most common journey worked end to end — a person asking for their data, from inbox to closure — see the full walkthrough in Scenario: handling a data-subject request; HR staff who receive such requests first should start with the HR scenario.
The module is provisioned per tenant. When it is not enabled the entry is hidden and the registers cannot load. Ask your account manager to switch it on.
Who uses it
A Viewer and a
Contributor can open every
register. Creating and editing records needs
Manager or
Admin. Those buttons are absent
rather than disabled for lower roles, which is why the register captures here
show no Add
button: they were taken as a Contributor. A Contributor may still acknowledge or
refuse an existing subject request; deciding a DPIA needs the approval right
only Manager and Admin hold.
What's on this screen
The landing page at /gdpr is headed GDPR Compliance.
The Deadline Alerts panel fills the first screen: five pills —
All, DSR, DPA, Consent,
Transfer — above rows that each name a record and the party it
concerns, with the due date underneath and a coloured days marker on the right.
Scrolling on brings four metric cards — Processing Activities,
Data Subject Requests, Data Processing Agreements,
Consent Records — then the Quick Actions tiles (Handle DSR, Start DPIA, Add Activity, Transfers),
Recent Subject Requests and a Compliance Checklist.
The module has one sidebar entry, so those cards and tiles are how you reach its
registers.
-
In the sidebar, open
PRIVACY & WHISTLEBLOWINGand chooseGDPR. The landing page opens and the alerts panel loads. -
Select a pill in
Deadline Alerts.Allis active on arrival; another narrows the feed to that one kind of record. - Read down the list. For a subject request, the line gives the right being exercised and the person's email address.
-
Treat red markers first — that date has passed. This workspace opens with an
access request marked
380 days overdue. -
The
?in the top bar opens this guide inside Aegis. Scroll on and select a card or tile to open the register behind it.
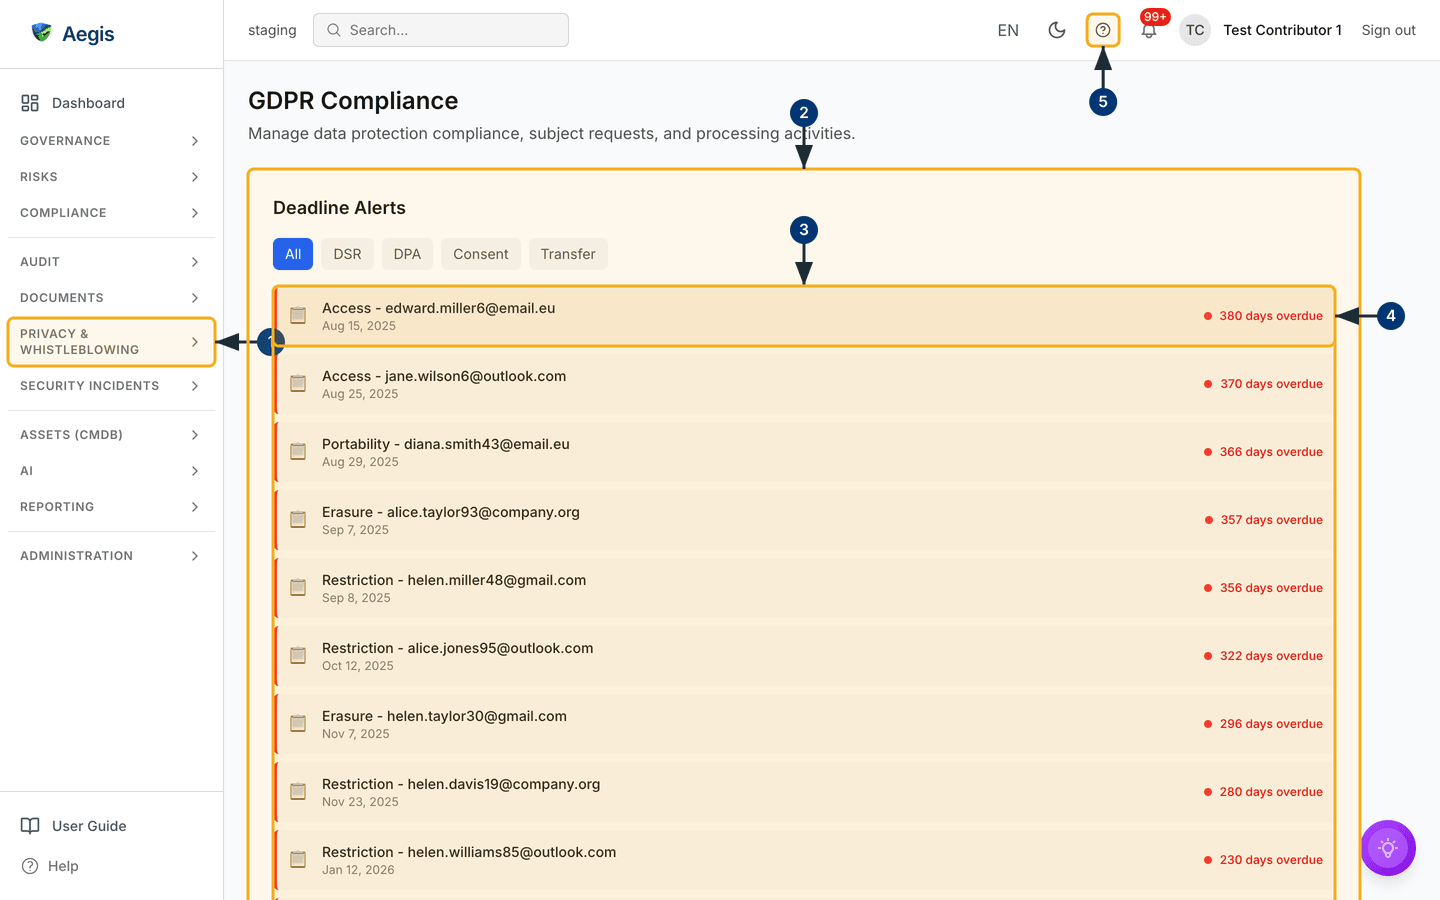
The rows are read-only. Open the register yourself and act there.
Handling a data subject request
A data subject request (DSR) is a person
asking to see, correct or delete the data you hold about them — or to restrict
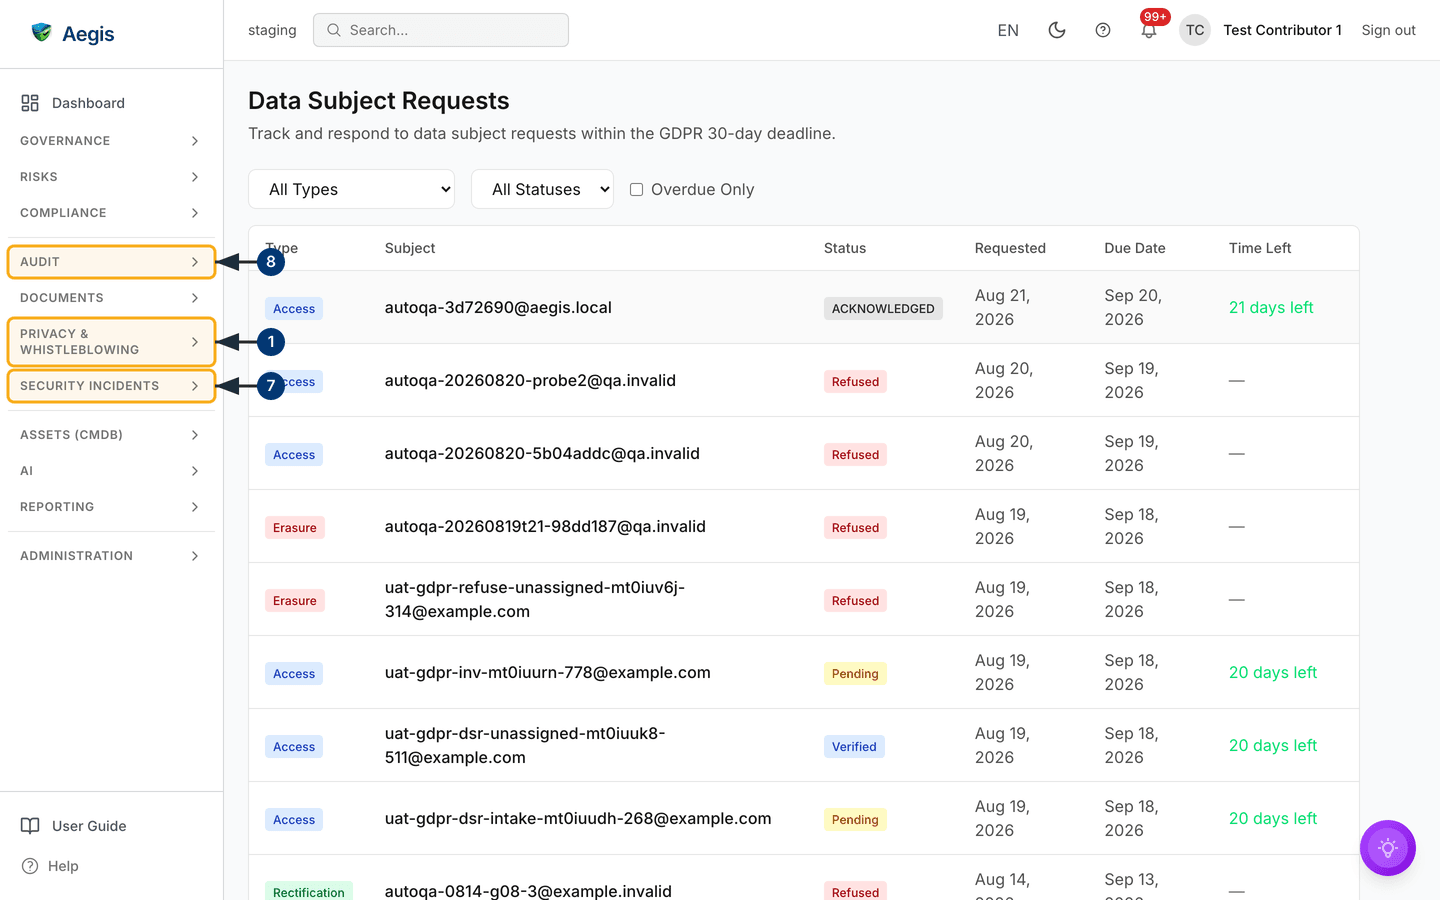
it, object, or receive a portable copy. The queue at
/gdpr/dsr carries All Types and
All Statuses dropdowns and an Overdue Only tickbox
above a table of Type, Subject, Status,
Requested, Due Date and colour-coded
Time Left.
-
Open the queue from the
Data Subject Requestscard or theHandle DSRtile. The sidebar entry underPRIVACY & WHISTLEBLOWINGreturns you to the landing page. - Narrow the queue with the dropdowns or the tickbox. The filters combine.
-
Read
Time Leftto decide what comes first. The capture shows an acknowledged access request with21 days leftbeside refused rows showing a dash. -
Select a row. The request opens on its own page with a details grid and a
Fulfillmentstepper:Pending→Acknowledged→Verified→In Progress→CompletedorRefused. -
Select
Acknowledge Request(shown only whilePending). Aegis records the acknowledgement and its operator before attempting the notification. The delivery panel remains available after reload: send a pending notification only if no attempt has started. An uncertain or stalled attempt is never resent. Check the original outcome or contact the person through another channel, then record your confirmation and a note. Human confirmation is labelled separately from the mail service’s acceptance. -
To turn a request down, select
Refuse, type theRefusal Reasonand selectConfirm Refusal. Acknowledge and refuse are the only two transitions the page offers today (seeThe AI assistbelow), so send your answer through your normal channel and file it underCOMPLIANCE→Evidence. -
If the request uncovers a personal-data breach, log it under
SECURITY INCIDENTS. The 72-hour notification clock is handled there. -
Open
AUDIT→Audit Logto see who moved a request, when, and to what.
| Status | What it means |
|---|---|
Pending |
Logged; no acknowledgement sent |
Acknowledged |
Receipt recorded; check the separate notification delivery status |
Verified |
Identity confirmed by the recorded method |
In Progress |
Being worked on |
Completed |
A response is recorded; final |
Refused |
Turned down with a recorded reason; final |
Expired |
Set automatically once the deadline passes an open request |
Logging a new request
With Manager or Admin rights the queue shows New Request, which
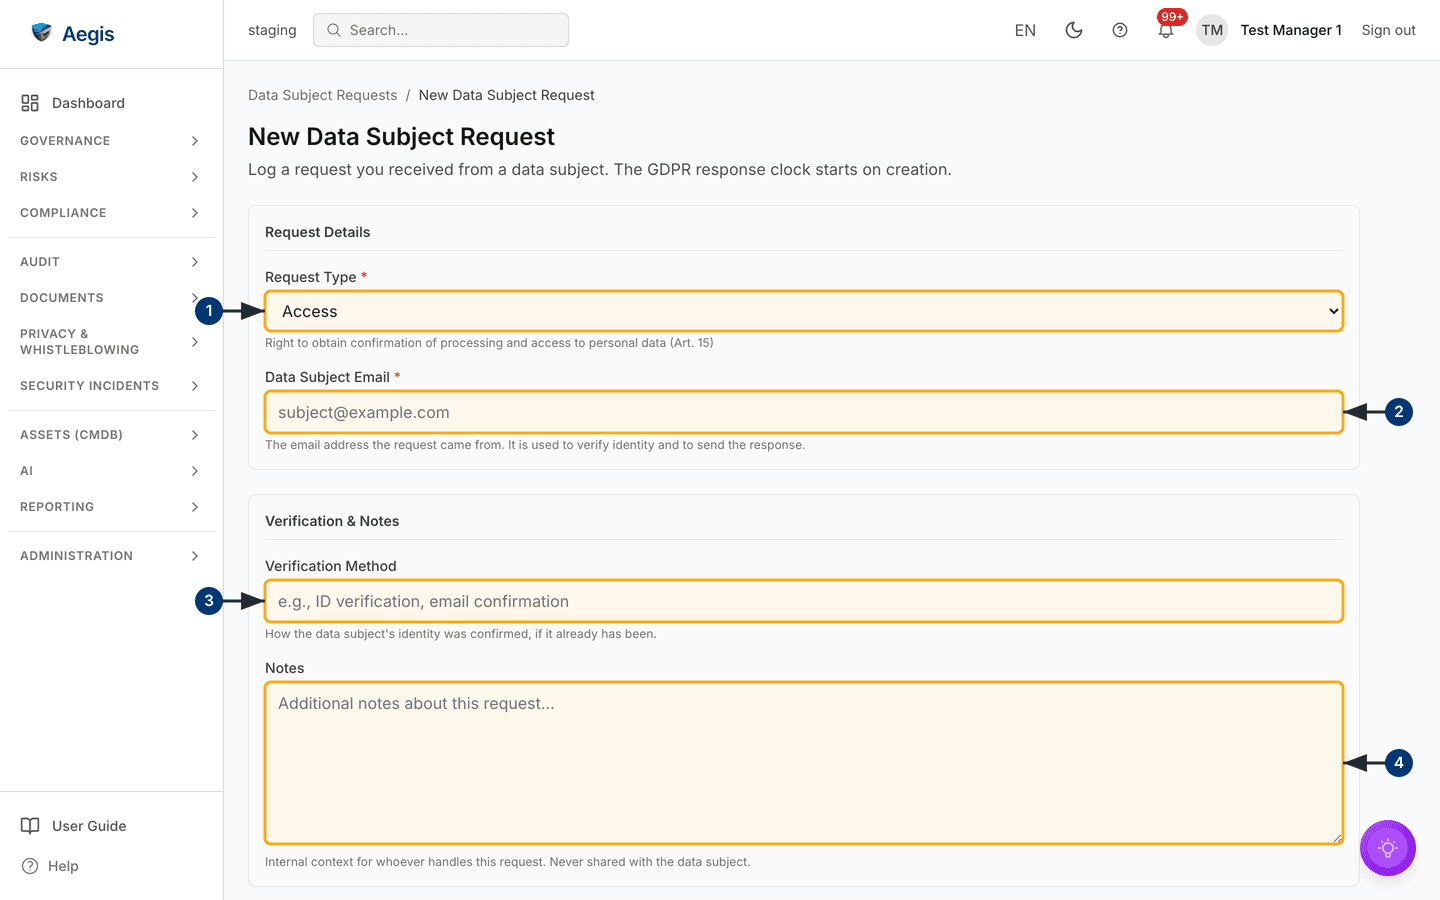
opens the full-page form at /gdpr/dsr/new, headed
New Data Subject Request. Its subtitle says it plainly: the GDPR
response clock starts on creation.
-
Choose the
Request Type.Accessis preselected, and the line under the box explains the right each type exercises — here Article 15. -
Type the
Data Subject Email. It is the address the request came from, used to verify identity and to send the response. -
Record the
Verification Method— how the person's identity was confirmed, if it already has been. -
Add
Notesfor whoever handles the request. They are internal, never shared with the data subject. -
Select
Create Requestat the foot of the form. The request saves asPendingwith a due date 30 days out, and its detail page opens.
Aegis sets the due date 30 days from the moment the record is created, not from the date the request arrived. If it reached you earlier, note the real received date so your team manages the true legal deadline. The acknowledgement is the only message Aegis sends.
Building the record of processing activities
A record of processing activities (ROPA) is
the map, required by Article 30, of every activity in which you process personal
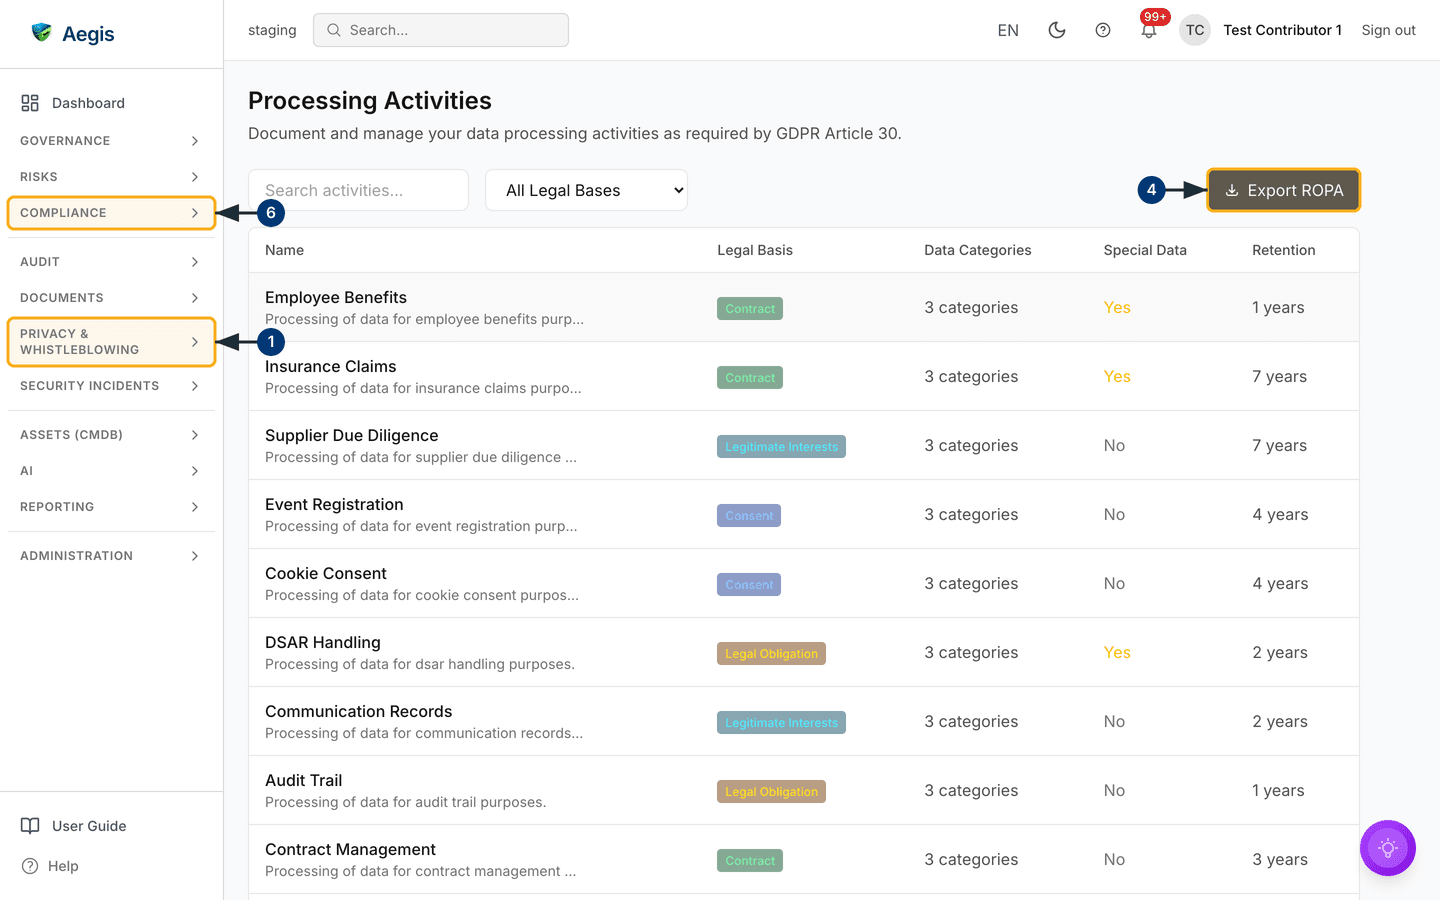
data. The page at /gdpr/processing has a
Search activities… box and an All Legal Bases dropdown
on the left, Export ROPA on the right, and a table of
Name, a coloured Legal Basis badge,
Data Categories, a Special Data flag and
Retention.
-
Open the register from the
Processing Activitiescard.PRIVACY & WHISTLEBLOWING→GDPRin the sidebar takes you back to the landing page. -
Search by name, or pick a legal basis. The seeded rows include
Employee BenefitsonContract,Cookie ConsentonConsentandDSAR HandlingonLegal Obligation. -
Select a row to open the activity: purposes, data categories, recipients,
retention and safeguards, plus a
Related Datablock counting attached consents and transfers. AYesunderSpecial Datameans Article 9 special-category data. -
Select
Export ROPA. A dialog offersJSON,CSVorPDF; choose a format and it downloads. -
With Manager or Admin rights,
Add Activitysits beside the export button and opens the form for name, legal basis, purposes, categories, recipients, retention and safeguards. -
File the export under
COMPLIANCE→Evidenceso an auditor can find the version you relied on.
Assessing high-risk processing
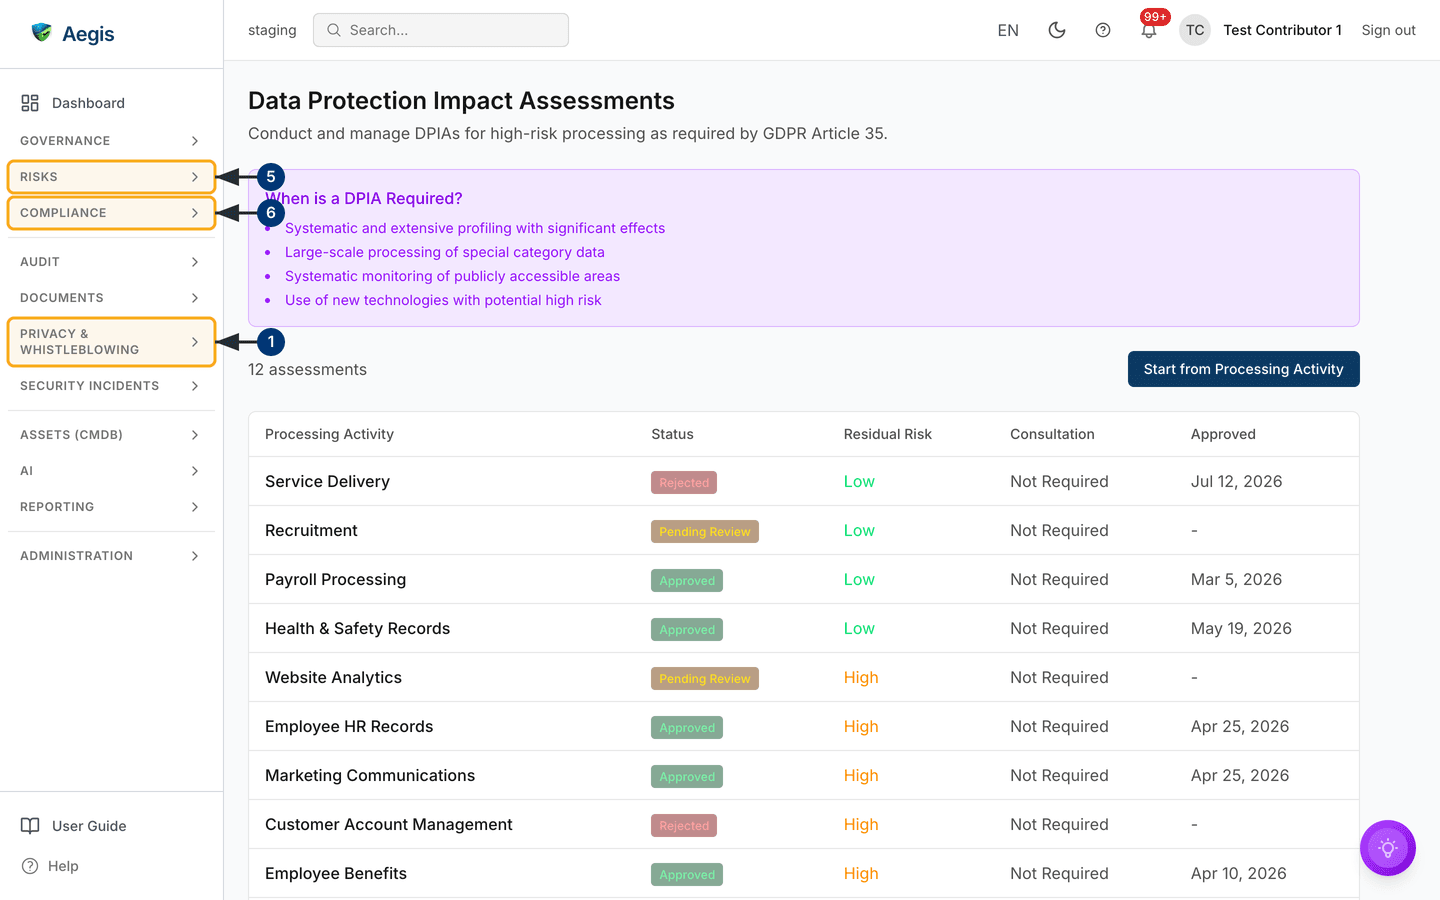
A data protection impact assessment (DPIA) is
the analysis Article 35 requires before high-risk processing. The page at
/gdpr/dpia opens with a When is a DPIA Required? panel
listing four triggers, then a count — 12 assessments in the capture
— with Start from Processing Activity beside it, then the table:
Processing Activity, Status,
Residual Risk, Consultation, Approved.
-
Open
PRIVACY & WHISTLEBLOWING→GDPR, then take theStart DPIAtile. - Read the trigger panel first. If none of the four applies, record why instead.
-
Open an assessment: necessity, proportionality, risks and mitigations, and a
residual risk of
Low,Medium,HighorCritical. Where Article 36 prior consultation applies,ConsultationreadsRequired. -
Decide it. With Manager or Admin rights the detail page carries
Approve DPIAandReject DPIA; a rejection asks for a reason. A decided assessment cannot be decided again. -
A high residual risk you accept rather than mitigate belongs in
RISKSas well. Aegis does not raise the risk for you. -
Keep the signed write-up under
COMPLIANCE→Evidence.
Creating an assessment
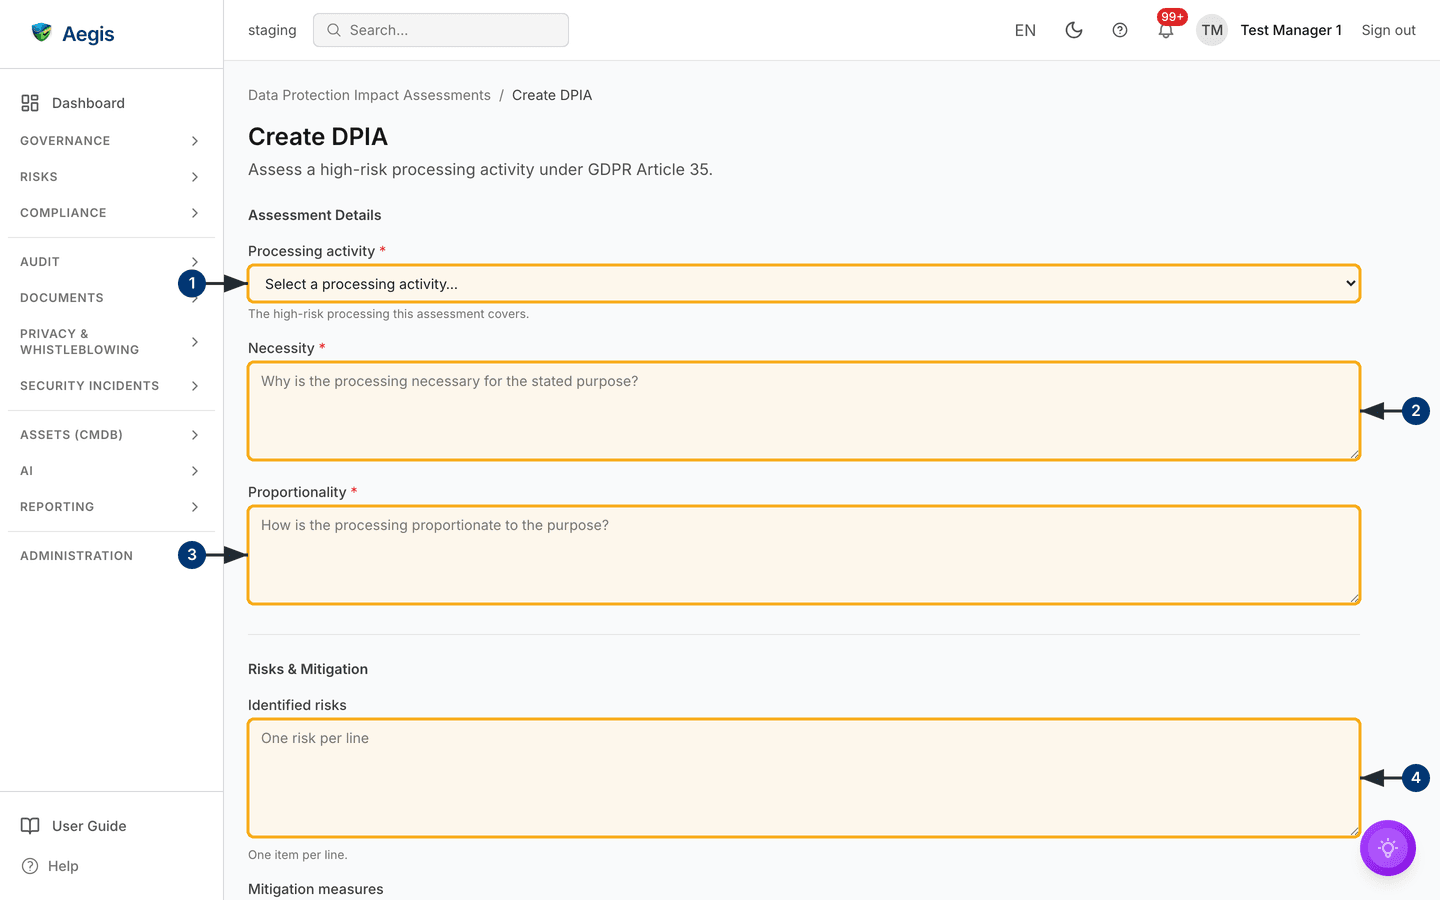
Start from Processing Activity — or, for Managers and Admins,
Create DPIA — leads to the full page at
/gdpr/dpia/new, because every assessment is anchored to one
activity. Build the ROPA first.
-
Select the
Processing activitythe assessment covers. The dropdown lists your recorded activities. -
Necessity: why the processing is necessary for the stated purpose. Proportionality: how it is proportionate to that purpose.-
Under
Risks & Mitigation, list theIdentified risksto data subjects — one per line. -
Add the
Mitigation measuresbelow, one per line, then save. The assessment opens on its detail page asPending Review, ready for a decision.
Recording processor agreements
A data processing agreement (DPA) is the
contract Article 28 requires with every supplier that processes personal data
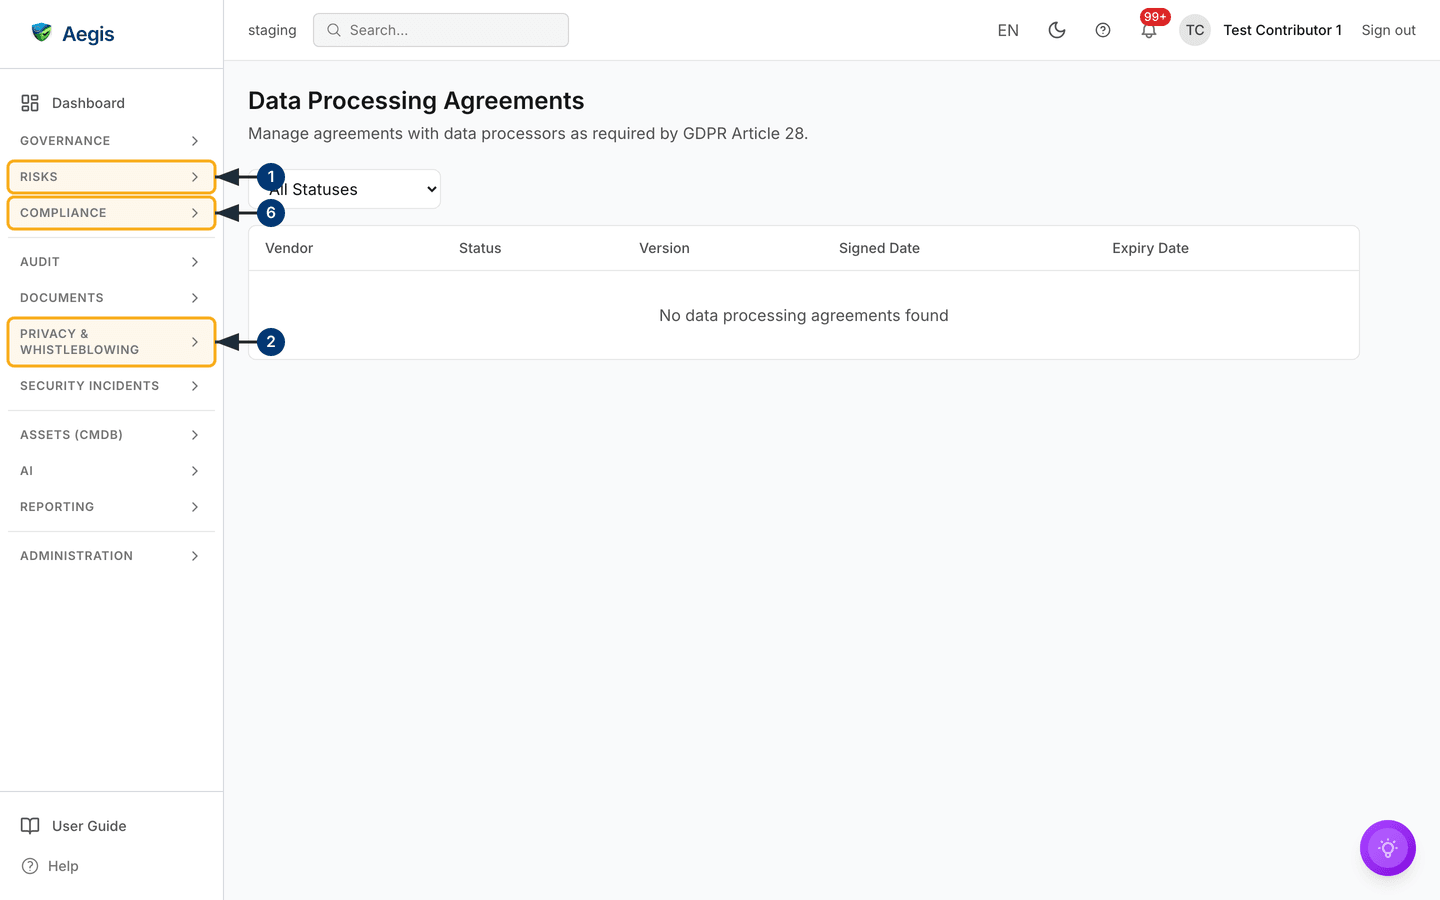
for you. The page at /gdpr/dpa has a single
All Statuses dropdown above Vendor,
Status, Version, Signed Date and
Expiry Date. The capture shows the empty starting state:
No data processing agreements found.
-
Create the supplier first. Vendors live under
RISKS→Vendors, and an agreement must point at a vendor record that already exists. -
Return to the landing page and select the
Data Processing Agreementscard. The register opens on the empty table shown here. -
With Manager or Admin rights,
Add Agreementappears beside the filter: vendor, status, DPA and SCC version, signed and expiry dates, the breach-notification window in hours, and whether encryption, audit rights and location restrictions are agreed. -
Use
All Statusesto work one slice —Draft,Pending Signature,Signed,Active,ExpiredorTerminated. - On renewal, open the row and update the dates. The expiry date feeds the deadline alerts on the landing page.
-
Keep the signed contract itself under
COMPLIANCE→Evidence. This register holds facts about the document, not the document.
Transfers out of the EEA
Transfers record when personal data leaves the European Economic Area and the
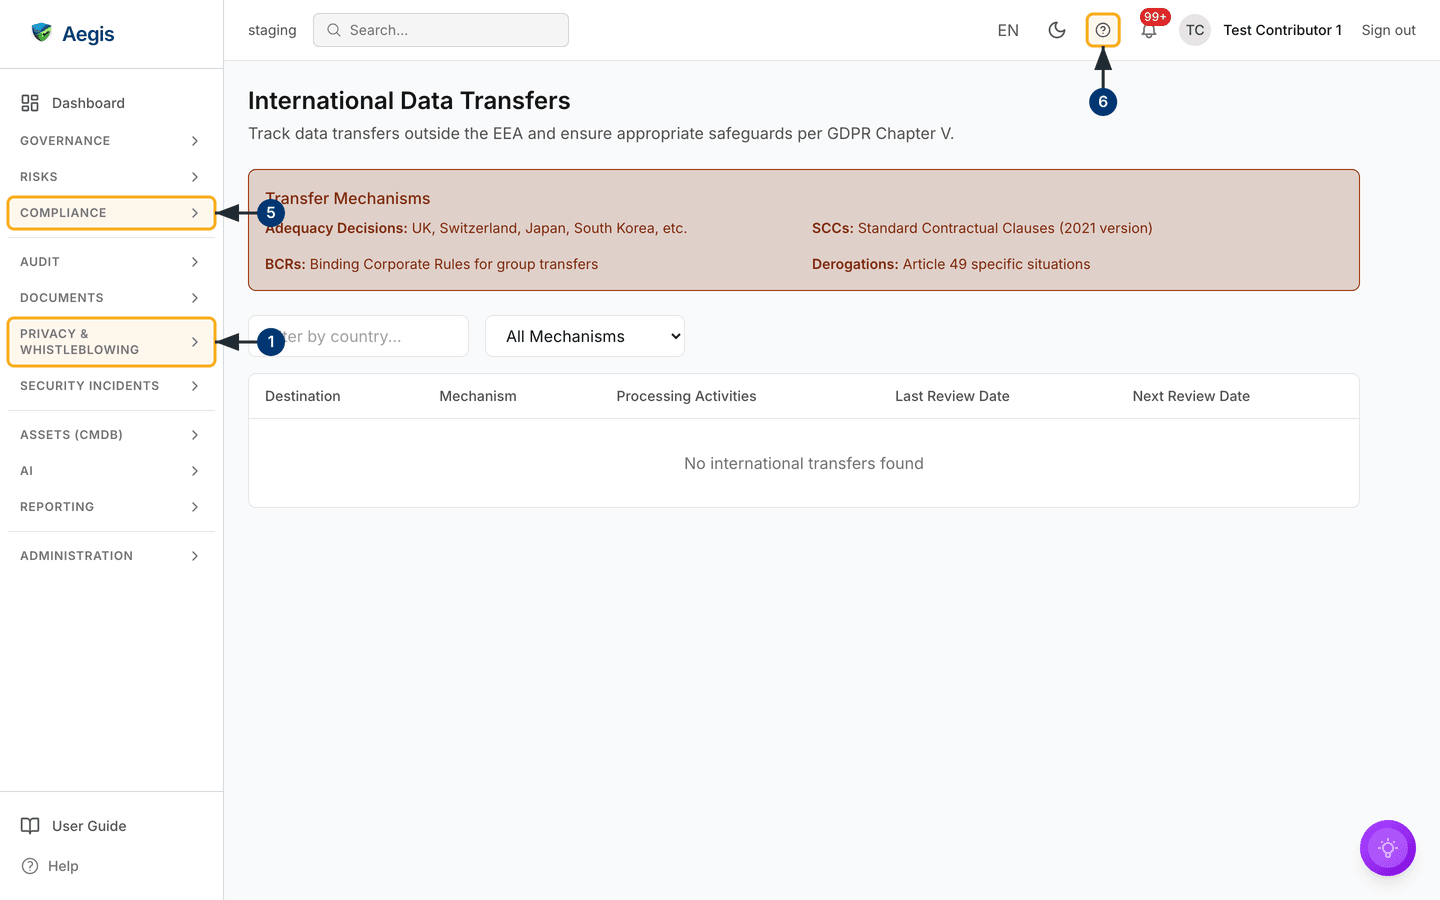
safeguard that authorises it. The page at /gdpr/transfers opens
with a Transfer Mechanisms reference panel — adequacy decisions,
standard contractual clauses (2021 version), binding corporate rules and Article
49 derogations — then a Filter by country… box and an
All Mechanisms dropdown above Destination,
Mechanism, Processing Activities,
Last Review Date and Next Review Date. The capture
shows it empty: No international transfers found.
-
Open the register with the
Transferstile, which sits underPRIVACY & WHISTLEBLOWING→GDPRin the sidebar. - Read the mechanisms panel first: the one you pick sets what the record must prove.
-
Open a saved transfer and scroll to
Transfer Impact Assessment (TIA). The section appears only where your licence includes the GDPR automation feature.Run TIAqueues an AI-assisted adequacy and Schrems II analysis, which returns an overall risk, a confidence figure and recommendations. -
Keep
Next Review Datecurrent — it is what raises a transfer in the alerts. -
Use
Copy,Export PDForExport DOCXon the TIA, and file the result underCOMPLIANCE→Evidence. -
Unsure which mechanism applies? The
?in the top bar opens this chapter inside Aegis.
Recording a transfer
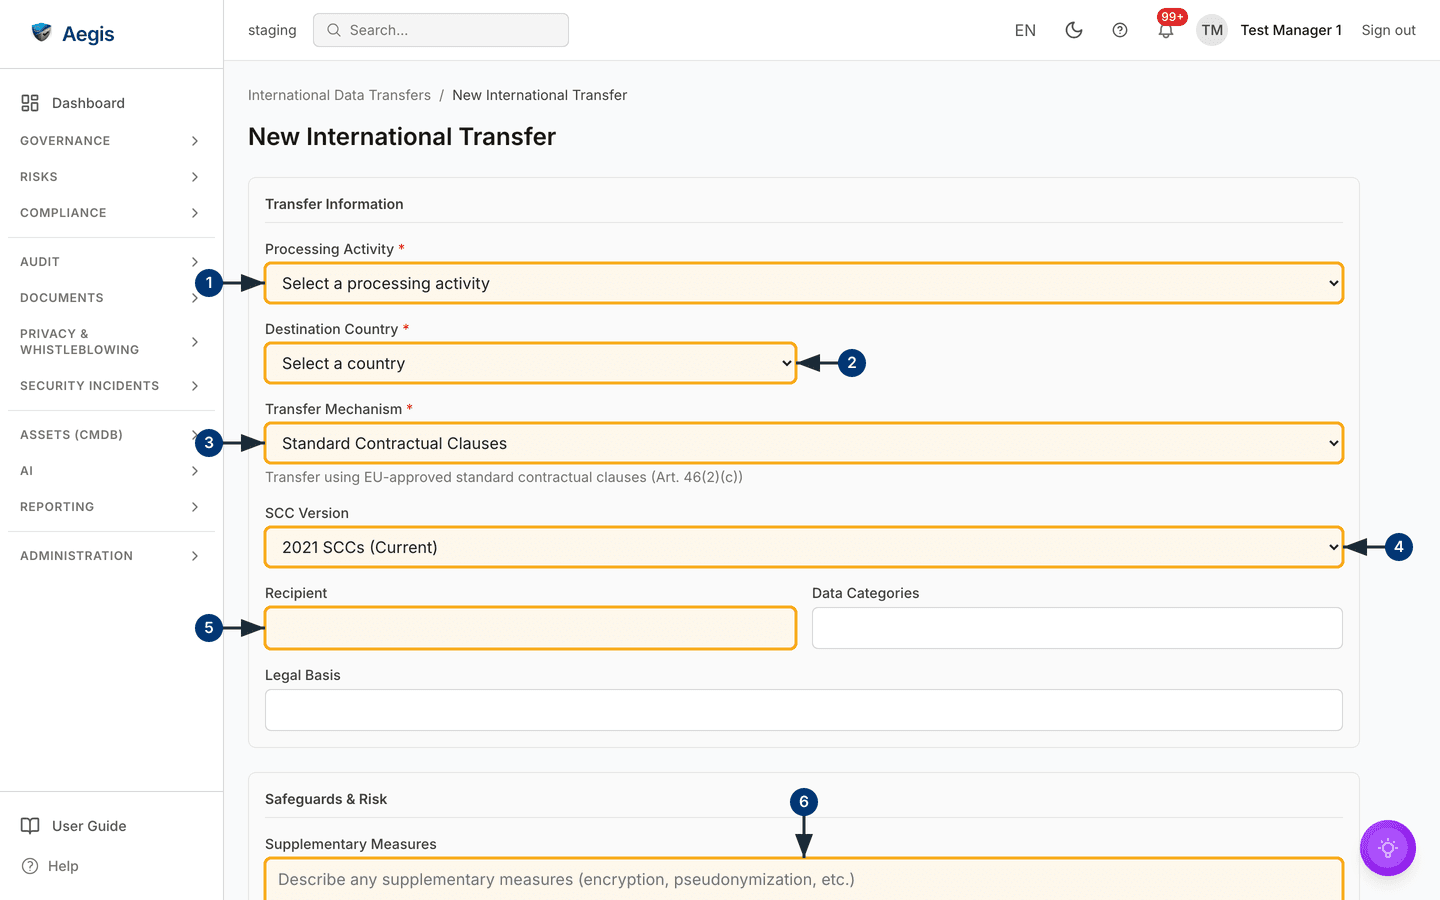
With Manager or Admin rights, Add Transfer opens the full page at
/gdpr/transfers/new, headed
New International Transfer, split into
Transfer Information and Safeguards & Risk.
- Select the
Processing Activitythe transfer belongs to. -
Select the
Destination Country. ChoosingOtheradds a free-text field for the country name. -
Select the
Transfer Mechanism.Standard Contractual Clausesis preselected, with the Article 46(2)(c) reference beneath; an adequacy decision asks for its reference instead. -
Confirm the
SCC Version—2021 SCCs (Current)unless you have a legacy set still in force. -
Name the
Recipient, and fillData CategoriesandLegal Basisalongside. -
Under
Safeguards & Risk, describe theSupplementary Measures(encryption, pseudonymisation) and the risk summary, then save. The transfer opens on its detail page.
Retention schedules
Retention defines how long each category of personal data may be kept, as
Article 5(1)(e) requires. The register is at /gdpr/retention and is
reached by address — it has neither a card nor a tile on the landing page. The
table lists policy name, retention period, data categories, disposal method and
review date, with an All Methods filter and, for Managers and
Admins, Add Policy. Each policy records the retention criteria, a
disposal method — Deletion, Anonymization or
Archival — and a next review date. Aegis holds the schedule but
deletes nothing when a period ends; the disposal records that prove you followed
it belong under COMPLIANCE → Evidence.
Keeping consent records
Where consent is your lawful basis, Article 7 requires you to show it was freely
given, specific, informed and unambiguous. The page at
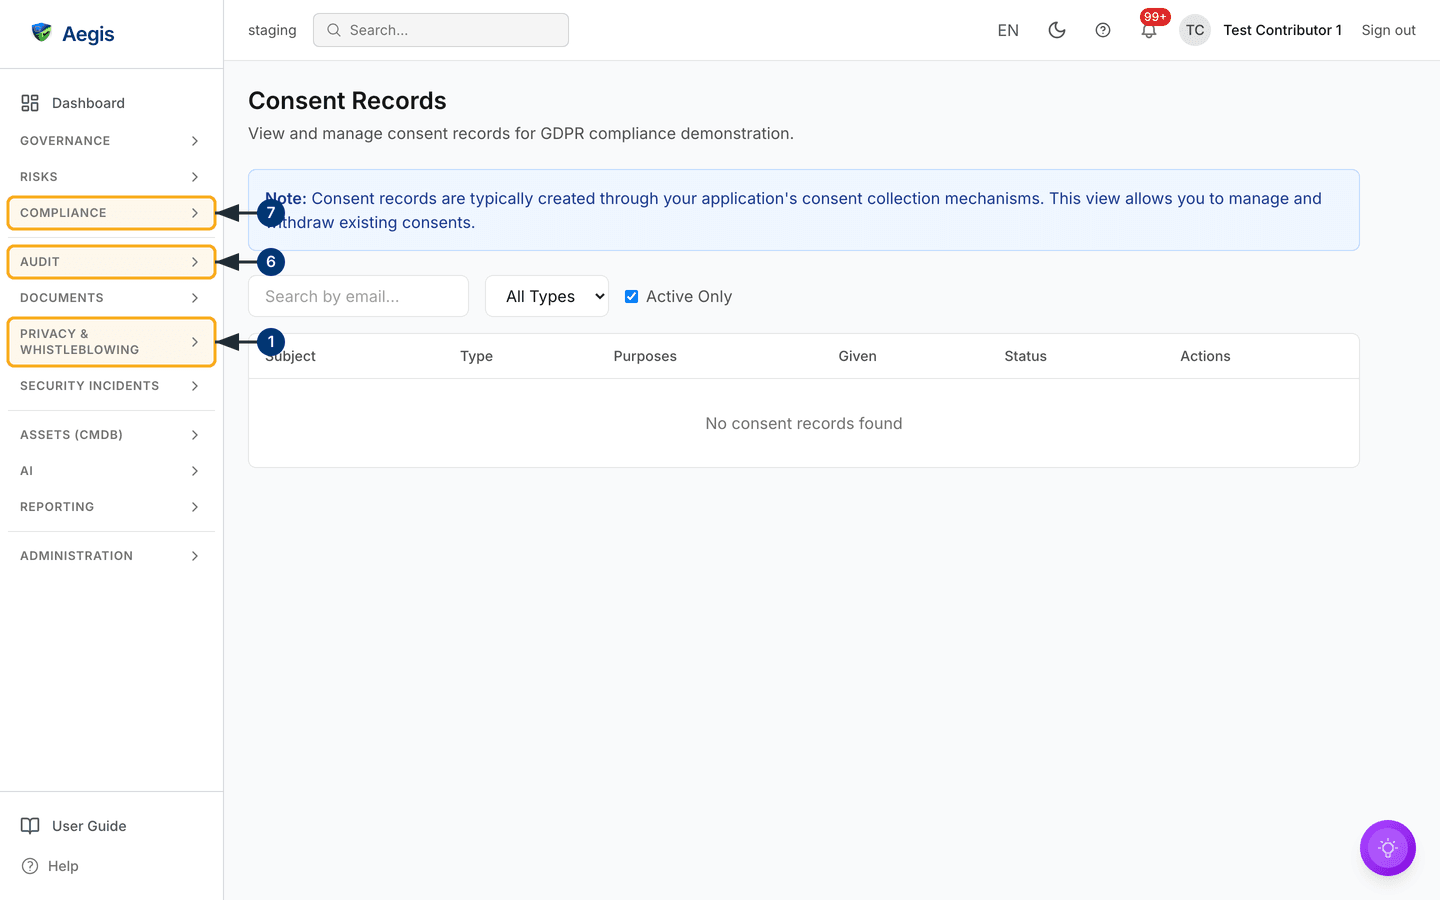
/gdpr/consent opens with a note saying plainly that consent records
normally come from your own application's consent collection, and that this view
is for managing and withdrawing them. A Search by email… box, an
All Types dropdown and an Active Only tickbox — ticked
by default — sit above Subject, Type,
Purposes, Given, Status and
Actions. The capture shows it empty:
No consent records found.
-
Open the register from the
Consent Recordscard, reached throughPRIVACY & WHISTLEBLOWING→GDPRin the sidebar. -
Search by email address, or untick
Active Onlyto bring withdrawn records back. The tickbox filters on withdrawal alone, so a consent past its expiry date that was never withdrawn stays in the list either way. -
Select a row to read the full record: activity, purposes, consent type, the
proof and version you recorded, and the metadata captured at the time. Its
badge reads
Active,WithdrawnorExpired. -
With Manager or Admin rights,
Record Consentlogs one by hand — email, activity, type, purposes, dates, proof and version. -
To process a withdrawal, select
WithdrawinActionsand confirm. The status becomesWithdrawn, the time is stamped, and it cannot be undone. -
A withdrawal is a record, not an instruction to your systems: stop the
processing where it happens, then use
AUDIT→Audit Logto prove when. -
The wording and version shown to the person is the proof behind the record —
keep it under
COMPLIANCE→Evidence.
The AI assist
Two AI actions are live in this module where your licence includes them.
Draft with AI on a DPIA proposes the Article 35 sections —
necessity, proportionality, risks and mitigations — from the linked processing
activity, and warns you before replacing an assessment you already have.
Run TIA on a transfer produces the adequacy and Schrems II analysis
described above. Both are Manager or Admin actions and both consume the tenant's
AI credits. The AI drafts and a person decides: you review, edit and save, and
the assessor of record is always a named human.
A third surface is built but not yet connected. The
AI-Drafted Response panel on a subject request would show a
suggested reply with a confidence figure, but no draft yet reaches the record,
so the panel does not appear and a request cannot be moved to
Verified, In Progress or Completed from
the page. Treat subject-request responses as entirely manual work for now.
Tips and limits
-
Move between registers with the landing page's cards and tiles — except
retention, which has neither and is reached at
/gdpr/retention. - The compliance checklist is a prompt for your DPO, not a score, and its retention line does not update from your data.
- A DPIA and a transfer are both anchored to a processing activity — build the ROPA first.
-
A
Completed,RefusedorExpiredrequest is locked. To correct a response, log a fresh request and note that it supersedes the earlier one. - No screen offers the two-month extension Article 12(3) allows for complex requests. Note it against the record and manage the extended date yourselves.
- There is no bulk export of the request queue. The audit log is the authoritative record of every status change across these registers.
Where this connects
A personal-data breach must reach the supervisory authority within 72 hours where required — handle and time-stamp it in Incidents. Agreements depend on Vendors; residual risks you accept from a DPIA belong in Risks; contracts, exports and write-ups belong in Evidence. The cross-system lookup that would gather what you hold about a person draws on the systems joined up in Connectors. Who may do what here follows Part 3 — What each role can do, and the whole journey runs end to end in When someone asks for their data.