Evidence
The Evidence Locker is where you keep the proof that your organisation does what its policies say — certificates, reports, screenshots, log extracts, audit letters — each item typed, dated, owned, and linked to the controls it supports.
Evidence (the proof that a control is actually working) turns a written claim into something an assessor can check. Keeping it in one place means that when an audit comes round, the answer is already assembled rather than scattered across shared drives. Each item carries a name, a type, an optional source system, an owner and a created date, and links to the controls it satisfies, the policies it backs and the risks it treats.
The locker is append-only by design. Every stored file is hashed with SHA-256 when it lands so that tampering can be detected, and deleting a record would break that chain of custody. No role — Admin included — can delete an evidence item through Aegis. A mistaken upload stays in the locker and is superseded, not removed.
Who uses it
A Viewer can open the locker,
search it, read an item's detail page, run the
Evidence Gaps (AI) and Refresh Triage (AI) briefings
and export a selection; the Upload Evidence button and the
row-level AI Classify action are hidden for them. A
Contributor and a
Manager can also upload, link
items to controls and run AI Classify. The one difference between
those two is export: the bulk Export action needs the report-export
permission, which a Manager, an
Admin and a Viewer hold but a
Contributor does not. Nobody deletes evidence, and nobody edits it either: there
is no edit form, so the only field the interface can change after upload is the
type, by accepting an AI Classify
suggestion. Everything else is settled in the upload dialog.
What's on this screen
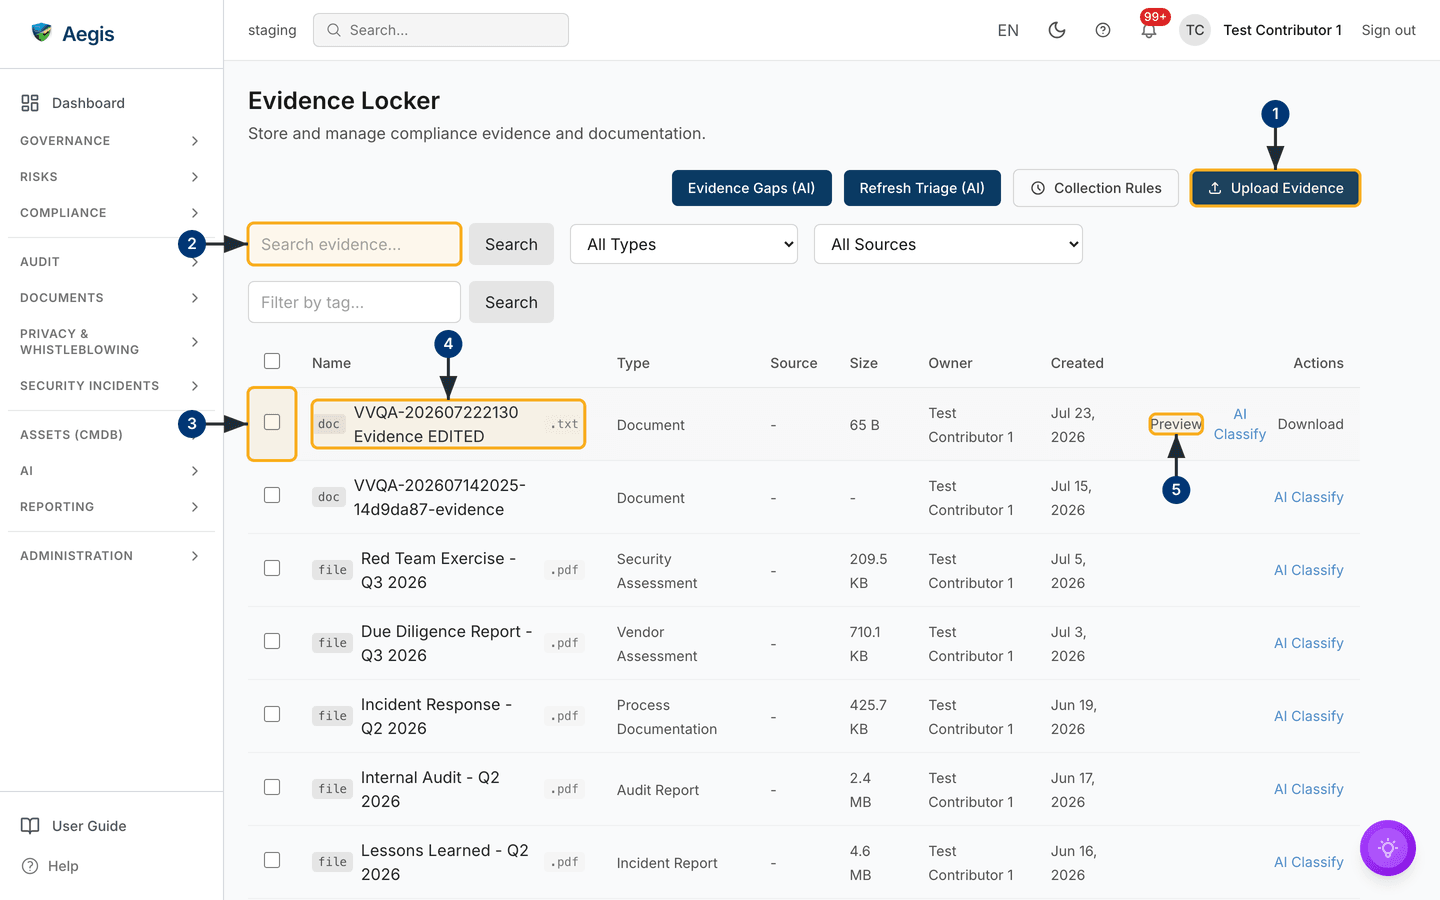
The locker lives at /evidence, headed Evidence Locker.
On the right of the header sits a row of four actions:
Evidence Gaps (AI), Refresh Triage (AI),
Collection Rules, and the primary action,
Upload Evidence. Below them is the filter bar: a
Search evidence… box with its own Search button, an
All Types dropdown, an All Sources dropdown, and on
the next line a Filter by tag… box with a second
Search button. The two dropdowns are built from the values that
exist in your own locker, so they differ from tenant to tenant.
The table underneath has a select-all checkbox and then the columns
Name, Type, Source, Size,
Owner, Created and Actions. Each name is
prefixed by a short type chip — doc, img,
rpt, cert, log, pol or
file — and followed by the file extension where one can be worked
out.
The Actions column offers Preview,
AI Classify and Download, but the first and last
appear only for items with a stored file — several rows in the capture carry a
.pdf chip taken from their content type with no file behind it, so
they offer AI Classify alone. Note what is not there: no validity
or freshness column. A Valid Until date is stored and shown on the
item's detail page, but the list neither surfaces nor colours it. Saved AI
refresh-triage briefings and their action items sit below the table.
Working through the list
-
Select
Upload Evidenceat the top right to add something new; theUpload Evidencedialog opens over the page — the next section walks through it. -
Type into the
Search evidence…box to find an item by name; the table narrows as you type, so theSearchbutton beside it is rarely needed. Narrow further withAll Types,All SourcesorFilter by tag…. -
Tick a row's checkbox to select it. A bulk action bar appears above the
table carrying whichever actions your role holds —
Link to Control,Exportor both; tick the header checkbox to select every row on the page. -
Select an item's name to open its detail page at
/evidence/{id}, described below. -
Select
Previewin theActionscolumn to read the file in a panel over the list, orDownloadto fetch the original.
Uploading evidence
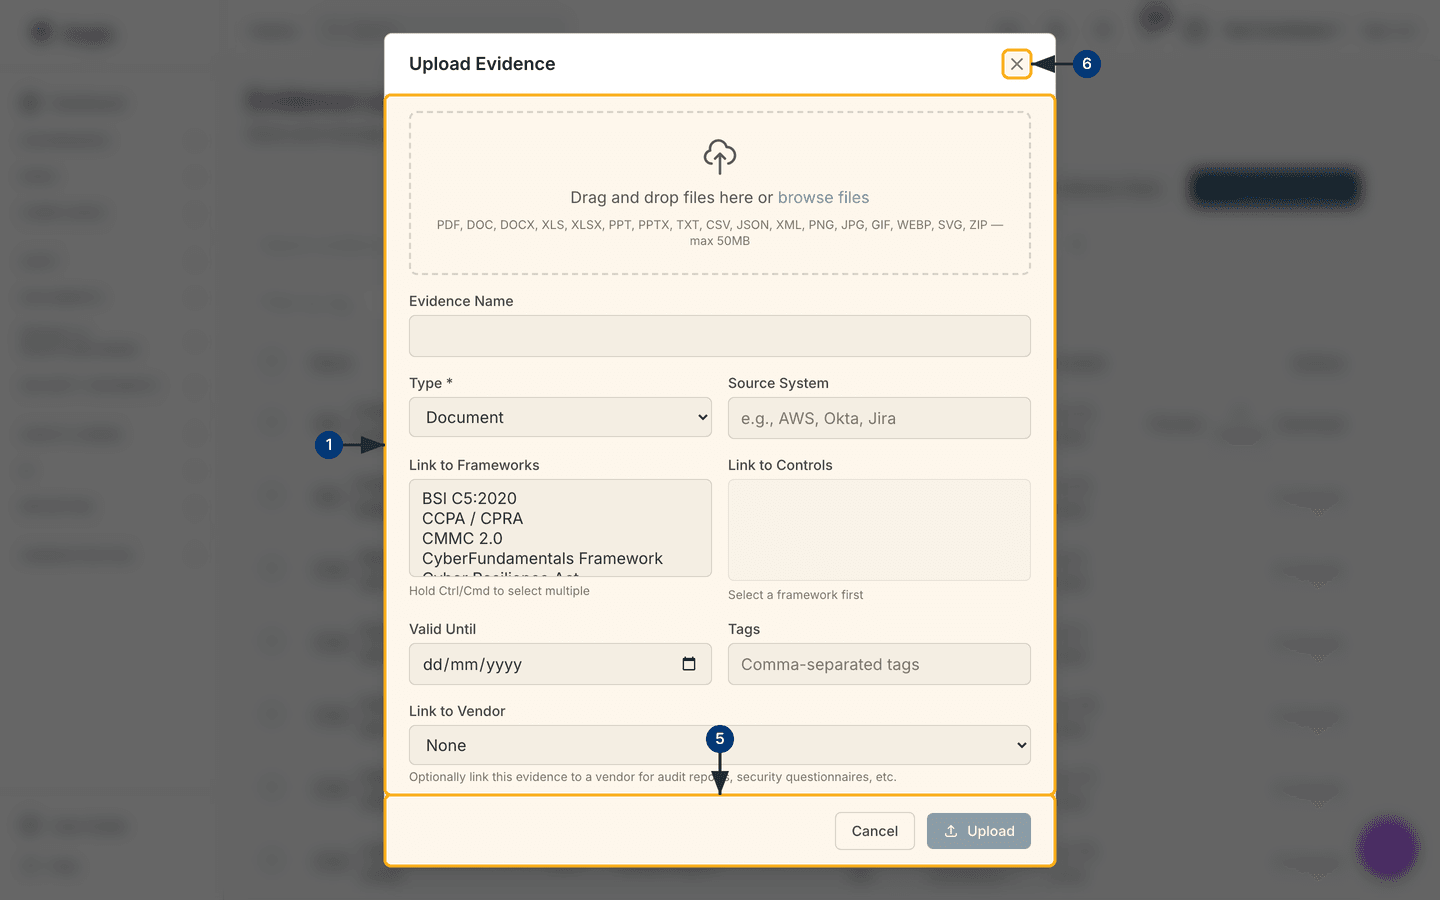
Selecting Upload Evidence opens a dialog with a drop zone at the
top and the metadata fields below it. The accepted formats and the size limit
are printed inside the drop zone: PDF, Word, Excel and PowerPoint files,
TXT, CSV, JSON and XML, the
common image types and ZIP, each up to 50 MB. Both the list and the limit are
fixed in Aegis rather than configurable; a file outside them is refused, with
the reason shown beneath the drop zone.
-
Drag files onto the dashed drop zone, or select
browse filesto pick them. You may add several at once; each is listed beneath the zone with a control to remove it again. -
Check the
Evidence Name. It is filled in from the first file's name and can be edited, but it is only applied when you upload one file — add several and each item takes its own file name instead. Choose theType—Document,Screenshot,Log,Report,ConfigurationorOther— and type theSource Systemthe artefact came from, such asAWS,OktaorJira. -
Select one or more frameworks in
Link to Frameworks, holding Ctrl or Cmd for several. Until you do,Link to Controlsbeside it stays empty and readsSelect a framework first; once a framework is chosen it fills with that framework's controls. -
Set
Valid Untilif the artefact expires, add comma-separatedTags, and pick a vendor underLink to Vendorif the evidence belongs to a supplier relationship. -
Select
Upload. Several files upload in turn, each with its own progress indicator; the dialog closes when all are done and the table refreshes with the new items. -
To abandon the upload instead, select
Cancelin the footer or the×at the top right of the dialog; nothing is saved.
You can submit the form with no file attached, creating an item from the
metadata alone — useful for recording that an artefact exists in an external
system without copying it into Aegis. Such an item has no
Preview or Download action.
Linking evidence to controls
Linking is what turns a stored file into demonstrated coverage, and the quickest
route is at upload time. For items already in the locker, tick their checkboxes
and select
Link to Control in the bulk action bar. A dialog opens with a
Filter by Framework dropdown — leave it on
All Frameworks or narrow it to one — and a control picker below it.
Choosing a control links every selected item and refreshes the table.
Removing a link works from the other side: open the control in Compliance frameworks and detach the evidence there. There is no unlink action on the evidence item itself.
What the detail page shows
The page is headed by the item's name and its type, with a
Download File button and an inline preview when a file is stored.
Below sit panels for File Information (file name, file size,
content type), Ownership (owner and source system) and
Dates (created, updated, Valid Until). Where text has
been extracted, Extracted Text shows the excerpt under a status
line — Text extraction queued,
Searchable text extracted, Text extraction failed or
Text extraction skipped. Where a file is stored,
File Information also prints its SHA-256 with a
Verify Integrity button that re-reads the file and reports
Checksum matches or a failure. The Tags panel and the
sections at the foot listing linked controls, policies and risks each appear
only when there is something to show.
Collecting evidence automatically
Collection Rules opens /evidence/collection-rules,
where you define rules that gather evidence from a source on a cadence you set,
independently of connector sync timing. The list shows Name,
Source, Evidence type, Schedule,
Status, Last run, Enabled and
Actions, and reads No collection rules yet on a fresh
tenant.
-
Select
Collection Rulesin the locker header, thenNew rule; a form appears. -
Name the rule, choose the
Evidence typeit produces and theSource system— optionally a connector — set aFrequency(HOURLY,DAILY,WEEKLY,MONTHLY, orCUSTOMwith an interval in seconds), pick the evidence owner, and save. -
Use
Pauseto stop a rule without losing it,Editto change it, orDeleteto remove it. Deleting a rule keeps the evidence already collected — that, like all evidence, is permanent.
The AI assist
Three AI helpers sit around this module. All three are read-only: they narrate and suggest, a person decides and acts.
-
Evidence Gaps (AI)finds the controls in your enabled frameworks with no linked evidence, puts them in a fixed, repeatable order, and describes a collection plan — including where one artefact would cover several controls at once. -
Refresh Triage (AI)ranks your active evidence by expiry and staleness and narrates what to renew first, with a next step per item. Both rankings are worked out in code before the model writes anything, so the order is explainable. Saved briefings stay below the table and can become action items. -
AI Classifyon a row suggests the category the item appears to belong to, with a confidence level. Accepting a suggestion sets the item's type; nothing changes until you accept it.
Tips and limits
- There is no replace-in-place. To supersede a file, upload the new version as a new item, link it to the same controls, and leave the old one as the historical record.
-
Aegis does not chase expiries on its own: nothing is sent as a
Valid Untildate approaches and the list does not flag it. RunRefresh Triage (AI), or build an alert in Workflows. - The preview panel handles PDFs and common image types; download a Word file, spreadsheet or log instead.
-
Exportin the bulk bar produces a CSV of the selected items' details, not a bundle of the files. - Evidence is the proof behind an attestation (a formal statement that a control is in place): the locker holds the proof, the statement is made against the control.
Where this connects
Evidence proves the controls tracked in Compliance frameworks and watched in Control monitoring; the mappings are described in Control mapping. It backs the treatment of a risk and the claims in a policy, and can be attached to a vendor. Collection rules can draw on a connector. When an assessment approaches, a well-linked locker is what you rely on in Audit readiness and the external audit walkthrough.