Threat Actors
Keep one reusable register of the people, groups and hazards that could harm your organisation, then link each one to the risks it drives.
The threat-actor register is a shared list of
threat sources — the kinds of attacker or
hazard your organisation faces, such as an organised crime group, a careless
insider, or a flood. You describe each actor once, then point at that single
entry from as many risks as it applies to. That keeps your risk language
consistent: instead of re-typing "ransomware gang" on every risk, every risk
refers to the same register entry. The register lives under the
RISKS group in the left menu, at /risks/threat-actors,
alongside the Risk Register and the
Exceptions Register.
Who uses it
Every role can read the register. Creating and editing needs Contributor; deleting needs Manager. The whole page sits behind the Risks module, so if that module is not switched on for your organisation, the menu entry is absent and the route is refused for everyone.
| Role | What you can do here |
|---|---|
| Viewer |
Open the register, search, filter by category, and open an actor to
read its definition and linked risks. Can also run the two AI
briefings. No create, edit or delete — the
Add Threat Actor button and the
Edit button are not rendered.
|
| Contributor | Everything a Viewer can do, plus add a new actor and edit an existing one. |
| Manager | Everything a Contributor can do, plus delete an actor. |
| Admin | Full access, including delete. |
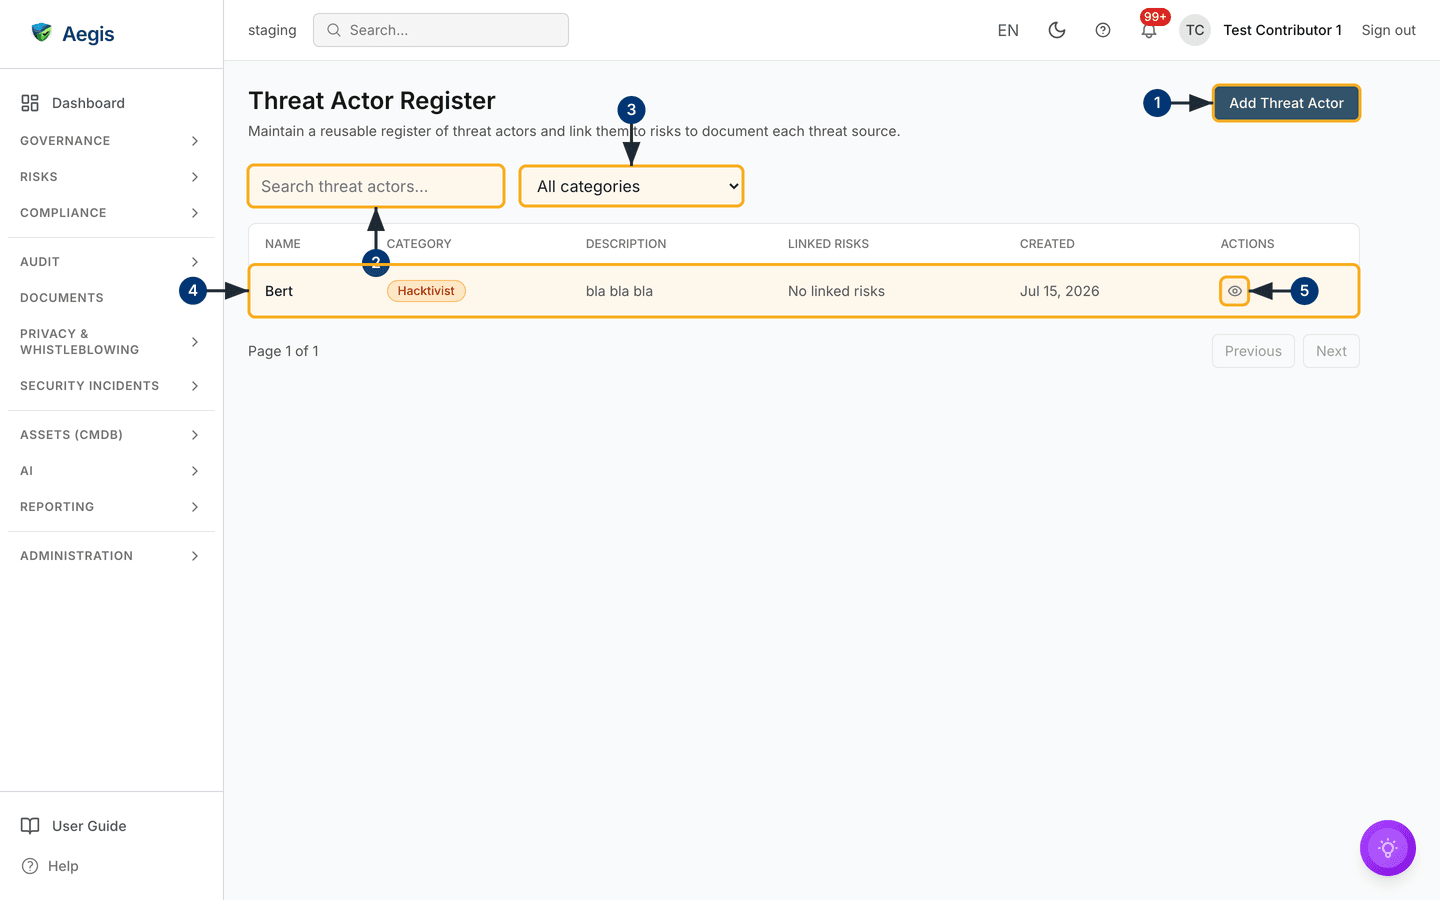
The screenshot below was captured as a Contributor. That is why the row's
ACTIONS column shows only the view (eye) control — the delete (bin)
control appears beside it for Managers and Admins.
What's on this screen
The header carries the page title Threat Actor Register and, under
it, the line "Maintain a reusable register of threat actors and link them to
risks to document each threat source." On the far right sits the one primary
action, Add Threat Actor.
Directly below is a slim toolbar with two controls and nothing else: a
Search threat actors... box on the left and an
All categories
dropdown beside it. The toolbar stays on screen in every state, including when a
filter returns nothing, so you can always clear what you typed.
The register itself is a table with six columns: NAME,
CATEGORY (a coloured badge), DESCRIPTION (the
definition, truncated to a single line), LINKED RISKS (a count, or
No linked risks), CREATED (the date) and
ACTIONS. The capture shows a single seeded test entry — an actor
named Bert with an orange Hacktivist badge, the
placeholder description "bla bla bla", no linked risks, created 15 July 2026.
Under the table, a Page 1 of 1 indicator sits opposite
Previous and Next
buttons, both greyed out here because one page holds everything. Pages hold
twenty actors each.
Before any actor exists, the table is replaced by an empty-state panel offering
the same
Add Threat Actor action. When a search or filter matches nothing, a
short "no results" panel appears instead, with the toolbar still above it.
Find your way around the register
-
To add an entry, select
Add Threat Actorat the top right. TheCreate Threat Actordialog opens over the page — the next task covers it. -
To find an existing actor, type into the
Search threat actors...box. The list narrows about a third of a second after you stop typing, and jumps back to page one. -
To narrow by kind, open the
All categoriesdropdown and choose a category. The table shows only actors of that category. ChooseAll categoriesagain to clear it. Search and category apply together. - Read across a row for the actor's name, category badge, one-line definition, linked-risk count and creation date. Select the name to open the actor's detail dialog.
-
In the
ACTIONScolumn, select the eye icon to open that same detail dialog. Managers and Admins see a bin icon here as well, which starts the delete confirmation.
Add a threat actor
A new actor takes three fields, all required. The dialog is not shown in the
screenshot above; these steps describe what appears once you select
Add Threat Actor.
-
Select
Add Threat Actor. A dialog headedCreate Threat Actoropens over the page with three fields stacked vertically and the register still visible behind it. -
Enter a
Name— a short, recognisable label. The field is prompted with "e.g. Organized cybercrime group" and accepts up to 200 characters. Names must be unique, ignoring capitals; re-using one that already exists is refused, and the message "A threat actor named "…" already exists" appears in a red band at the top of the form. -
Open
Categoryand pick one of the nine values (listed in the next section). The dropdown starts onSelect a category, which is not a valid choice. -
Write the
Description. The prompt asks you to "Define this actor: motivation, capabilities, and why it is a threat source." Up to 5,000 characters — this is what everyone else, and the AI briefings, read later. -
Select
Add Threat Actorin the dialog footer. A short confirmation appears at the corner of the screen, the dialog closes and the register reloads with the new entry in it. Anything missing or over-length is flagged inline under the field, and the dialog stays open so you can correct it.
The categories
Category is a fixed list — you cannot add your own. Pick the
closest fit and use Other when nothing applies. Each category
carries its own badge colour, the same on the register and inside the detail
dialog. The labels below are the on-screen strings.
| Category | Use it for |
|---|---|
Nation State |
State-sponsored or government-backed attackers. |
Organized Crime |
Financially motivated criminal groups, such as ransomware gangs. |
Hacktivist |
Attackers driven by a political or social cause. |
Insider |
Staff or contractors, whether malicious or careless. |
Competitor |
Rival organisations seeking commercial advantage. |
Supply Chain |
A threat arriving through a supplier, partner or third-party component. |
Script Kiddie |
Low-skill opportunists using off-the-shelf tools. |
Natural / Environmental |
Non-human hazards such as fire, flood or a power cut. |
Other |
Anything the list above does not cover. |
Open an actor and read its detail
Selecting a name, or the eye icon in the ACTIONS column, opens a
dialog titled with the actor's name. No capture of this dialog is included in
this chapter; the steps describe what it contains.
-
Select the actor's name in the
NAMEcolumn. The detail dialog opens with the category badge and theCreateddate on the top line. -
Read the full
Descriptionbelow that — the whole definition, not the truncated version the table shows. -
Look at
Linked Risks. Each linked risk is a small card with the risk title on the left and its status on the right; selecting the title opens that risk's own page. When nothing is linked yet, the section reads "No risks are linked to this threat actor yet." -
Below that,
Saved AI insightslists any briefing someone chose to keep against this actor. It stays empty until the first one is saved. -
Close the dialog to return to the register. A link from a risk's
Threat Actorstab opens this same dialog directly; closing it clears the?actor=parameter from the address bar so a refresh does not re-open it.
Edit an actor
Editing happens inside the same dialog, in place. Contributor and above.
-
Open the actor, then select
Editin the dialog footer. The read-only content is replaced by a form holding the current name, category and description. - Change what you need. The same rules apply as when creating: name up to 200 characters and unique ignoring capitals, category required, description up to 5,000 characters.
-
Select
Save. The button readsSaving...while it works, then a confirmation appears, the dialog returns to its read-only view and the register behind it refreshes.Cancelabandons the changes and returns to the read-only view.
If another actor already uses the name you typed, Aegis does not save and
does not close the form — the message appears under the
Name field so you can adjust it and save again.
Link an actor to a risk
The detail dialog shows linked risks but does not create the link. Linking is
done from the risk, which is where the count in the
LINKED RISKS column comes from.
-
Open the risk on the Risk Register and go to its
Linked Itemspanel. -
Select the
Threat Actorstab. It lists what is already linked, or the line "No threat actors linked to this risk." -
Select
+ Link Threat Actorand pick an entry from the register. The actor appears in the tab straight away, with its category badge and description. -
Return to
/risks/threat-actors. That actor'sLINKED RISKScount has gone up, and the risk now appears in its detail dialog.
There is a second route in. When someone runs Enrich with AI on a
risk, the AI Enrichment output includes a
Suggested threat actors panel, and each row there offers the link
in one step. Where the suggestion matches a register entry, the action is
Link to risk; where it does not, it is
Add to register & link, which creates the register entry and
then links it. Rows that are already attached are labelled
Already linked to this risk and offer no action. Nothing is created
or linked until you select the action yourself.
Delete an actor
Managers and Admins only. The bin icon does not appear for other roles.
-
In the row's
ACTIONScolumn, select the bin icon. A confirmation dialog headedDelete Threat Actorasks "Are you sure you want to delete" followed by the actor's name in quotation marks and "? It will no longer appear on linked risks." -
Select
Deleteto confirm, orCancelto back out. On confirmation the actor stops appearing on the register and on every risk it was attached to; the risks themselves are untouched.
The record is marked deleted rather than erased, and the action is recorded in the Audit Log along with every create and edit on this register.
The AI assists
Two AI actions sit in the footer of an actor's detail dialog. Both only write a briefing to the screen: neither edits the register, links a risk or deletes anything. A person reads the output and decides what to do with it — and anything that is kept afterwards is kept by that person's own choice.
-
Map to Risks (AI)reasons over your internal records only: it confirms the risks already linked, suggests further ones from your open register, and proposes mitigating control themes such as access control or segmentation. Suggestions are drawn from risks you already hold, never invented. -
Investigate (AI)also reaches outside. It combines external threat-intelligence found by web search with your internal record — a profile summary with cited sources, known tactics and targeted sectors, and relevance to your linked risks. Findings are attributed only to sources that name the actor, and when external search is unavailable the briefing falls back to your internal record rather than failing.
-
Open the actor and select either
Map to Risks (AI)orInvestigate (AI). A dialog opens explaining what that briefing covers, with a start button in the footer —Map to risksorRun investigation. - Select the start button. Progress lines show what Aegis is doing (loading the record, gathering risks or searching external intelligence, then drafting), and the text streams in as it is written.
-
Read the result together with the
Confidenceindicator and anySupporting evidenceshown beneath it. Treat the whole thing as a suggestion to check, not a finding. -
Decide what to keep.
Copyputs the text on your clipboard,Export DOCXandExport PDFdownload it, andSave as recordstores it against this actor, where it then appears underSaved AI insightsin the detail dialog. From Contributor upwards there are two more buttons:Create action itemturns the briefing into a piece of tracked work, andCreate work itemsopens aCreate roadmap work itemsdialog.Run againstarts over;Closediscards an unsaved result.
Each run is a billable AI action against your organisation's monthly allowance, and it is recorded in the AI usage log. A run is refused if the allowance is exhausted, if the AI assist is switched off for your organisation, or until the AI transparency notice has been acknowledged on your account — an EU AI Act requirement, covered in EU AI Act.
Tips and limits
- The search box matches on both the name and the description, ignoring capitals — a word you only used inside a definition still finds the entry. To find by kind, reach for the category filter.
- Keep entries reusable. One well-written "Organised cybercrime group" linked to eight risks is worth more than eight near-duplicates.
- There is no bulk import and no export of the register itself. Entries are added one at a time, here or from a risk's suggestion panel.
- The register has no owner, review date or status field, and badge colours are fixed. It is a vocabulary, not a workflow — assessment and treatment live on the risk.
-
Deleting an actor removes it from the risks it was linked to. If that actor
was the only recorded threat source for a risk, the risk loses that context
— check the count in
LINKED RISKSbefore you delete.
Where this connects
-
Risks — where an actor is linked to a risk, and
where the
LINKED RISKScount comes from. -
Exceptions Register — the other
supporting register under the
RISKSgroup. - Incidents — when a threat source acts, the response is handled there.
- EU AI Act — the transparency acknowledgement that gates the two AI briefings.
- Audit Log — every create, edit and delete on this register is recorded there.
- Roles overview — the full picture of what each role may do across Aegis.