What each role can do
Every person who signs in to Aegis holds exactly one of four roles, and that role decides what they can read, change, approve and administer across the whole application.
A role (a named bundle of powers attached to an account) is the most consequential setting on a person's record. Aegis ships with four, and they form a ladder from read-only to full administration. A person holds one role at a time on your tenant (your organisation's own private Aegis instance), and only an Admin can change it.
The four roles
From the bottom of the ladder to the top: Viewer < Contributor < Manager < Admin.
- Viewer — the observer: auditors and executive sponsors. Reads policies, risks, evidence, framework progress and board reports, and can export a report. Creates nothing.
- Contributor — the day-to-day worker: drafts policies and procedures, creates and scores risks, uploads evidence, logs incidents and responds to data-subject requests. Cannot approve anything, and cannot delete policies, risks, vendors, incidents or evidence.
- Manager — the functional owner: everything a Contributor does, plus approving policies and procedures, deleting records (evidence excepted — that stays with an Admin), configuring connectors, handling whistleblowing cases, editing the public Trust Center and using the regulatory reporting view.
- Admin — the workspace administrator: everything a Manager does, plus users and roles, the licence, single sign-on, API keys, webhooks and the auto-incident rules. Internally an Admin holds a wildcard grant, which is why no administrative screen is ever hidden from one.
In the normal configuration Aegis is invitation-only: there is no self-registration, so every new person starts from an Admin's invitation.
Which role fits my job title?
The four role names describe powers, not jobs, so people reasonably ask which one they should hold. The table below maps common job titles to the role that usually fits, and to what to ask your Admin for when you request an account. It is a starting point, not a rule — your organisation decides, and a person's real duties matter more than their title.
| Your job | Typical Aegis role | What to ask your Admin for |
|---|---|---|
| Ordinary employee (no compliance duties) | Viewer, or often no account at all | An account only if you must acknowledge policies in Aegis — see the employee scenario |
| HR officer | Contributor | Access to the HR register and training records; Manager instead if you will log data-subject requests yourself — see the HR scenario |
| Office manager | Contributor | Create rights for the records you keep — vendors, evidence, incidents |
| Quality manager | Manager | Approval rights for policies and procedures, and audit access |
| Compliance officer / CISO | Manager | The full working set: approve, delete, connectors, whistleblowing cases |
| DPO / privacy lead | Manager | The GDPR area, including creating and closing data-subject requests |
| Director / board member | Viewer | Read access and report export — board packs and dashboards are readable as-is |
| IT administrator | Admin | Users and roles, single sign-on, API keys, webhooks and system settings |
| External auditor | Viewer | A time-limited account for reading evidence, exports and the audit trail |
What's on this screen
The quickest way to understand a role is to sit in front of the screen as that
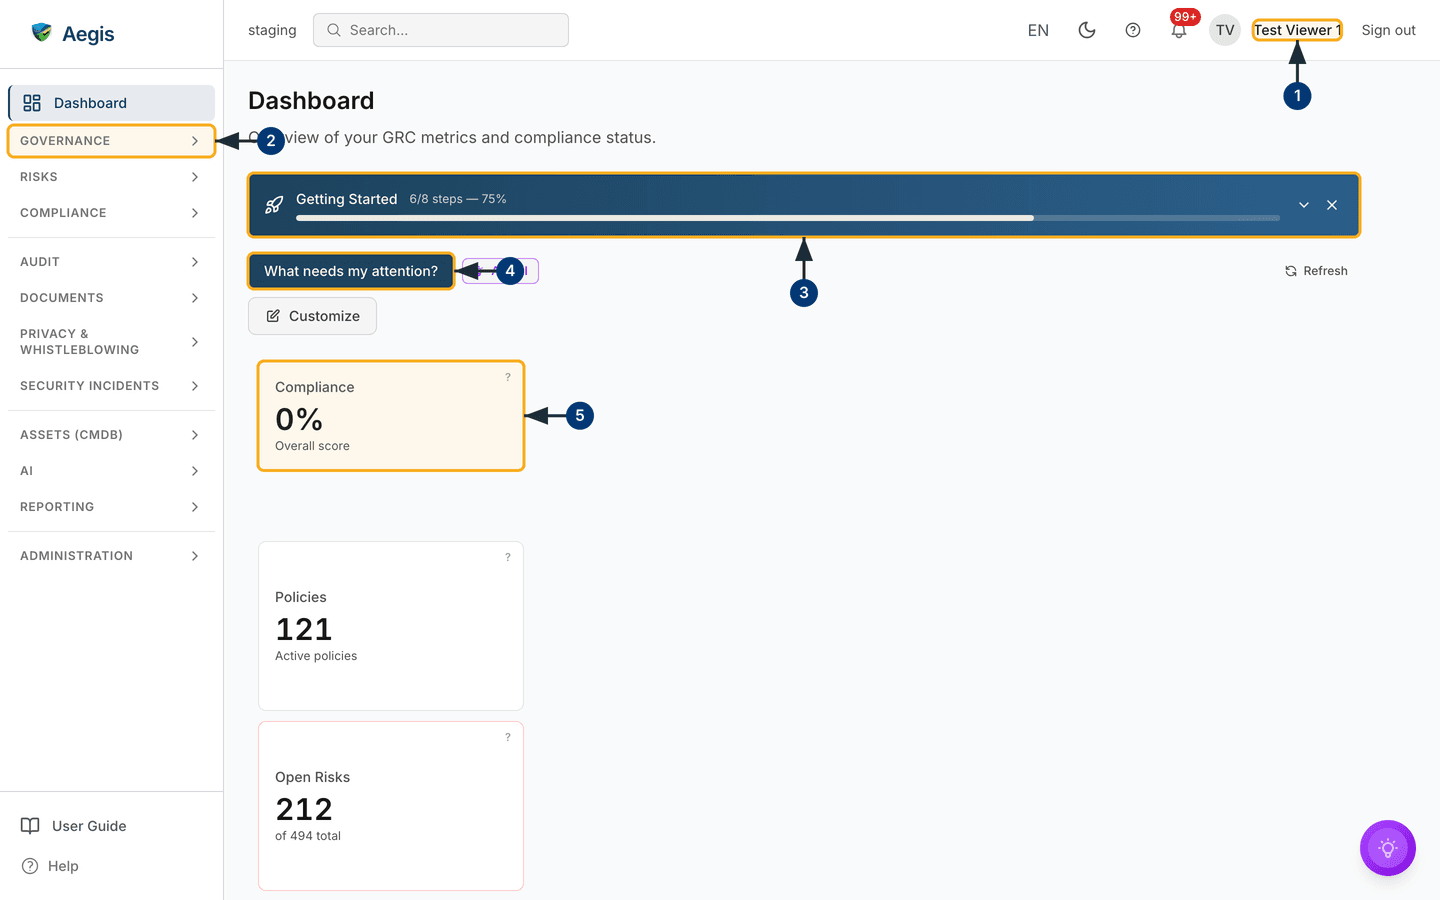
role. The figure below is /dashboard signed in as
Test Viewer 1, whose name sits top-right beside
Sign out, in the top bar with the global search box, the
EN language switch, the theme toggle, the help icon and the
notification bell. Down the left runs the grouped sidebar; across the top of the
content sit a Getting Started banner (here
6/8 steps — 75%), then the What needs my attention?,
Ask AI, Customize and Refresh buttons,
then the headline cards — this capture shows Compliance,
Policies and Open Risks stacked in a column, with the
rest of the dashboard past its bottom edge (see
The dashboard for the full page). What the role
changes is mostly not the layout but which controls accept a change — and, one
level down in the sidebar, which entries are offered at all.
-
Check who you are signed in as, top-right — here
Test Viewer 1. The role behind that name is what every permission check reads, on every request. -
Open the sidebar groups —
Governance,Risks,Compliance,Audit,Documents,Privacy & Whistleblowing,Security Incidents,Assets (CMDB),AI,ReportingandAdministration. Every group heading renders for a Viewer; the filtering happens one level down, where role-gated entries such asConnectors, incidentReportingandAPI Keysare dropped from the list. -
Read the
Getting Startedbanner, which tracks this tenant's setup —6/8 steps — 75%here. The arrow at its right edge expands the step list and the × dismisses the banner; both work for a Viewer, because neither changes a record. -
Select
What needs my attention?. A dialog opens with a prioritised, read-only feed of items that need attention across modules. It renders for a Viewer precisely because it only reads — like theAsk AIbutton beside it, which opens the AI assistant's chat panel. -
Read the headline cards —
Compliance(0%overall score on this seeded tenant),Policies(120active) andOpen Risks(212of494total). Each card is a shortcut into its module, which opens read-only for a Viewer, and the small?in each card's corner explains how that number is calculated.
The same list, one role apart
The read-only pattern repeats on every module. Here is the
Policies list as the same Viewer. Where a
Contributor sees a New Policy button, the Viewer's header offers
only the List / Grouped view toggle and
Review Triage (AI). Below that sits a full reading surface: the
All Statuses and All Levels filters, a
Search policies… box with its Search button, and a
table of Title, Status, Level,
Owner, Version, Controls,
Effective Date, Review Date, Updated and
Actions.
-
Switch between
ListandGroupedto see a flat table or policies clustered by level. The missing create button beside this toggle is the first visible difference from a Contributor's screen. -
Narrow the table with
All Levels(andAll Statusesto its left). The list reloads against the chosen filter; filtering is a reading aid and is open to every role. -
Type a title into
Search policies…and selectSearch. The table reloads with the matches — search changes what you see, never the records. -
Note the pencil icon in each row. It still renders for a Viewer, because the
decisive gate lives on the server rather than in a hidden button — a Viewer
who opens the editor and saves is refused by the
policy:updatecheck. - Select the eye icon to open the policy read-only. That is the Viewer's action on this screen: read in full; approve and delete, never.
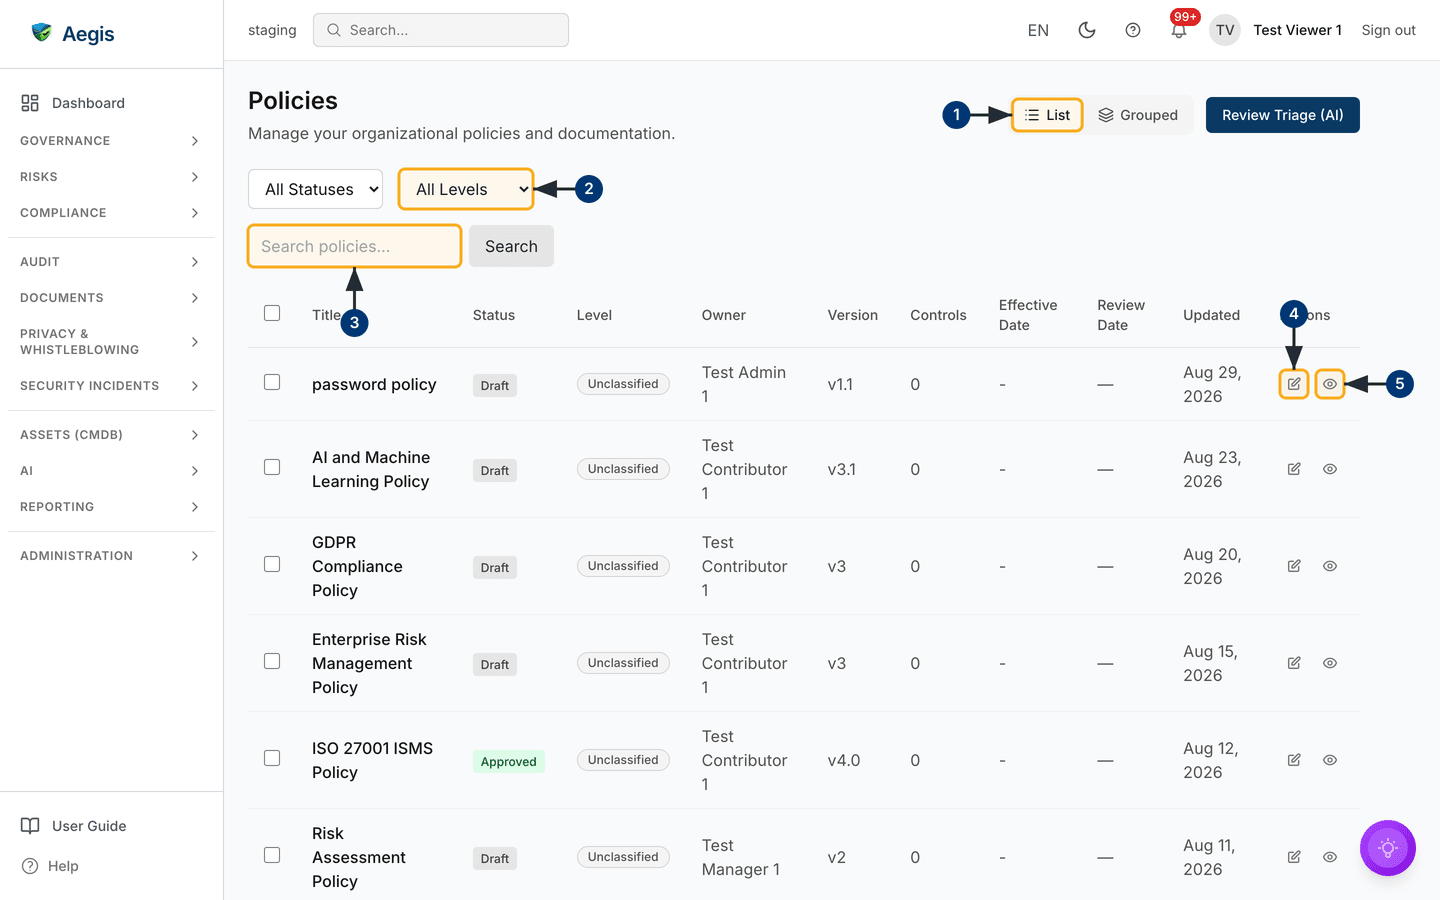
This capture settles one common question: the role controls which actions
succeed, not which rows appear. The Viewer sees policies still in
Draft — such as AI and Machine Learning Policy —
alongside Approved ones, and cannot change any of them.
The capability matrix
Underneath the four roles sit fine-grained
permissions — the individual checks Aegis
runs before accepting a change, each named in a
resource:action pattern. Each role is a fixed bundle of these
checks. An action your bundle lacks is refused with a
403 Forbidden; the message is short (Forbidden or
Insufficient permissions) and does not name the missing permission,
so use the table below to work out which role would have held it. Browsing to a
page you may not open sends you to /unauthorized instead. A ✓ below
means the role can do it.
| Action | Viewer | Contributor | Manager | Admin |
|---|---|---|---|---|
| Read policies, risks, vendors, evidence, incidents | ✓ | ✓ | ✓ | ✓ |
Export a report (report:export) |
✓ | ✓ | ✓ | |
Create and edit records (policy:create,
risk:update, …)
|
✓ | ✓ | ✓ | |
Respond to data-subject requests (gdpr:dsr:respond)
|
✓ | ✓ | ✓ | |
Approve policies and procedures (policy:approve) |
✓ | ✓ | ||
| Delete policies, risks, vendors, incidents | ✓ | ✓ | ||
Delete evidence (evidence:delete) |
✓ | |||
Configure connectors (connector:*) |
✓ | ✓ | ||
Handle whistleblowing cases (whistleblow:*) |
✓ | ✓ | ||
| Write board reports, edit the Trust Center | ✓ | ✓ | ||
Regulatory incident reporting (/incidents/reporting)
|
✓ | ✓ | ||
| Users, roles, licence, SSO, API keys, webhooks | ✓ |
A handful of sidebar entries never render below their minimum role, so the
page is not only refused — it is not offered. Connectors,
incident Reporting and Whistleblowing require
Manager;
Auto-Incident Rules, API Keys,
Webhooks, License and
Document Template require
Admin. Reading ordinary records
— including Board Reports, Benchmarking,
Mock Audit and the Trust Center — is open to every
role, which is why the Viewer above still saw draft policies.
Change someone's role
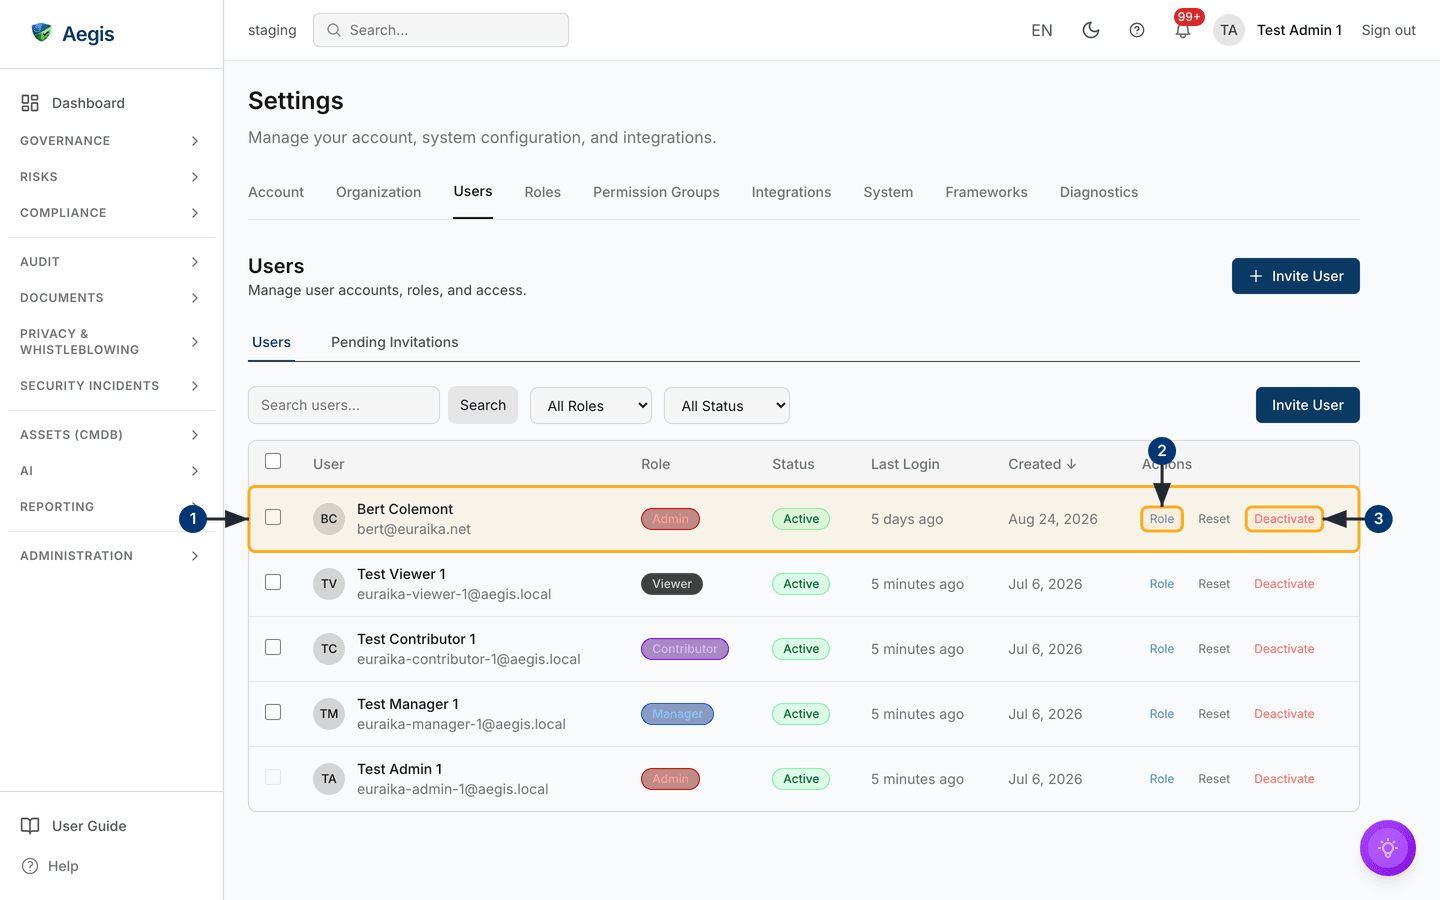
User and role management lives on the Settings page
as a tab, not at its own address: /settings/users redirects to the
canonical /settings?tab=users. Of the nine tabs on that page —
Account, Organization, Users,
Roles, Permission Groups, Integrations,
System, Frameworks and Diagnostics — the
administrative ones render only for an
Admin. The capture below is the
Users tab as Test Admin 1: an
Invite User button, Users and
Pending Invitations sub-tabs, a Search users… box with
All Roles and All Status filters, and a table of
User, Role, Status,
Last Login, Created and Actions.
-
Find the person's row. Each shows their name and email, a role badge, their
status (
Activefor all five accounts here), the last sign-in and the creation date. Narrow a long list with the search box or the two filters; the table pages at 20 rows. -
Select
Roleon that row. A dialog opens listing the four built-in roles, each with a one-line description of what it grants; pick one and confirm, and the badge in theRolecolumn updates. The change applies from the person's next request — no sign-out needed, because the role is re-read on every check — and lands in the audit log with the previous role, the new role, who changed it and when. -
To remove access, select
Deactivate. The account can no longer sign in, its open sessions are revoked at once, and the person's records and audit history stay intact; the action then readsReactivate.Resetbeside it sends a password-reset email; it needs email (SMTP) configured, and it is refused for an account that is already deactivated.
Open a person's detail page
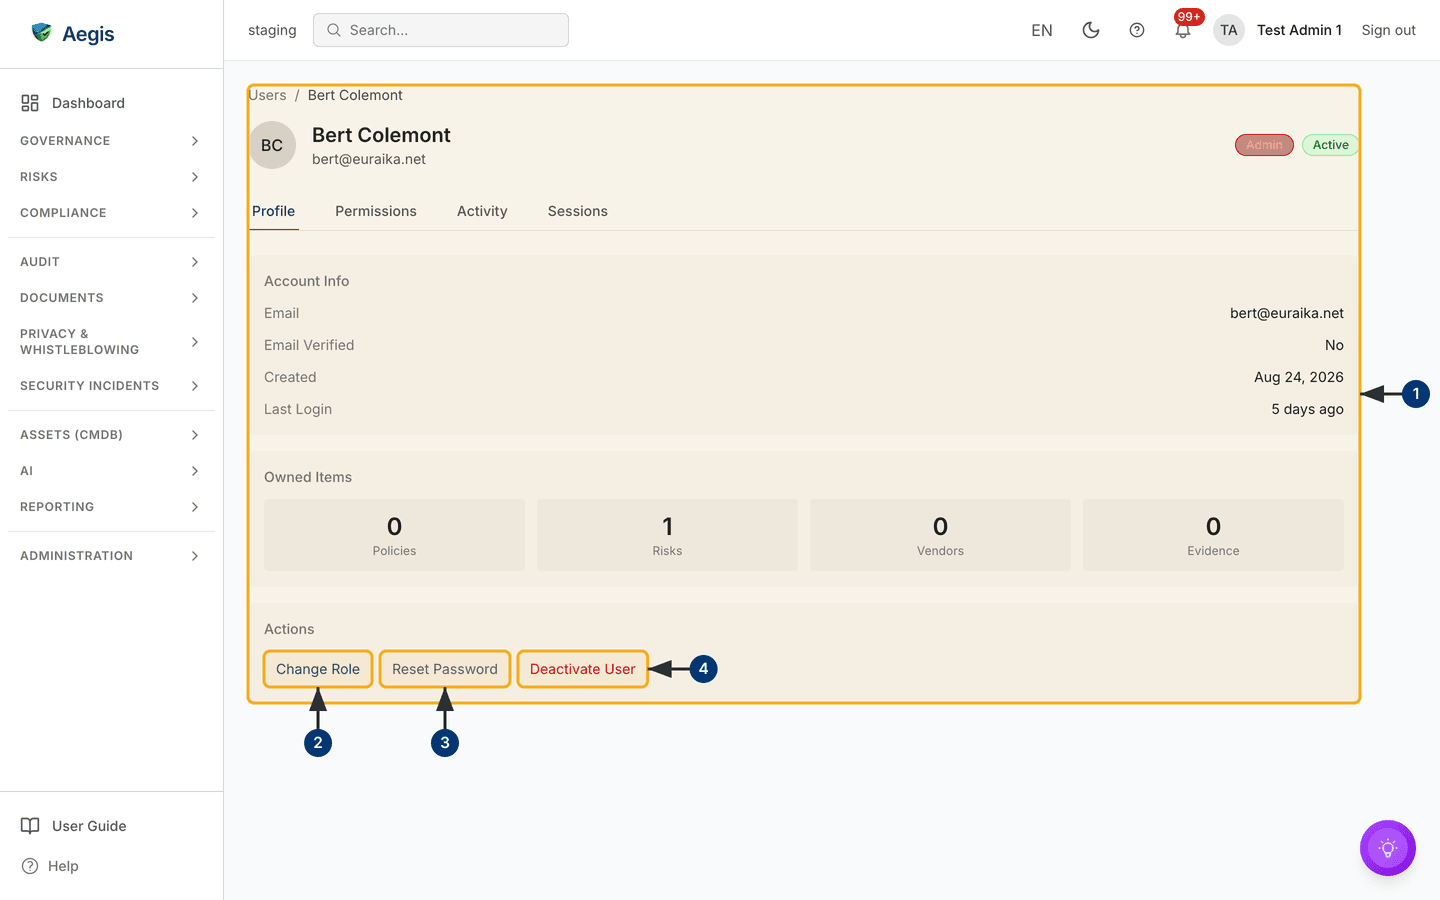
Selecting anywhere on a user's row (other than an action link) opens their
detail page at
/settings/users/<id> — a full page you can bookmark and
reload. The capture below is Bert Colemont's: a breadcrumb (Users / Bert Colemont), the name and email under the avatar with the role and status badges on the
right, and four tabs — Profile, Permissions,
Activity and Sessions. The Profile tab
shows an Account Info card (email, whether it is verified, created
date, last sign-in), an Owned Items card counting the policies,
risks, vendors and evidence the person owns, and an Actions card.
-
Review the profile before you change anything: the badges top-right show the
current role (
Admin) and status (Active), andOwned Itemstells you how much work is attributed to this person — here1risk. ThePermissionstab shows their role and the permission groups they belong to;ActivityandSessionsshow what they have done and where they are signed in. -
Select
Change RoleunderActions. The same role chooser as on the list opens; pick a role and confirm, and the badge in the header updates. -
Select
Reset Passwordto send the person a password-reset email — the same action asReseton the list row. -
Select
Deactivate Userto block sign-in and revoke open sessions, exactly as on the list; for a deactivated account the button readsReactivate Userinstead.
To add a person, select Invite User, enter their email address and
choose a role; the account waits under Pending Invitations until
they accept and set a password. The Roles tab beside it is a
read-only reference — the four roles are defined in code, not in the database,
so there is nothing to edit there — and Permission Groups holds the
optional extra layer described under Tips and limits below.
Aegis blocks the two moves that would lock you out from inside the application: you cannot change your own role, and you cannot deactivate your own account — your own row's selection checkbox is disabled for the same reason. It cannot protect you from what happens outside the application. If your only Admin leaves or loses access, nobody can manage users, roles or settings. Keep a second active Admin, and contact Euraika support if you do lose Admin access.
Map roles from your identity provider
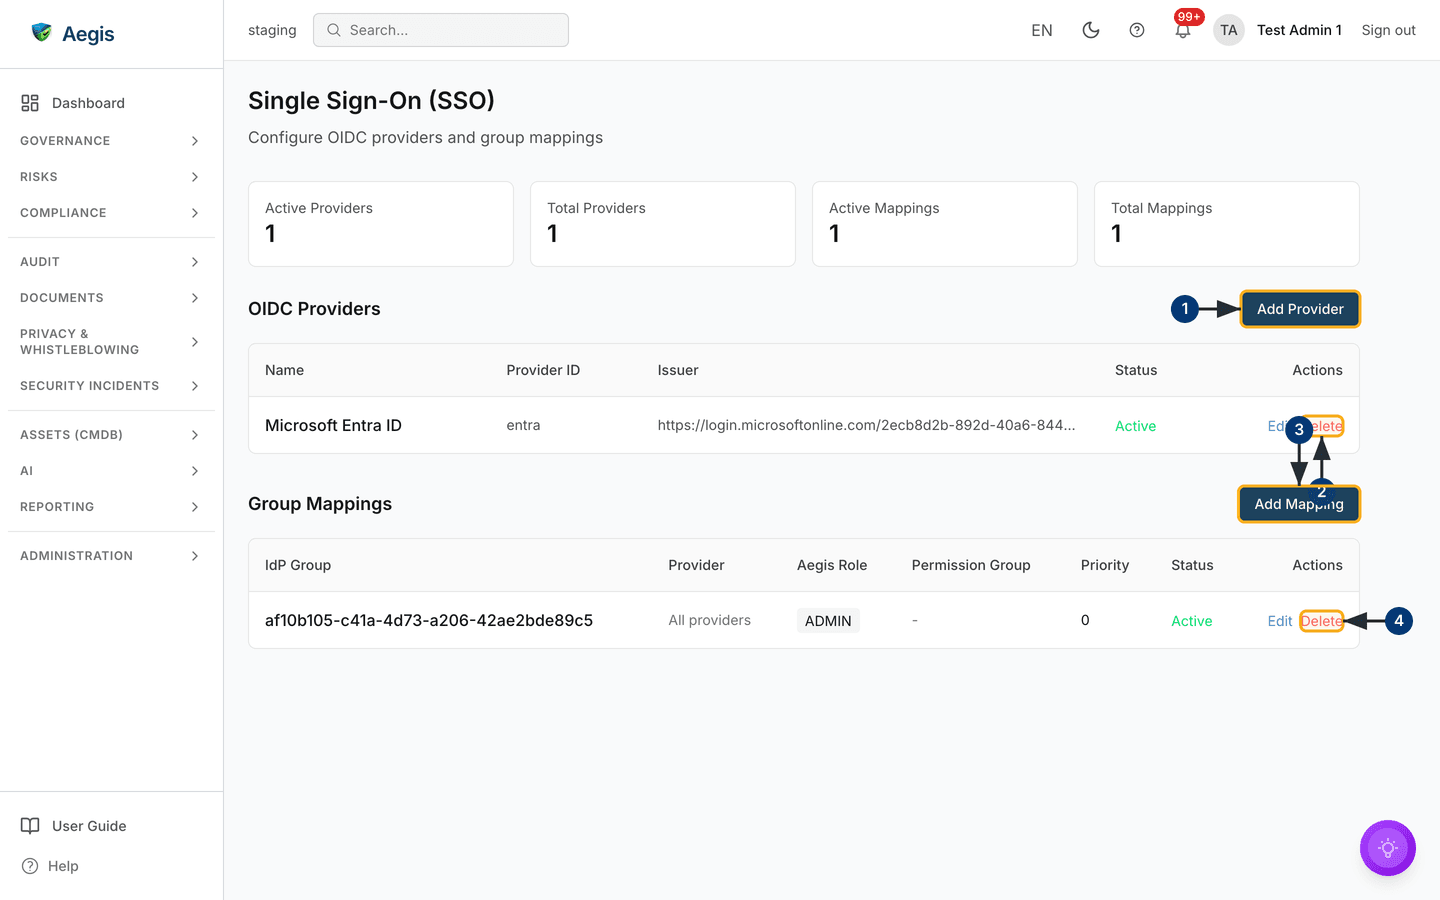
If your organisation uses single sign-on (SSO — signing in with your existing
work account; see
Signing in), people can inherit an Aegis role from
their identity-provider group instead of being set one at a time. An Admin
configures this at Settings → Integrations → SSO. The screen opens
with four counters — Active Providers,
Total Providers, Active Mappings and
Total Mappings, each reading 1 here — then an
OIDC Providers table (Microsoft Entra ID, provider ID
entra, its issuer URL, Active) and a
Group Mappings table mapping one identity-provider group to the
ADMIN role across All providers at priority
0.
-
Select
Add Providerto register an identity provider. TheAdd OIDC Providerdialog opens over the page — the next figure walks through it. -
Use
Deletein the provider row'sActionscolumn to remove a provider — that removes the sign-in route with it, so people who used it must then sign in through another provider or a password account.Editbeside it reopens the same form on the existing provider instead. -
Select
Add Mappingto link one identity-provider group to one Aegis role and, optionally, a permission group. The mapping appears in theGroup Mappingstable with its provider, role, priority and status. When someone belongs to more than one mapped group, the most privileged matched role wins. -
Use
Deleteon a mapping row to remove it (Editbeside it changes the role or priority instead). From the next sign-in, members of that group no longer inherit the mapped role; the role they already hold stays until an Admin changes it.
Add an OIDC provider
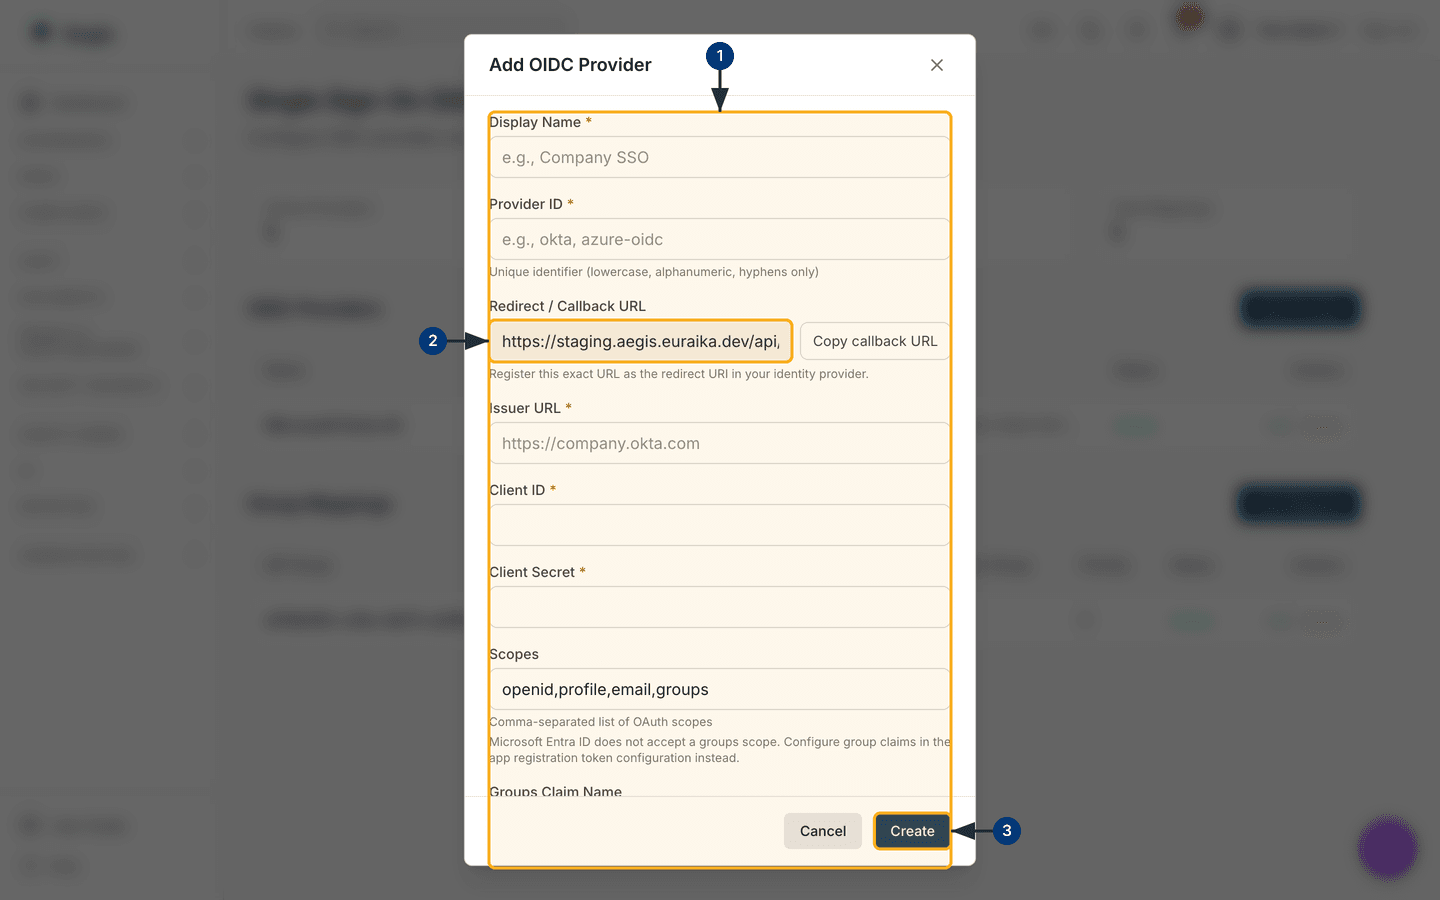
Add Provider opens a dialog with, in order,
Display Name, Provider ID (lowercase letters, numbers
and hyphens only), the read-only Redirect / Callback URL,
Issuer URL, Client ID, Client Secret,
Scopes (pre-filled with openid,profile,email,groups)
and Groups Claim Name. Required fields carry a red asterisk.
-
Fill in the form with the values from your identity provider's app
registration. Read the note under
Scopes: Microsoft Entra ID does not accept agroupsscope, so configure group claims in the app registration's token configuration instead. -
Select
Copy callback URLbeside theRedirect / Callback URLfield and register that exact URL as the redirect URI in your identity provider. Sign-in fails if the two differ by a single character. -
Select
Create. The dialog closes, the provider joins theOIDC Providerstable and theActive Providerscounter goes up.Cancel— or the × in the dialog header — discards the form instead.
A page can be hidden for three different reasons, and it is worth checking them in this order: your licence tier (some modules and frameworks are pay-to-unlock), then module enablement (your operator can switch whole modules off for the tenant), then your role. A Viewer on the highest tier with every module enabled still cannot create a policy — that is the role gate, not the licence.
Tips and limits
-
The four roles are fixed. You cannot create custom roles.
The
Permission Groupstab adds named permissions on top of a person's role — the two sets are combined, so a group can only add, never take away. - Role changes are not retroactive. A downgrade applies from the next request; work already authored or approved stays valid and stays attributed to its author.
- Approval routing is configuration, not a hard separation of duties. An approval configuration can name designated approvers by role or by person, and can require more than one approver. Aegis does not by itself stop a Manager approving a policy they drafted, so if you need author and approver to be different people, set the approvers deliberately and check the approval history on the record.
- Deleting evidence is Admin-only. A Manager can delete policies, risks, vendors and incidents, but not evidence — that one sits with Admin.
-
Report export skips Contributor. A Viewer and a Manager can
export a report; a Contributor can create and edit reports but does not hold
report:export, so ask a Manager for the file. - Deactivated accounts still count in the user total. The usage figure Aegis reports counts every account, active or not. Under the 2026 licence catalogue no tier caps the number of users, so this affects the reported number rather than your access.
-
Email addresses are not self-service. There is no
change-email control on the
Userstab; contact Euraika support, who verify identity first.
Where this connects
For the complete per-role list of every action, see the action catalogue. To watch the roles work end to end, follow preparing for an external audit. The read-only surfaces above are covered in The dashboard and Policies; the administrative ones in Settings, Microsoft Entra ID sign-on and API keys. If a role gate surprises you, getting help explains how to reach support.