Settings
One tabbed screen holding your own account and theme, the organisation profile, users and roles, the integration directory, the system-wide switches, frameworks and a health panel.
Settings is where Aegis is configured. You come here for your own profile and theme, but it is also the door to what shapes the whole tenant (your organisation's private Aegis instance): who may sign in, what is connected, which frameworks are tracked. Most of that is reserved for administrators, so the tabs you see depend on your role.
Who uses it
Everyone can open /settings, but almost every tab beyond the first
is gated.
-
Admin sees all nine tabs —
Account,Organization,Users,Roles,Permission Groups,Integrations,System,FrameworksandDiagnostics— and can change what is on them. -
Manager holding the
department-settings permission also sees
Organizationand can edit the profile there; the risk-severity editor further down that tab stays administrator-only. -
Contributor and
Viewer normally see only
Account. The other tabs read from an administrator-only API, so their buttons are hidden rather than opening an empty panel.
The active tab is mirrored into the address as ?tab=users, so a
bookmark reopens it. A link naming a tab your role cannot see falls back to
Account rather than a blank panel.
What's on this screen
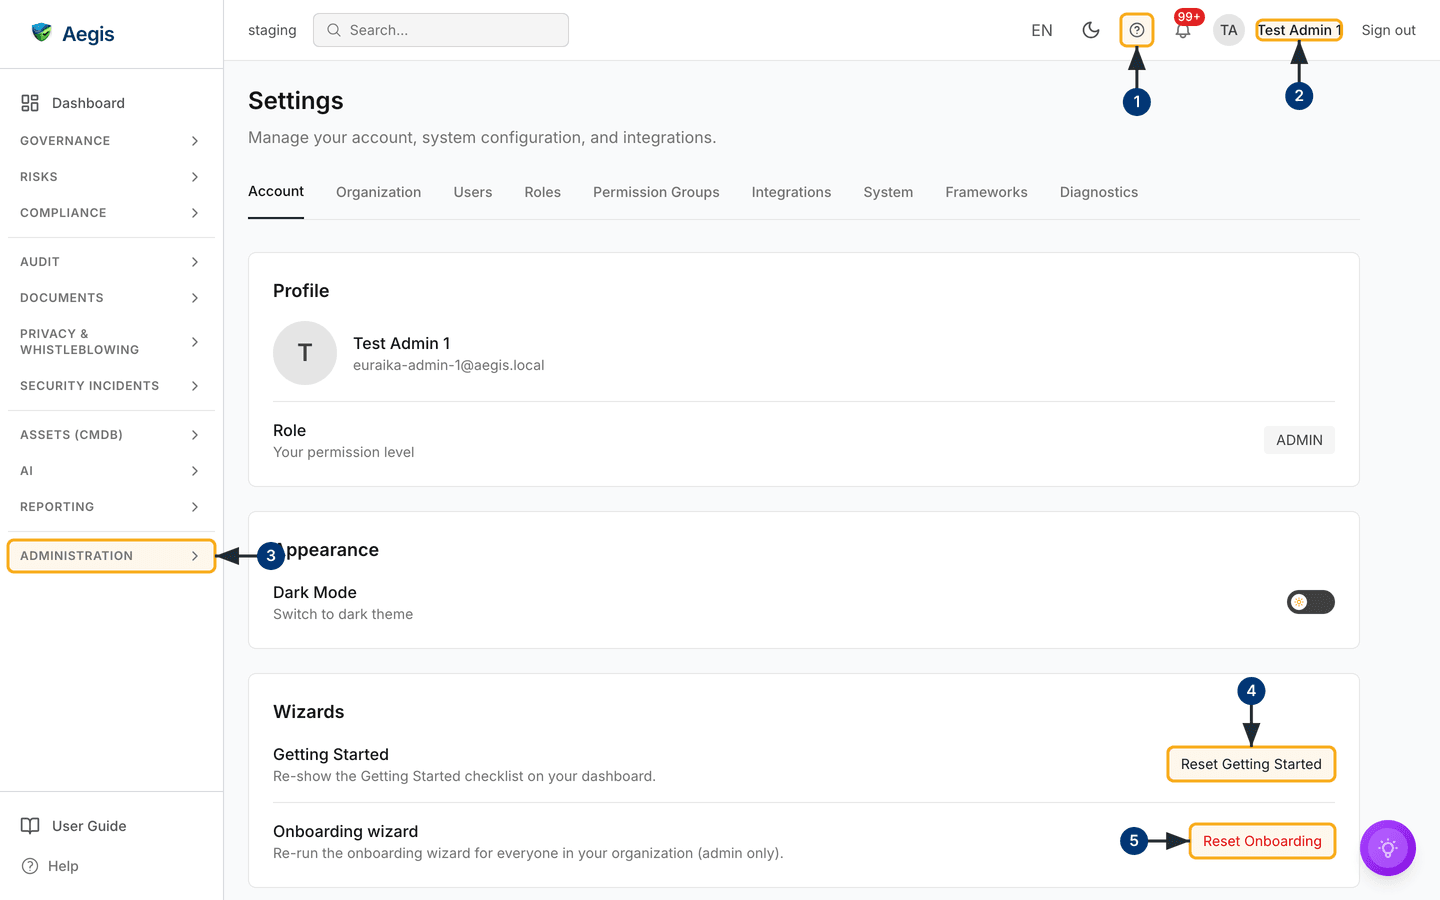
The page opens with the heading Settings and the line "Manage your
account, system configuration, and integrations." Under it runs the tab strip,
with Account
selected and underlined. A save anywhere on this page drops a green "Settings
saved successfully." message above the tabs; errors and rate-limiting appear in
the same place.
The Account tab stacks four cards. Profile shows an
avatar built from the first letter of your name, your name and email address,
and a Role row labelled "Your permission level" with your role as a
grey badge at the right — ADMIN in the capture. Nothing on this
card is editable. Appearance holds a single row,
Dark Mode / "Switch to dark theme", with a toggle at the far right.
Wizards holds the two reset controls covered below.
Quick Links sits under the fold of the capture, with shortcuts to
Configure Connectors and View Compliance.
Around the page is the usual Aegis frame: a top bar with the environment label,
search, language code, a moon for dark mode, a help "?", a notification bell and
your name with
Sign out; and a left sidebar of eleven collapsed groups,
Governance down to Administration.
Get your bearings, and reset the wizards
- Select the help "?" in the top bar. The built-in User Guide opens at the chapter for the screen you are on.
-
Your name sits at the right of the top bar with
Sign outbeside it; theProfilecard repeats it and adds your role. -
Select
Administrationat the foot of the left sidebar. The group expands to show the administration pages, Settings among them — that is how you get back here. -
In the
Wizardscard, selectReset Getting Started. The button reads "Resetting…", then a message confirms the checklist will re-appear on your dashboard. This affects only you. -
Select the red-outlined
Reset Onboarding— administrators only. A dialog headed "Reset onboarding for all users?" warns that everyone sees the wizard again at their next sign-in. Confirm, and a message reports it is done.
Switch the theme, and jump to a linked screen
-
On the
Appearancecard, select theDark Modetoggle. The dark theme applies at once and the row relabels itselfLight Mode/ "Switch to light theme", so the same toggle takes you back. -
Scroll to
Quick Linksand selectConfigure ConnectorsorView Complianceto leave Settings for those screens.
Set the organisation profile
The Organization tab records the jurisdiction and the
data-protection contact Aegis uses for regulatory reporting.
-
Select
Organization. Two cards load with your stored values:Jurisdiction & NIS2 ClassificationandData Protection Officer. -
Choose your
EU Member StateandNIS2 Entity Type; both start atNot set. Where Aegis knows the matching regulator, a read-onlySupervisory Authoritypanel appears under the two fields after saving. -
Fill in
DPO NameandDPO Email— the contact used for GDPR and NIS2 notifications — then selectSave Organization Settings. The green confirmation appears at the top. -
Administrators also see a
Risk Severity Levelscard below. Pick aSeverity Preset—Default (5 levels)orISO 27005 (4 levels)— or switch toCustomand set each level'sKey,Label,Min ScoreandColor, with aPreviewgrid showing how scores will be shaded. Saving is refused, with the reasons listed, unless there are between two and ten levels, every key is unique, and the lowest level starts at aMin Scoreof 1 so no score is left uncovered.
Manage users, roles and permission groups
Three administrator-only tabs carry access control.
-
Open
Users. A table lists everyone underUser,Role,Status,Last Login,CreatedandActions, with a search box,RoleandStatusfilters and anInvite Userbutton above it. The row actions change someone's role, reset their password and deactivate or reactivate the account; invitations not yet accepted sit in their own table underneath. -
Open
Roles. This tab only reports: a card per built-in role with the number of users holding it, then aPermission Matrixof what each may do. A notice states that the built-in roles have fixed permission sets and cannot be edited here. -
Open
Permission Groupsfor finer-grained access than a role gives. SelectCreate Group, name it and choose the permissions it carries; the table then listsName,Description,Permissions,MembersandView,EditandDeleteactions. Mapping groups from your identity provider onto Aegis roles is a different screen — see Single sign-on with Microsoft Entra ID.
Open an integration
The Integrations tab is a directory of link cards in two groups.
-
Under
External Integrations, openSingle Sign-On (SSO)to configure OIDC providers and group mappings, orWebhooksto push Aegis events to other tools. -
Under
Advanced Configuration, openControl Monitoring,Hybrid Appliances,MCP Servers,Peer Benchmarking,Meeting Rooms,Notification PreferencesorInstall tool. Each opens its own page; the back button returns you here. An extraAI Modelscard joins this group when model management is switched on.
Configure the system
The System tab carries the tenant-wide switches, all
administrator-only.
-
Use the
Enable AI Assistancetoggle in theAI Featurescard to turn the AI helpers on or off across the product. It saves as soon as you select it, and the AI controls in the other modules stop offering suggestions. -
Use the
AI Modelscard below it — "Configure AI models available in the chat interface" — toAdd Model, or to edit, disable or delete an existing one. A dot at the left of each row shows whether it is enabled, and the model in use by default carries aDefaultbadge. -
Read the
Licensecard forType,Max UsersandMax Storage, plus anExpiresrow when your licence has an end date; uncapped values readUnlimited, andManage license & usageopens the licence page. -
Under
Session Duration, choose aSession Lifetime— 1, 3, 7, 14, 30, 60 or 90 days. ASavebutton appears beside the list once the value differs from the stored one. -
If your tenant is licensed for regulatory intelligence, switch on
Enable regulatory digestand enter aDigest email recipient. An invalid address is refused inline before anything is saved; clearing the field removes the recipient. Teams and Slack delivery follows your connector webhooks. -
Use
Regulatory Feed Sourcesto add, edit, enable or disable the feeds the digest draws on, andSupport Contactto set where people are sent for help; itsPreviewbutton shows them what they will see.
Saving Session Lifetime stores the value, but the hint under
the field says the change applies after the next application restart. Plan
it with whoever operates your Aegis instance.
Turn frameworks on and off
-
Open
Frameworks. TheCompliance Frameworkscard lists each framework your tenant holds, with its key, control count and a read-only maturity-scale summary. - Use the toggle at the right of a row to enable or disable it. Disabled frameworks drop out of the tracking views; enabling one brings its controls back into scope.
-
If the card reads
No frameworks available, none is provisioned for your tenant yet. Frameworks are licensed one at a time, so ask your provider.
The list shows what your tenant is entitled to. SOC 2 is on the roadmap, not shipped, so it does not appear here.
Check system health
-
Open
Diagnostics. Two cards report whether theDatabaseisConnectedand whether theBackground Workeris running, with its queue depth; a coloured dot repeats what the text says. -
Read the
Usagecard forUsersandStorageagainst your licence limits. AnUnlimitedlimit shows the numbers without a bar; the storage bar turns amber past 70% and red past 90%. -
Read
License Statusfor your licence type and expiry date, orNo expiration.
The AI assist
Settings is where AI is switched on, not where it acts. Aegis AI only suggests: a person reviews and decides, and it never changes a setting on its own.
Tips and limits
-
You cannot change your own role here; that is an administrator action on the
Userstab. -
Reset Getting Startedaffects only you;Reset Onboardingaffects everyone. -
An amber "temporarily unavailable because of too many requests" banner is
short-lived rate-limiting — a second browser tab loading this page will
cause it. Select
Retry. - The regulatory digest section stays hidden unless your tenant is licensed for regulatory intelligence. Changes made here are written to the audit log, so it answers "who changed this?".
Where this connects
-
Roles at a glance — the full matrix behind
the
Users,RolesandPermission Groupstabs. - Signing in and Single sign-on with Microsoft Entra ID — what the session and SSO settings govern.
-
First-time setup — the wizard that
Reset Onboardingbrings back. -
Connectors,
Webhooks,
Control monitoring and
Benchmarking — all reached from
Integrations. -
Compliance frameworks and
Risks — fed by the
Frameworkstoggles and the severity levels. - Regulatory alerts — what the digest summarises — and Audit log, where these changes are recorded.