Auto-Incident Rules
Build rules that open an incident on their own when a connector event matches conditions you have set — so a known signal becomes a tracked incident without anyone watching a feed.
An auto-incident rule (a saved set of match conditions plus a template for the incident it should raise) sits between your connectors and the Incidents module. When a connector delivers an event — a cloud-security detection, an endpoint alert, a webhook (a message one system pushes to another) — Aegis checks it against every enabled rule, and a match creates an incident from the title, severity, category and tags you chose. This page is where you create, edit, test, enable, disable and delete those rules.
Rules are tenant-level configuration, so the page sits behind the settings permission — and because a broad rule can open many incidents quickly, each rule carries its own deduplication, rate-limit and cooldown controls.
Who uses it
-
Admin Full access — view the
list, create and edit rules, run the dry-run test, toggle rules on or off,
and delete them. The route checks
settings:update, the same permission the underlying API enforces. -
Manager
Contributor
Viewer No access. The link is
absent from the left menu, and opening
/incidents/auto-rulesdirectly sends you back to the Incidents list rather than showing an error. These roles still work the incidents rules create — they cannot change the rules.
The page belongs to the Incidents module. If that module is not provisioned for your organisation the menu entry is hidden, and the rules list stays empty even if you type the address in. Settings shows which modules you have.
What's on this screen
The page is headed Auto-Incident Rules, with the line
"Automatically create incidents from connector events using condition-based
rules." beneath it. On the right sits Create Rule, the only way to
start a new rule. Below that is a single-row filter bar: a
Search rules... box with a Search button, and an
All Statuses dropdown that narrows the list to
Enabled or Disabled rules.
Everything below is the rules table. Once rules exist it shows
Rule Name and Trigger Type as plain text,
Incident Severity and Status as coloured pills, then
Actions with a per-row Enable/Disable
link and a red Delete link. Clicking elsewhere on a row opens it
for editing; the list pages at twenty rows.
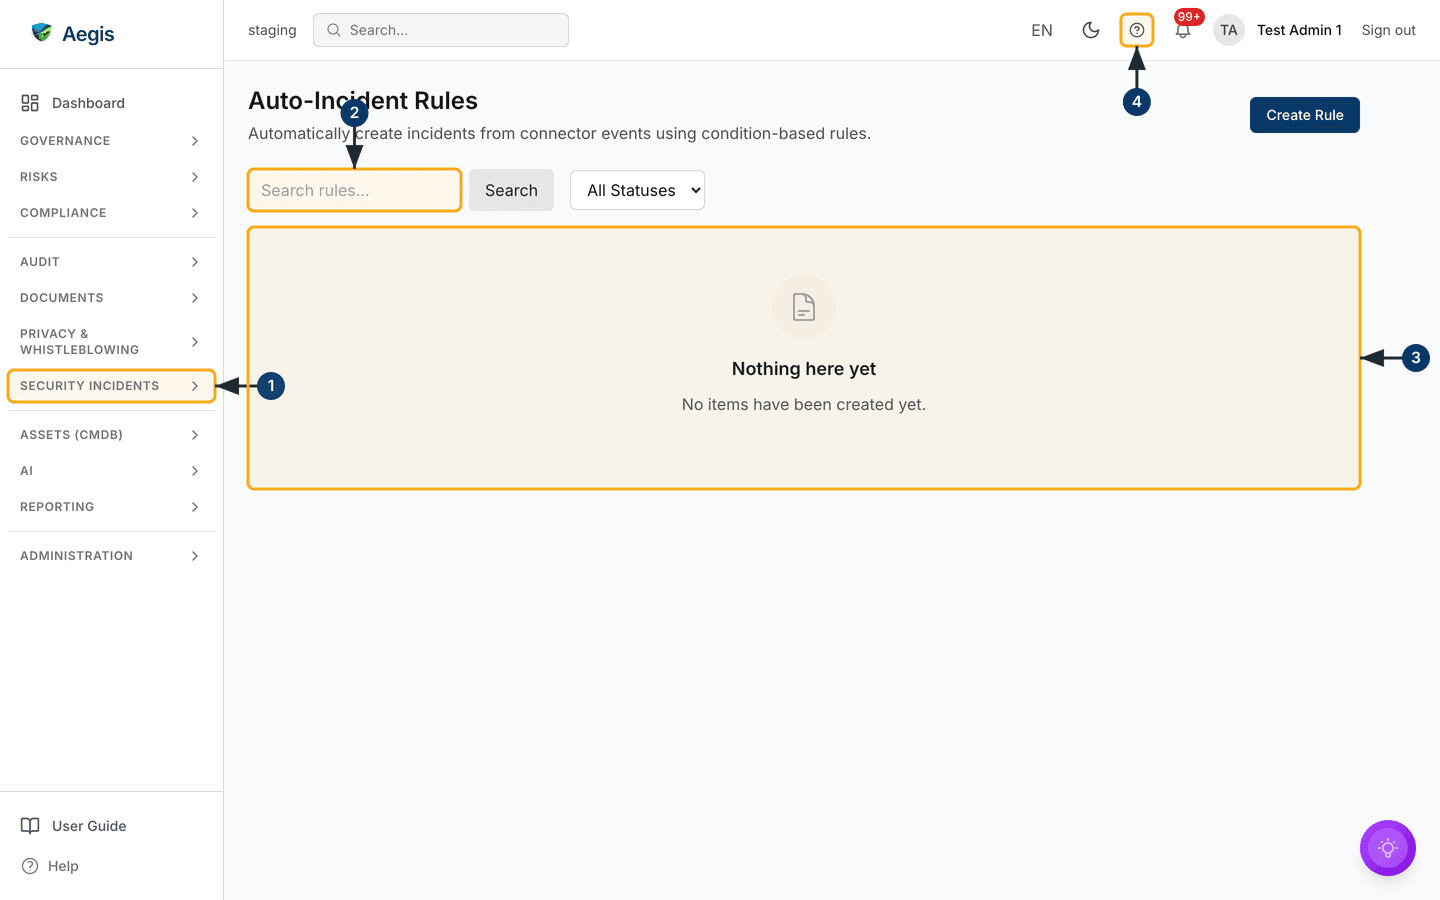
In the captured screenshot the tenant has no rules yet, so the table area shows the empty state: a document icon above "Nothing here yet" and "No items have been created yet".
-
Open
SECURITY INCIDENTSin the left menu and chooseAuto-Incident Rules. The group expands to showIncidents,ReportingandAuto-Incident Rules; the last is admin-only. -
Type into the
Search rules...box to narrow the list by rule name, then selectSearch; pair it with theAll Statusesdropdown to show only enabled or only disabled rules. With no rules yet, both return nothing. -
The centre panel holds the rules table. Here it shows the empty state —
"Nothing here yet" — so no rule exists. Choose
Create Rulein the top right to add one; the table replaces the empty state as soon as a rule is saved. -
The
?button in the top bar opens the in-app help for a reminder of how conditions or dedupe windows work while you build a rule.
Create a rule
Selecting Create Rule opens the
Create Auto-Incident Rule dialog — a long, scrolling form in four
parts: what the rule is, what it matches, what incident it produces, and how
much noise it may make. Rule Name and
Incident Title Template are required; miss either and a red message
appears at the top while Aegis scrolls that field into view.
-
Enter a
Rule Nameyou will recognise in the list — the placeholder suggests "e.g. Critical CrowdStrike Alerts". -
Choose a
Trigger Type—Connector Event,AI Analysis,Threshold Breach,Webhook,ScheduleorManual.Connector Eventis the default and the only type the connector pipeline evaluates — the others are stored on the rule but reached only through the API, so a rule set to one of them will not fire from a connector. -
Add an optional
Description, and a comma-separatedSource Typeslist such ascrowdstrike, aws-guarddutyto limit the rule to those sources. Left empty, it accepts any source. -
Build the match in the
Conditionspanel (next section). Left empty, the rule matches every event that reaches it — rarely what you want. -
Fill in the incident template.
Incident Title Templateaccepts placeholders in double braces, so{{data.title}} - {{data.hostname}}yields "Malware detected - srv-web-01" from the event itself. SetIncident Severity(Mediumby default), and optionallyIncident CategoryandIncident Tags. -
Set the noise controls: tick
Deduplicate matching events(unticked on a new rule) with aDedupe Window (seconds), cap the rule withMax Incidents / Hour, pause it withCooldown (minutes), and order evaluation withPriority— lower numbers run first, and a blank box stores 50, the middle of the 0–100 range it accepts. -
Leave
Rule enabledticked to start it straight away, or clear it to save the rule dormant. SelectCreate Ruleat the foot of the dialog: it closes and the new rule appears in the table.
A rule with no conditions, no source types and no dedupe window acts on
everything that reaches it. Start tight — one or two conditions, a dedupe
window, a sensible
Max Incidents / Hour — then loosen it once you have watched it
work.
Build the conditions
The Conditions panel is a visual builder, not a text box. It opens
as one blue AND group labelled "All must match" holding a single
empty row; switch the group dropdown to OR and it turns orange and
reads "Any can match". Reset
beside the panel heading clears the tree back to one empty group, and the line
beneath it repeats the warning: leave it empty and every event matches.
-
Click the field box in a row. A suggestion list drops down with common event
paths —
severity,data.hostname,data.title,sourceType— each described. Pick one, or type your own dotted path. -
Choose the operator:
equals,contains,greater than,in list,matches regex,is emptyand the rest. The value box adapts —in listtakes a comma-separated list,is emptyhides it. -
Enter the value, then use
Add Conditionfor another row in the same group, orAdd AND Group/Add OR Groupto nest a sub-group — that is how you express "this and that, or the other thing". The smallNOTbutton inverts a row, and×removes it.
Edit a rule and test it
Clicking a row opens the same dialog headed
Edit Auto-Incident Rule, pre-filled and with one panel create mode
lacks: Test Rule. It evaluates the saved rule against a sample
event and reports what would have happened, creating nothing.
- Click the rule's row. The dialog opens with every field populated; change what you need.
-
Scroll to
Test Ruleat the foot of the form. The box starts with a worked sample event in JSON — a severity, a hostname and a title. Edit it to resemble a real one. -
Select
Run Test. A green box reports "Matched — an incident would be created." with anIncident previewline showing the title the rule would produce, or a grey box reports "No match — no incident would be created." The test runs against the last saved version of the rule, not unsaved edits on screen, and invalid JSON is rejected before anything is sent. -
Select
Save Changesto keep your edits, orCancelto discard them. The test result is never saved — it is a dry run only.
Enable, disable or delete a rule
-
Select
Disableon a live rule, orEnableon a dormant one. TheStatuspill flips and a confirmation appears — "Rule disabled" or "Rule enabled". A disabled rule stops matching but keeps every setting. -
Select
Deleteto remove a rule. A dialog headedDelete Rulenames it — "Delete the rule ...? This cannot be undone." — and waits. - Confirm to delete, or close the dialog to keep the rule. Incidents it already created stay in the Incidents list.
How a rule actually fires
Aegis hands a delivered connector event to a background job rather than evaluating rules on the request itself, so a busy source cannot slow the receiver down. The job checks the event against your enabled rules in priority order — lowest number first — and a matching rule can still be held back by its own controls.
| Control | Holds the incident back when… |
|---|---|
Deduplicate matching events |
the same source event already opened one inside the dedupe window. |
Max Incidents / Hour |
the rule has already opened that many in the past hour. |
Cooldown (minutes) |
the rule is still waiting after the incident it last created. |
Tips and limits
-
The test is a genuine dry run — it reports the match and previews the title,
but never opens an incident. It appears only once a rule is saved, so create
first, then reopen to test. It weighs the conditions alone: a "Matched"
result is not a promise of an incident, because dedupe,
Max Incidents / HourandCooldown (minutes)are not applied to a test. -
Source TypesandIncident Tagsare comma-separated lists, and the numeric boxes take whole numbers. LeavingDedupe Window,Max Incidents / HourorCooldown (minutes)empty means no limit rather than zero. The table shows the stored code for trigger type and severity —CONNECTOR_EVENT,CRITICAL— while the dialog dropdowns show the readable label. -
If a rule never fires, work backwards: check it is
Enabled, that itsSource Typesmatch what the connector sends, and that the connector is delivering at all. Then test it with a real event. - This page manages rules, not incidents. What a rule creates is triaged and closed in Incidents; rule changes and test runs are recorded in the Audit Log.
Where this connects
- Incidents — where the incidents these rules open are tracked, assessed and closed.
- Connectors — the sources whose events the rules match against.
- Workflows — automating what happens once an incident exists.
- Incident Reporting — regulator deadlines for qualifying incidents.