Document Template
A single Admin settings screen where you set the branding — name, logo, accent colour, header, footer, cover page and an optional body skeleton — that Aegis applies to the documents it generates and exports.
When Aegis produces a document for you — the Word export of a policy, or a
vendor or portfolio report as a PDF — it does not invent a look each time. It
applies one shared
template (a reusable set of branding and
layout settings). This screen is where you set that template once, so exported
documents carry your organisation's name, logo and colours instead of a plain
default. It is a small settings page: there is no list, no table and no records
to manage — one form, three cards, and a Save Changes button.
Who uses it
Only one role can open this screen.
-
Admin can open, edit and save
the template. The
Document Templatelink is shown in the left rail only to an Admin, and the page itself callsrequireAdmin()on the server. -
Manager,
Contributor and
Viewer cannot open it. If one
of them reaches the URL directly they are redirected to
/unauthorized. They still see the result of your work — the branding you set here appears on the documents they export from other screens.
What's on this screen
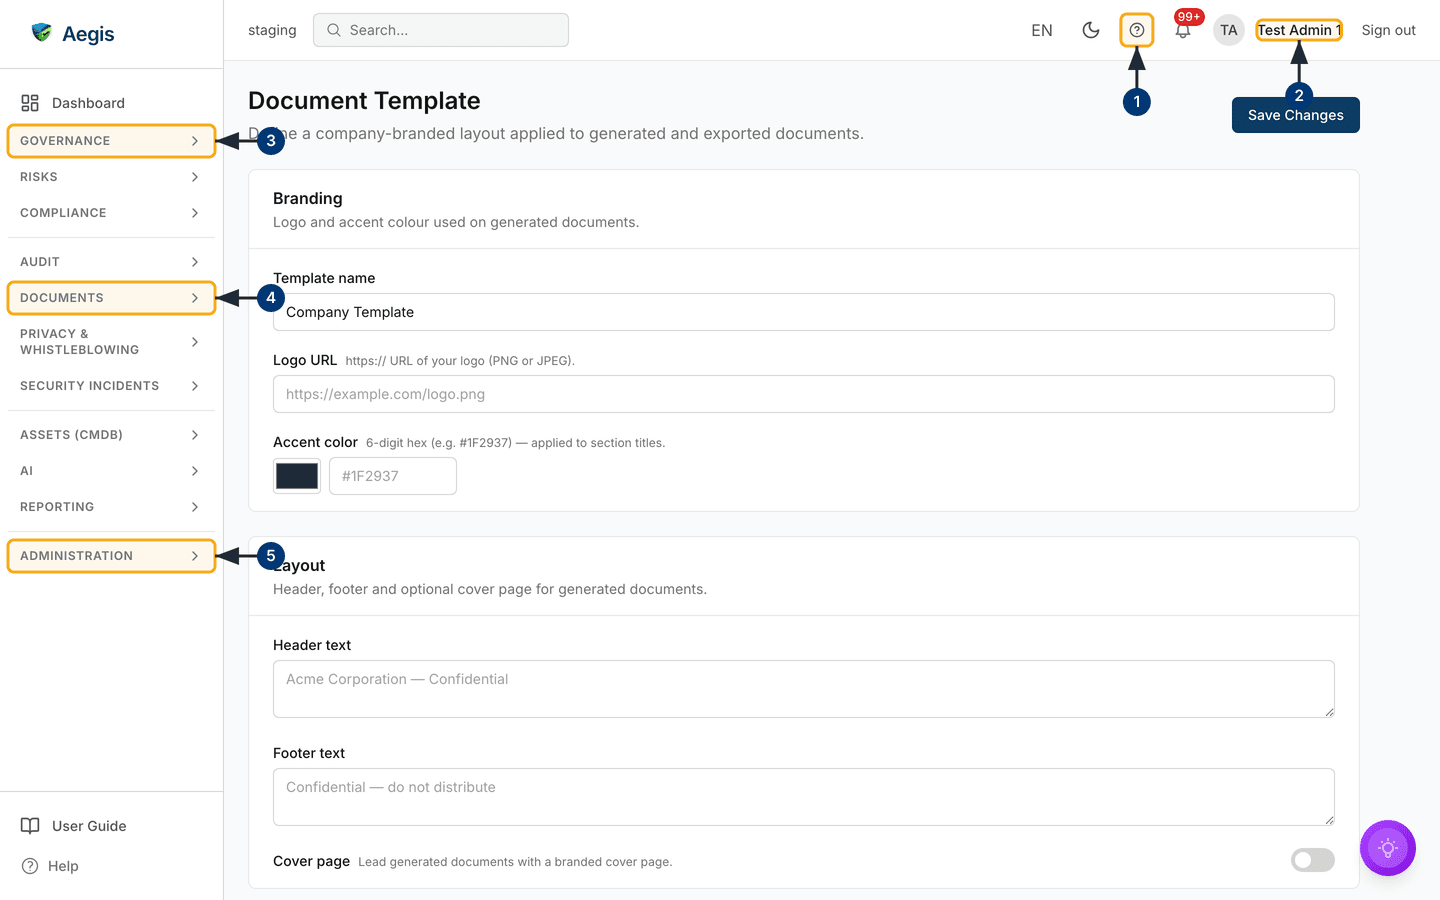
The page sits at /settings/document-template. Its header carries
the title Document Template and the line "Define a company-branded
layout applied to generated and exported documents", with a single primary
action on the far right: Save Changes. Below the header the form is
stacked as three bordered cards, each with its own heading and a one-line
explanation:
-
Branding — "Logo and accent colour used on generated
documents". It holds
Template name(seeded here with "Company Template"),Logo URL, andAccent color: a colour swatch beside a narrow text box for a 6-digit hex value. -
Layout — "Header, footer and optional cover page for
generated documents". It holds a two-line
Header textbox, a two-lineFooter textbox, and aCover pageswitch on the right-hand edge of its row. -
Default document body — "An optional Markdown or plaintext
skeleton pre-filled into the body of new policies and procedures. Authors
can edit or clear it freely." It holds a
Load from .md or .txt filebutton above a tall, full-width text area. This third card sits below the fold in the capture below; scroll down to reach it.
In the capture the fields are mostly empty: the header and footer boxes show
grey placeholder examples rather than saved text, the logo box shows
https://example.com/logo.png as a placeholder, the hex box is blank
behind a #1F2937 placeholder, and Cover page is
switched off. That is the starting state of an unconfigured template — nothing
has been saved yet.
Around the form is the usual Aegis frame: the left navigation rail with its groups, and the top bar with search, language, dark mode, help, notifications and your account. The numbered steps below trace the route to this screen on that frame, and match the callouts on the figure.
-
Select the Help button (
?) in the top bar. The in-app user guide opens at the chapter for the screen you are on — this document. -
Your account name sits at the top right, next to
Sign out. Check it reads as an Admin account; if it does not, the Document Template link will not be in the rail. -
Governanceheads the left rail, under theDashboardlink. The eleven groups run from here down the rail; select a heading to expand it. -
Documents, further down, expands to the read-and-collaborate surfaces —Compliance DocumentsandCollaboration. That is where published documents are read; it is not where this template is configured. -
Administration, the last group in the rail, holds the tenant settings. Expand it and selectDocument Templateto open this screen.
Set the branding
Work down the Branding card at the top of the form.
-
In
Template name, type a label for the template — for example "Company Template". This is an internal name of up to 200 characters; it identifies the template and is not printed on the page. If you clear it, saving restores "Company Template". -
In
Logo URL, paste anhttps://link to your logo as a PNG or JPEG. Aegis stores the address, not the picture, so the link has to stay reachable for the logo to keep appearing. -
Set
Accent coloreither by selecting the swatch and picking a colour, or by typing a 6-digit hex value such as#1F2937into the box beside it. The two controls are tied together — changing one updates the other. The accent is applied to section titles in generated documents.
There is no file picker for the logo, and no image is stored in Aegis. If the address is private, expires, or the image is later moved, the logo stops appearing in exports. Use a stable, publicly reachable image address.
Set the page layout
The Layout card controls what runs along the edges of each generated page. Both text boxes accept up to 2,000 characters.
-
In
Header text, type the line for the top of every page — the placeholder suggests "Acme Corporation — Confidential". Leave it empty for no header. -
In
Footer text, type the line for the bottom of every page — the placeholder suggests "Confidential — do not distribute". -
Select the
Cover pageswitch at the right of its row to turn it on. The switch turns blue and generated documents open with a branded cover page. Left off, as it is in the capture, documents start straight at the content.
Add an optional body skeleton
The Default document body card pre-fills the body of new policies and procedures with a starting structure. It is optional — leave it empty and authors start from a blank body.
-
Type the skeleton straight into the text area. The placeholder shows the
shape that works well:
## Purpose,## Scope,## Responsibilities,## Procedure. Markdown and plain text are both accepted, up to 50,000 characters. -
Or select
Load from .md or .txt fileto read a file from your computer into the text area. The file is read in the browser and never uploaded; anything longer than the 50,000-character limit is cut off at that point. -
Only
.md,.markdownand.txtfiles that the browser reports as plain text are accepted. If you pick anything else the text area is left untouched and a red line appears under the button: "Could not read that file. Please choose a .md or .txt file." - Edit the loaded text freely before saving. Authors can also edit or clear the skeleton when they write a policy or procedure — it is a starting point, not a fixed wrapper.
Save your changes
Nothing is stored until you save. Every field on the form is saved by the one button.
-
Select
Save Changesat the top right. While the save runs the button readsSaving...and cannot be selected again. - On success a confirmation appears reading "Document template saved", and the form redraws with the values as they were stored. Fields you left blank are stored as empty rather than as the placeholder text you can see.
-
If a value is rejected — an accent colour that is not a 6-digit hex code, or
a logo address that is not a valid
https://address — an error message appears and a red line is added beneath the offending field in the Branding card. Correct it and save again.
If the screen will not load
The form is fetched when the page opens. While it loads you see the title and
three grey placeholder blocks. If the fetch fails, the form is replaced by a red
panel reading "Failed to load the document template" with a
Retry button; selecting it fetches the template again. Nothing is
lost — the stored template is untouched by a failed load.
Tips and limits
- The line at the foot of the form names the policy Word export and the vendor and portfolio PDF reports. The branding is in fact picked up by more exports than that line lists — among them procedure and management-review documents, board report PDFs, and the compliance, analytics and GDPR record exports. It does not restyle the on-screen interface, and it does not reach every document Aegis produces.
- There is one template per organisation. Saving overwrites the previous values; this screen keeps no version history and has no preview, so export one document after a change to check the result.
- The 50,000-character cap on the body skeleton mirrors the limit on a policy or procedure body, so a template can never be longer than a body field will accept.
- Changing the template does not rewrite documents that were exported earlier. Only documents generated after the save carry the new branding.
Where this connects
- Policies — the Word export picks up this branding, and new policy bodies start from the skeleton you set here.
- Procedures — procedure bodies use the same skeleton.
- Vendors — vendor and portfolio PDF reports are branded from this template.
-
Settings — the other tenant settings in the
Administrationgroup. - Roles overview — why only an Admin can open this screen.
- The left menu — the navigation rail the steps above trace.