Vendors
A register of every third party you rely on, with a risk rating and a review date for each, so your supply-chain due diligence is on record when an auditor asks.
Keep suppliers, cloud providers, contractors and service partners here, with the risk each one carries. Most frameworks expect it: ISO 27001 (an international information-security standard), NIS2 (a European cybersecurity law) and DORA (a European law for financial-sector operational resilience) all ask you to manage third-party risk (the risk that a supplier's failure or breach becomes yours).
This chapter is the screen-by-screen reference. To see the whole journey worked as a story — from "we want to use this supplier" to a rated, monitored vendor — see the full walkthrough in Scenario: onboard and risk-rate a vendor.
Who uses it
-
Viewer can search, filter and
open a vendor. In the
Actionscolumn a Viewer sees one view (eye) icon instead of three, but may tick rows and use the bulkExport— the report-export permission Viewer holds. -
Contributor can also add
and import vendors, run an AI investigation, send a questionnaire, archive a
vendor and change status in bulk — but not export, so no
Exportaction appears for that role. - Manager and Admin can do all of that, and delete vendors in bulk as well.
What's on this screen
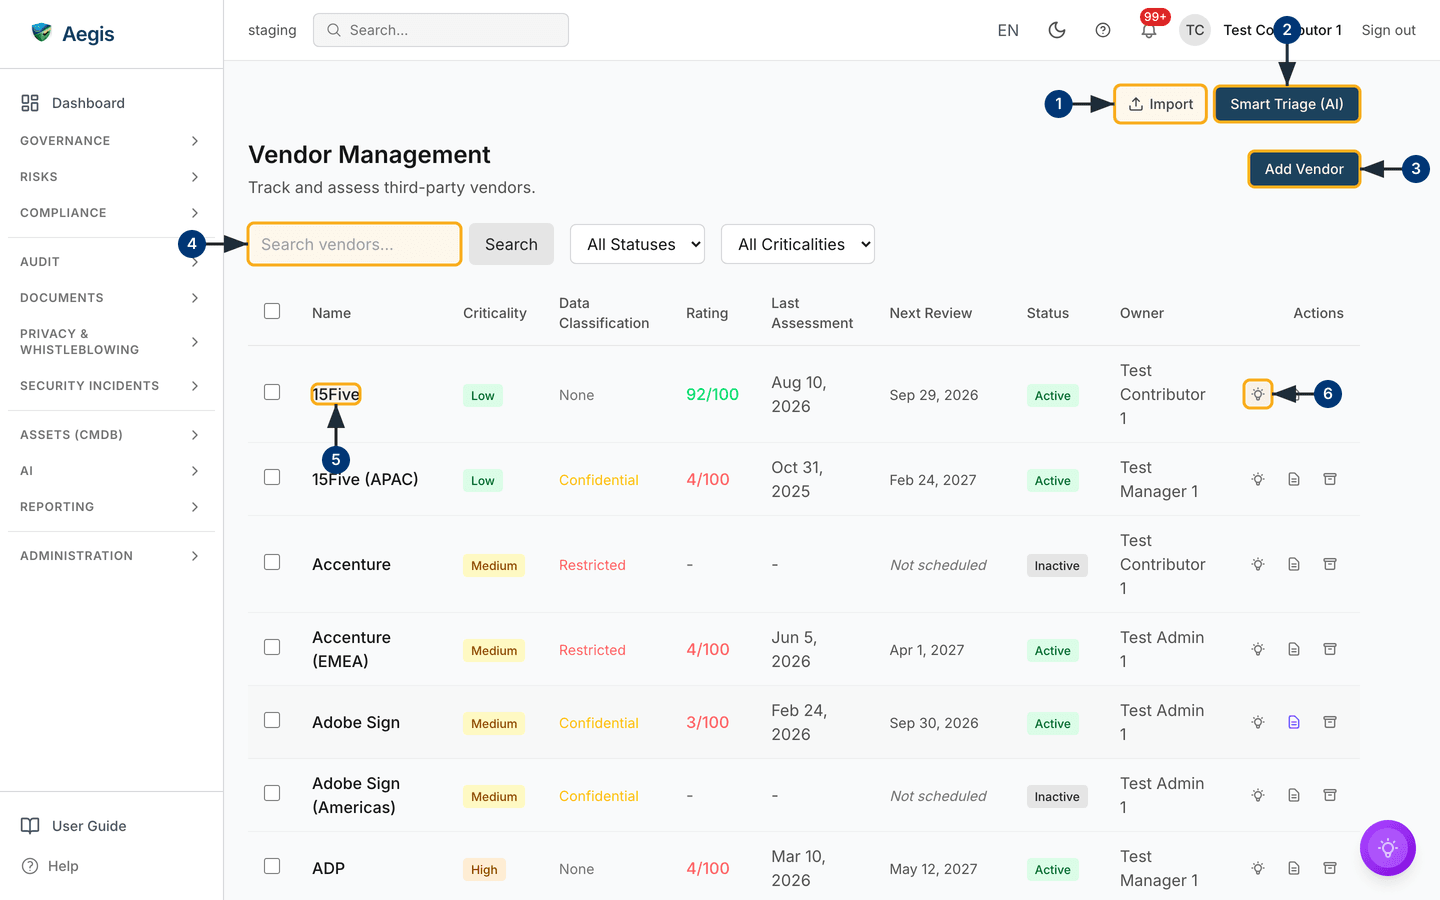
Open /vendors from the Risks group in the left
sidebar. Two buttons sit above everything else at the top right — the outlined
Import and the dark blue Smart Triage (AI) — then the
heading Vendor Management with the subtitle
Track and assess third-party vendors, and a dark blue
Add Vendor
button on the right.
Under the heading is the filter bar: a Search vendors… box with a
Search button beside it, an All Statuses dropdown and
an All Criticalities dropdown. Then the register table, with a tick
box in the header row and on each row for the bulk actions. Left to right the
columns are the select box, Name (a link that opens the vendor),
Criticality, Data Classification, Rating,
Last Assessment, Next Review, Status,
Owner and Actions. In a narrow window the table
scrolls sideways, with a soft shadow at the edge to show there is more.
In the capture, ratings run from 92/100 in green down to
3/100 in red, and vendors never assessed show a dash under
Rating and Not scheduled under Next Review.
If your register is empty, the table shows an empty state and you begin at step
3. A Portfolio Report card, a
Concentration Risk panel, saved AI briefings and the action
items raised from them sit below the table, off the bottom of the screenshot.
-
Select
Importto bring in a list from a spreadsheet. The Import vendors dialog opens. -
Select
Smart Triage (AI)to ask which vendors need reassessing first. A modal opens with aRun Smart Triagebutton. -
Select
Add Vendorto create one by hand. The Add New Vendor dialog opens over the register. -
Type a name into
Search vendors…and selectSearch. The table redraws with only the matching vendors; the two dropdowns narrow it further. -
Select a vendor's
Name. Its detail page opens at/vendors/{id}. -
Use the three icons in a row's
Actionscell to act without leaving the list: the lightbulb runs an AI investigation, the document icon sends a questionnaire, the box icon archives the vendor. Each opens its own dialog.
Adding a vendor
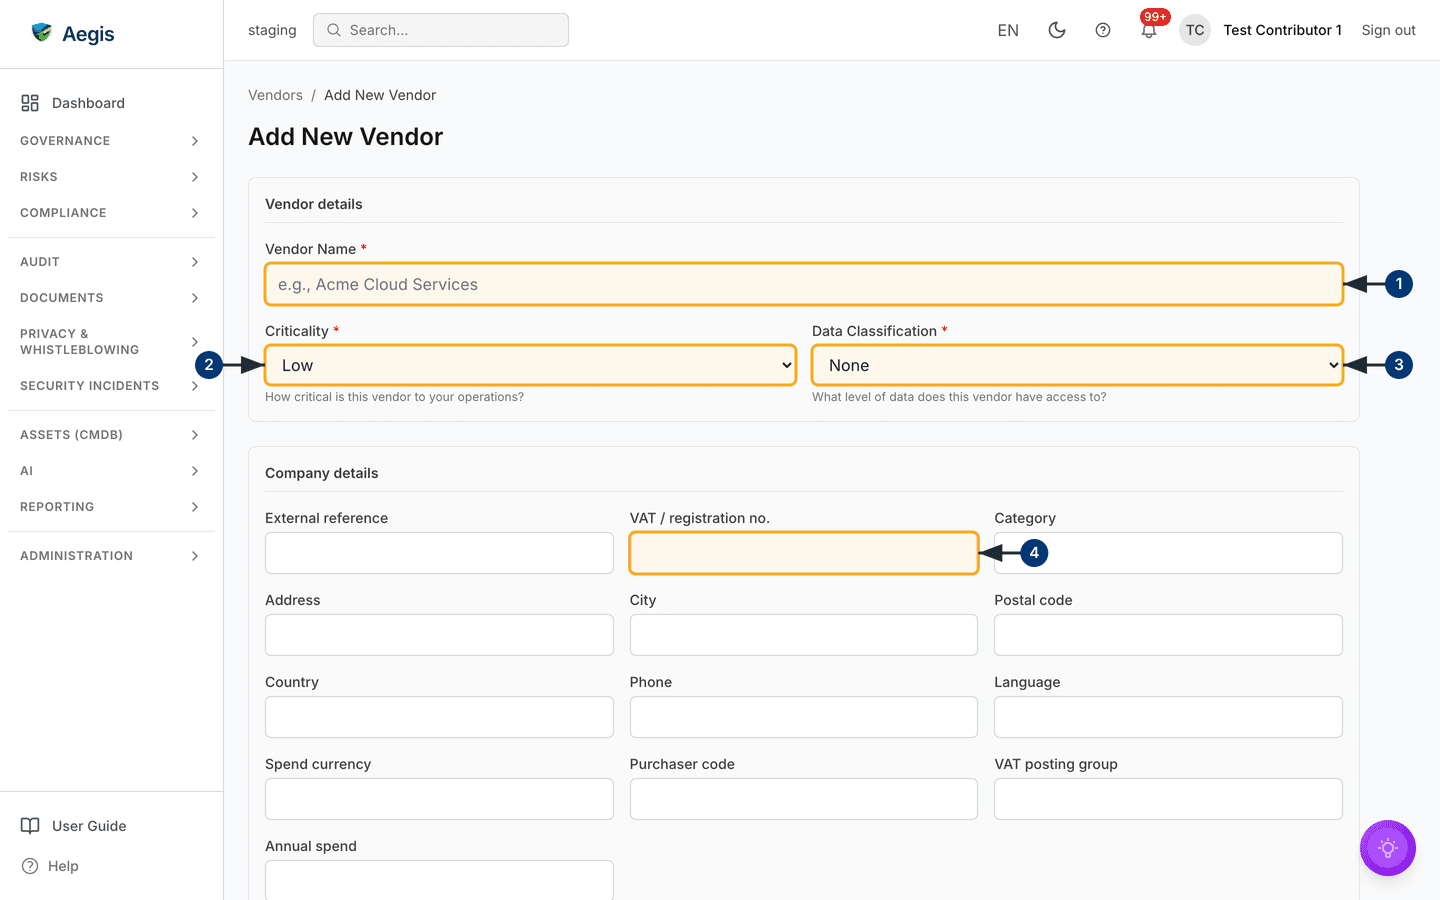
Three fields are required; the company details underneath are optional.
-
Enter the
Vendor Name. It is the only field that blocks you if left blank. -
Choose a
Criticality. It starts onLow; the list runsLow,Medium,High,Critical. -
Choose a
Data Classification. It starts onNone; the list runsNone,Internal,Confidential,Restricted. -
Enter the
VAT / registration no.if you have it: the financial screening searches on the registration number. Fill in the rest of Company details as you can —External reference,Category,Address,City,Postal code,Country,Phoneand more below the fold. -
Select
Add Vendorin the footer to save, orCancelto discard. On save the dialog closes and the register refreshes with the new vendor in it.
Criticality is how badly a failure would hurt you; Data Classification is what data the vendor can touch. Criticality also sets the default review interval and leads the Smart Triage ordering, so set it honestly.
Importing a list of vendors
-
Select
Import, thenDownload templatein the dialog. An.xlsxtemplate downloads with the columns Aegis expects. -
Fill it in, choose your file, and select
Validate. A summary appears — valid rows, error rows, and a line per bad row saying what is wrong. Nothing is written yet. -
Fix the errors, re-validate, then select
Import. Only clean rows are created, and a confirmation says how many vendors were added.
The importer never matches rows against vendors you already hold, and never updates them. Import the same spreadsheet twice and you get two copies of every row.
Working a vendor from its detail page
Under the breadcrumb sit the vendor name, its status chip, the date it was last updated and a row of action buttons. Then the financial screening card, a Compliance Rollup and Supply Chain Graph side by side, and the Managed Relationships list. Below the fold: the current rating, assessment history, linked evidence and risks, services, security standards, data flows, and side panels of details and dates.
-
Select
AI Analysisto score the vendor from the record Aegis already holds. The button shows Analyzing… while it runs, with a note that it can take a few minutes. -
Select
Schedule reviewto set when this vendor comes round again. A dialog asks for aReview interval (days); leave it empty and the interval follows the criticality. OnSchedulethe date is set that many days out and appears in the register'sNext Reviewcolumn. -
Select
Raise non-conformityon the right for something that has gone wrong with this supplier, rather than a risk you are still watching. -
Read the AI Analysis panel beneath the buttons — in the
capture, badges for
Score 70/100,Medium risk,Suggested: 3andMedium confidence, with55%beside the last. Its sections open to show the security findings, compliance gaps, data-handling risks, DPA analysis and recommendations behind that score. None of it is applied until you act. - Check Financial & KYC Screening for the credit rating and sanctions/PEP (politically exposed person) results. It needs the GraydonCreditsafe integration switched on; until then it reads Creditsafe integration is not configured — contact your operator, as in the capture.
-
Read Compliance Rollup for the picture across this vendor's
supply chain — an
Overall Riskbadge and counts ofDependencies,Critical DependenciesandHigh Risk Dependencies— with the Supply Chain Graph beside it drawing the same thing. In the capture no dependency has been recorded, so the badge readsLow, all three counts are0, and the graph holds the single vendor node.
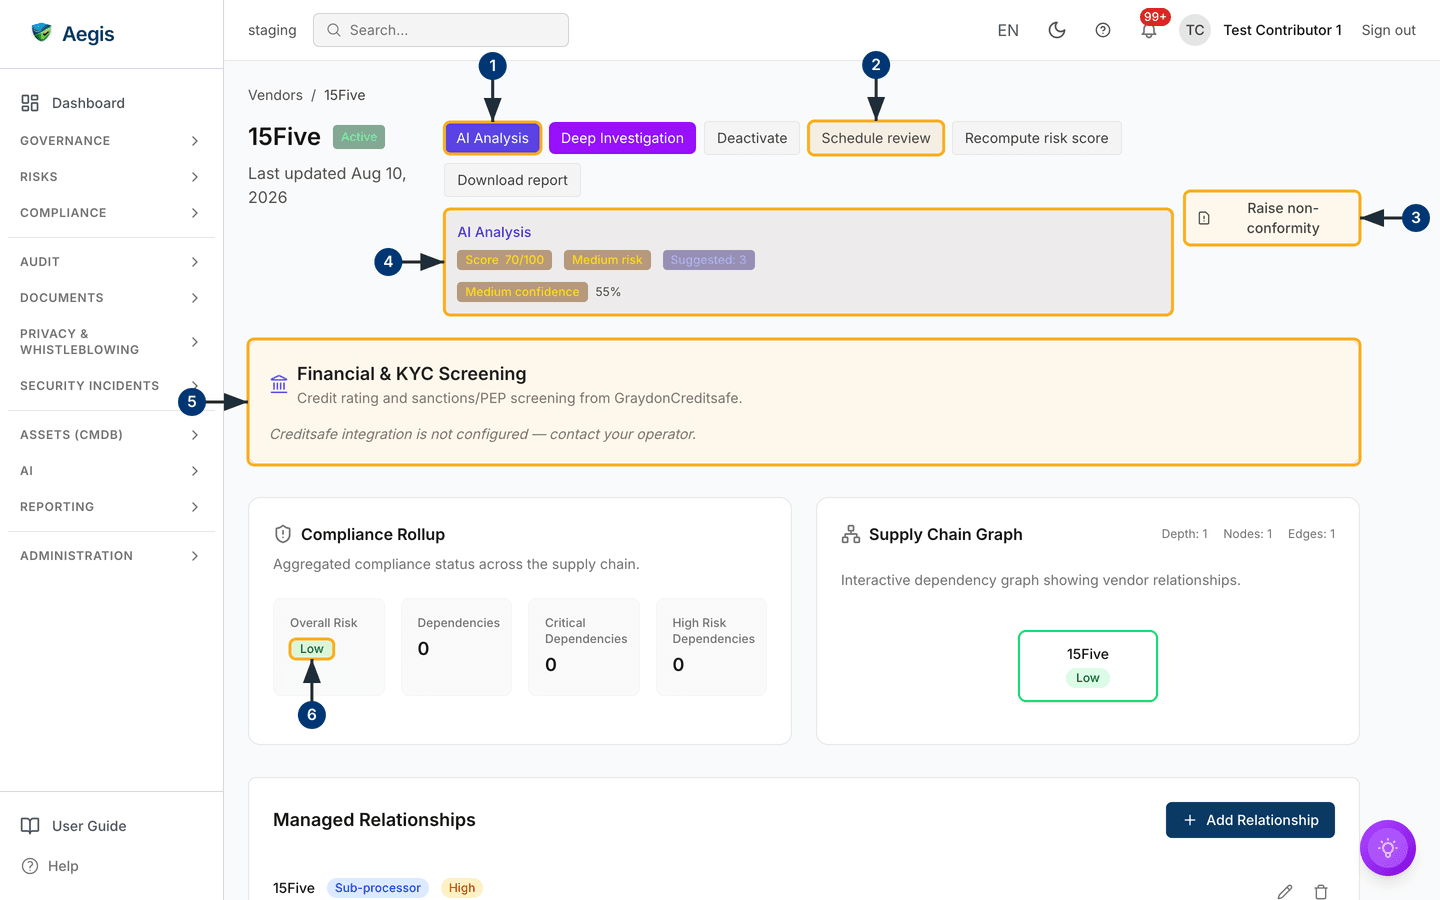
Four more buttons sit in that row. Deep Investigation runs the
external background check described below; Deactivate sets the
vendor to Inactive (it reads Activate for one already
inactive); Recompute risk score re-derives the rating and reports
the new score and tier; Download report saves a per-vendor report.
The current rating, explained
An assessment is one scored evaluation at a point in time; the
rating is the score currently held. Each assessment updates the
rating and the history stays, so you can see whether a vendor is improving or
slipping. With no rating, the register shows a dash and the page reads
Not Assessed.
| Score | Label |
|---|---|
| 80–100 | Excellent |
| 60–79 | Good |
| 40–59 | Fair |
| Below 40 | Poor |
Requesting an assessment
-
Select the document icon in the vendor's
Actionscell. The questionnaire dialog opens, headed with the vendor's name. - Choose a template — the list holds whatever you have published in Questionnaires.
-
Enter the
Recipient emailand, if you want, a custom message, then send. The vendor receives a link, and their answers come back as a scored assessment.
Archiving a vendor
- Select the box icon in the vendor's
Actionscell. -
Read the confirmation dialog, which lists what archiving does, and confirm.
The
Statuschanges toInactive. -
To bring it back, filter to
Inactive, tick the row and use the bulk Change Status action — orActivateon its detail page.
Bulk actions and export
Ticking rows reveals an action bar showing only what your role allows.
Change Status sets the selection to Active or
Inactive (Contributor
and above). Delete asks for confirmation and removes them
permanently (Manager and
Admin only).
Export downloads the selection as
vendors-export-{timestamp}.csv.
The AI assist
- Deep Investigation (the lightbulb icon, or the detail-page button) searches external sources for breach history, certifications and security incidents, then combines that with the vendor's own record — criticality, assessment history, DPA (data-processing agreement) details, GDPR and compliance requirements — to list gaps and recommendations. It usually takes 30 to 90 seconds; keep the dialog open.
- AI Analysis scores the vendor from the record you already hold, proposing a rating, a risk level and suggestions with a confidence level attached.
- Smart Triage (AI) ranks active vendors by criticality, overdue review, never-assessed and rating, then narrates that order. The ranking is worked out deterministically — the AI describes it rather than choosing it — with no external data.
All three gather, score and suggest. None changes a vendor's status, rating or owner on its own: a person reviews the output and decides. Investigation works best for well-known software and cloud providers; for a small local supplier it may return very little, so record your own due-diligence files as evidence. AI actions are recorded against your organisation's AI usage.
Tips and limits
-
A new vendor has no rating and no review date. Use
Schedule reviewon its detail page, or it sits in the register as Not scheduled indefinitely. -
An overdue review shows in red under
Next Reviewwith an overdue marker. Whether you also get an alert depends on your notification setup. - Archive rather than delete. Archiving keeps the record and its history; a bulk delete is permanent.
- If you are subject to DORA, its third-party-provider register is separate from this one and more detailed; you may keep both — see DORA.
Where this connects
Due-diligence files — questionnaire results, audit reports, certifications — belong in Evidence and link back to the vendor. Findings are raised in Risks, questionnaires built in Questionnaires, claimed certifications tracked in Security standards. For a worked example, see the vendor scenario.