The Trust Center
Publish a public web page that shows customers, auditors and prospects your security and compliance posture — no Aegis account needed to read it.
The Trust Center is the one part of Aegis built to face the outside world. Rather than emailing a static PDF of your certifications, you publish one web page that anybody with the link can open, assembled from your live Aegis records each time it loads. You choose which sections appear, set the branding, write the opening wording, and curate two lists: your certifications and your sub-processors (the third parties that process data on your behalf).
You configure all of it on one screen at /settings/trust-center.
The public page is served from your own Aegis address at /{slug},
outside the signed-in application, with no sign-in and no role check. Trust
Center is included in every licence tier, but the sidebar entry also depends on
the TRUST_CENTER module being provisioned for your tenant; if the
entry is missing, it has not been switched on for you.
Who uses it
An Admin and a
Manager hold the
Edit Trust Center permission: they see Save Changes,
the toggles respond, and the two lists show their Add,
Edit, Delete and reorder controls. A
Contributor and a
Viewer can open the same screen,
but a grey notice tells them access is view-only, there is no
Save Changes button, every branding and content field is inert, and
the two lists show neither their Add form nor any row controls. The
published page has no role at all: anyone with the address can read it, and it
is offered to search engines.
What's on this screen
This is a single scrolling column of stacked cards — no table, no filter bar, no
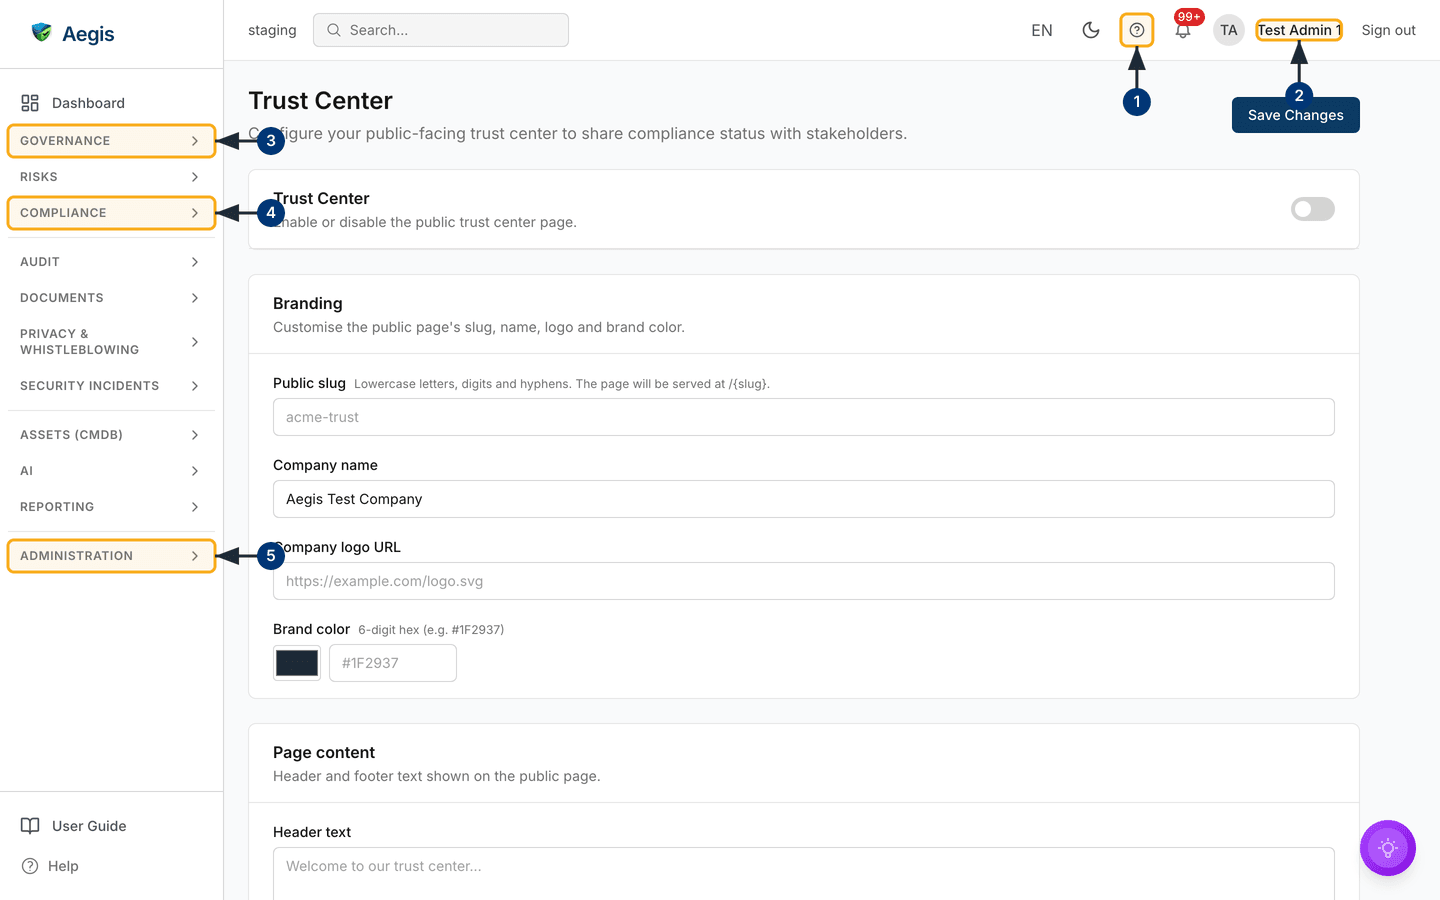
side panel. Top left, the heading Trust Center sits above the line
"Configure your public-facing trust center to share compliance status with
stakeholders." On the right is Save Changes, and nothing you change
takes effect until you select it. View public page and
Copy public URL appear beside it once the master toggle is on and
the slug box holds a value; in the capture below neither is there, because the
page is still switched off.
The first card is the master switch, titled Trust Center, with one
toggle on the right. Branding follows, holding
Public slug, Company name,
Company logo URL and Brand color — the last a colour
swatch beside a box for a six-digit hex value. Here the slug is empty (the faint
acme-trust is placeholder text) while
Company name already holds a value, so the fields keep whatever was
last saved. Then Page content with its Header text and
Footer text boxes; below the fold, four more toggle cards, all on
by default — Show policies, Show frameworks,
Show certifications, Show sub-processors — then the
two managed lists, Certifications and Sub-processors.
- The help "?" button in the top bar opens this User Guide inside Aegis, at the chapter for the screen you were on.
- Your name sits at the far right of the top bar. Check it before you edit: a Contributor or Viewer account loads this screen read-only.
-
Governancein the left sidebar holds theAction Center, the roadmap and the governance bodies — background for the posture you publish, not a source of it. -
ComplianceholdsPoliciesand the framework work, which feed theShow policiesandShow frameworkssections of the public page. -
Administrationis where this screen lives. Expand it and chooseTrust Center; the configuration loads in its saved state. On a tenant that has never published, that means the master toggle off, an empty slug, and the four section toggles already on.
Publishing for the first time
Work down the page — address and branding, then wording, then sections — and turn it on last.
-
In
Branding, type aPublic slug. This becomes the public address,/{slug}. Use 3 to 63 characters of lowercase letters, digits and single hyphens, starting and ending with a letter or digit. Paths Aegis already uses —policies,settings,gdpr— are refused as reserved. Stay inside that shape: the save accepts a slightly wider one than the public reader does, so a slug outside it saves cleanly and then returns "not found" to visitors. -
Fill in
Company name; it becomes the large heading on the public page. ACompany logo URLmust beginhttps://— anhttp://address is rejected with "Logo URL must use https://". SetBrand colorfrom the swatch or by typing a hex value; it colours the thick rule under the header band. -
In
Page content, write theHeader textthat greets visitors. It appears under the company name and theTrust Centerline, and doubles as the page description shown when the link is shared, so keep it to a couple of plain sentences. -
Set each of the four section toggles to match what you are willing to
publish. All four start on —
Show sub-processorsincluded — so review that one before you go live. -
Scroll back up, turn on the master
Trust Centertoggle, and selectSave Changes. "Trust Center settings saved" confirms it, the change is recorded in the audit log as a settings update, and only now does the address resolve. Open it in a private window to see the page as a visitor does.
The master toggle is the only gate between your settings and the live page. To check your work, enable it, save, look at the page, then switch it off again if you are not ready. Switching off keeps every field, toggle and list entry, so re-enabling restores the page as it was.
What each section publishes
Each "Show" toggle maps to one block, built from live records when a visitor loads the page. Above the blocks sits a row of four counts, and at the foot, the time the page was assembled. The counts are of what is published, so switching a section off drops its count to zero too.
| Toggle | What a visitor sees |
|---|---|
Show policies |
Approved policy titles with an effective date and a version badge. Drafts and policies in review never appear, and body text is never published. Maintained in Policies. |
Show frameworks |
Each enabled framework with one percentage and a progress bar, from the share of its controls marked implemented or assessed. Control names and statuses stay private. Maintained in Compliance frameworks. |
Show certifications |
A card for each entry in the Certifications list
further down this screen, in the order you arrange them, and only
those ticked as visible.
|
Show sub-processors |
The Sub-processors list as a table of
Name, Purpose, Location and
DPA status, again only those ticked as visible. An
empty field shows as a dash, and the DPA column is dropped on narrow
screens.
|
If a section is on but has nothing to show, the block is left out of the public page rather than published empty.
Adding a certification
The Certifications card near the foot of the screen is a small
editor of its own. Before you add anything it reads "No certifications yet. Add
one below."
-
Use the
Add certificationform at the bottom of the card.Nameis the only required field, marked with an asterisk; selectingAddwithout it shows "Name is required". -
Add the
Issuing body, aCertificate dateand anExpiry datefrom the date pickers, and aDocument URLif the certificate is hosted somewhere public. -
Leave
Visible on public pageticked to publish the entry, or clear it to keep the record while hiding it — a hidden entry is markedHiddenin the list. -
Select
Add. "Certification added" confirms it and the entry appears in the list above, live on the next public page load: this list saves on its own and does not wait forSave Changes. -
Use the up and down arrows to change the order visitors see,
Editto correct an entry, orDeleteto remove it. Delete asks you to confirm first.
Listing sub-processors
The Sub-processors card works the same way, and an unused list
reads "No sub-processors yet. Add one below." A published sub-processor list is
a common contractual commitment, so keep it current.
-
In the
Add sub-processorform, enter theName(required), theLocationwhere processing happens, and thePurpose. -
Enter the
DPA status— free text, so write what is true, such assigned,pendingorSCCs. -
Set
Visible on public pageand selectAdd. The entry joins the list and the public table, and the arrows reorder it.
The sub-processors published on the Trust Center are the entries you type on this screen. Adding a processor in Vendors does not add it here, and retiring one there does not remove it. When your vendor arrangements change, update this list too.
Day-to-day changes
-
To take the page offline, turn the master
Trust Centertoggle off and selectSave Changes. The public address returns "not found" straight away and your settings are kept. -
To hand the address to a customer or an auditor, use
Copy public URLin the header. It copies the full web address and confirms with "Public URL copied". -
After a certification renewal, edit the entry in the
Certificationslist and refresh theHeader textif it quotes a date. Both reach visitors on the next page load.
The slug is the public address. Change it after sharing the page and every existing link and bookmark stops working. It must also be unique: saving one already in use is refused with "Slug is already in use". Settle on it before you publish.
Tips and limits
-
Footer textis saved with your configuration, but the public page as it stands does not print it; the foot of the page carries only a "Powered by Aegis" line. Put anything visitors must read — a data protection contact, a scope note — inHeader text. -
The same applies to most of a certification's detail.
Issuing body,Certificate date,Expiry dateandDocument URLare stored and shown to you on this screen, but the public card as it stands prints the name alone. Treat those fields as your own record for now, and if a date matters to visitors, state it inHeader text. - Certifications are free text, so you can list any attestation you genuinely hold — but that does not mean Aegis tracks the scheme as a framework. SOC 2, for example, is a roadmap item rather than shipped, so a SOC 2 entry publishes as a certification card and nothing more.
- The timestamp at the foot of the public page is the moment that visitor's copy was assembled, not the date your posture last changed. A custom domain, or keeping the page out of search results, is a matter for Euraika support rather than a setting here.
- Every save is written to the audit log as a settings update, so you can show an auditor when the published posture last changed. See The audit log.
- A Trust Center shows your posture at a point in time. It does not make you compliant, and it is only as accurate as the records behind it — review it on a schedule, not only when a customer asks.
Where this connects
The two "Show" sections draw on Policies and Compliance frameworks. The sub-processor list should agree with Vendors and the processing records in GDPR; certificates you hold as files belong in Evidence. Other administration screens are covered in Settings, and who may edit what is set out in What each role can do.