Signing in
How an Aegis account comes to exist, how you sign in to it, and how you add a second factor so a stolen password is not enough on its own.
Before you can prove anything in Aegis, two things must be true: you have an
account (a record holding your email, your name, and your role), and you have a
live session (proof that the account belongs to the person at the keyboard).
This chapter covers both, and then
multi-factor authentication (MFA — a second
proof of identity on top of your password), which you manage yourself under
Account security.
Who uses it
Signing in is for everyone: /signin is public. What you can do
after you sign in depends on your role:
Admin,
Manager,
Contributor, or
Viewer. The account security page
at /account/security is open to every signed-in user whatever their
role (the second screenshot was captured as a Viewer), and each person manages
only their own second factor there — nobody can change another person's.
How an account is created
An Aegis account comes to exist in one of two ways, and the third route people look for is closed.
-
An administrator invites you. Most people join this way. A
one-time link in your email opens
/accept-invite, where you set your name and a password and are joined to the existing workspace with the role the administrator chose. - Single sign-on (SSO). Where your organisation federates logins through Microsoft Entra ID or Keycloak you never set an Aegis password: you authenticate with your work account, and your role is mapped from your identity provider's groups.
-
You cannot sign yourself up. Aegis is provisioned by an
administrator, so
/signupcarries no form: it showsRegistration Disabledwith the lineSelf-registration is not available for this application., points you at your administrator, and sends you to the sign-in page after a few seconds. An operator can open the underlying credential sign-up endpoint for a first-time installation, but the page itself always reads the same.
Every password is at least 12 characters. When you accept an invitation the
server applies the full policy on top of that: an upper-case letter, a
lower-case letter, a digit, and a symbol, and it must not contain the local
part of your email address. Where an operator has switched on the breach
check, a password found in a public breach corpus is refused as well. The
invitation form's hint reads Must be at least 8 characters, but
the server applies the twelve-character policy — choose twelve or more and
your first attempt is accepted. A password reset enforces the same
twelve-character minimum.
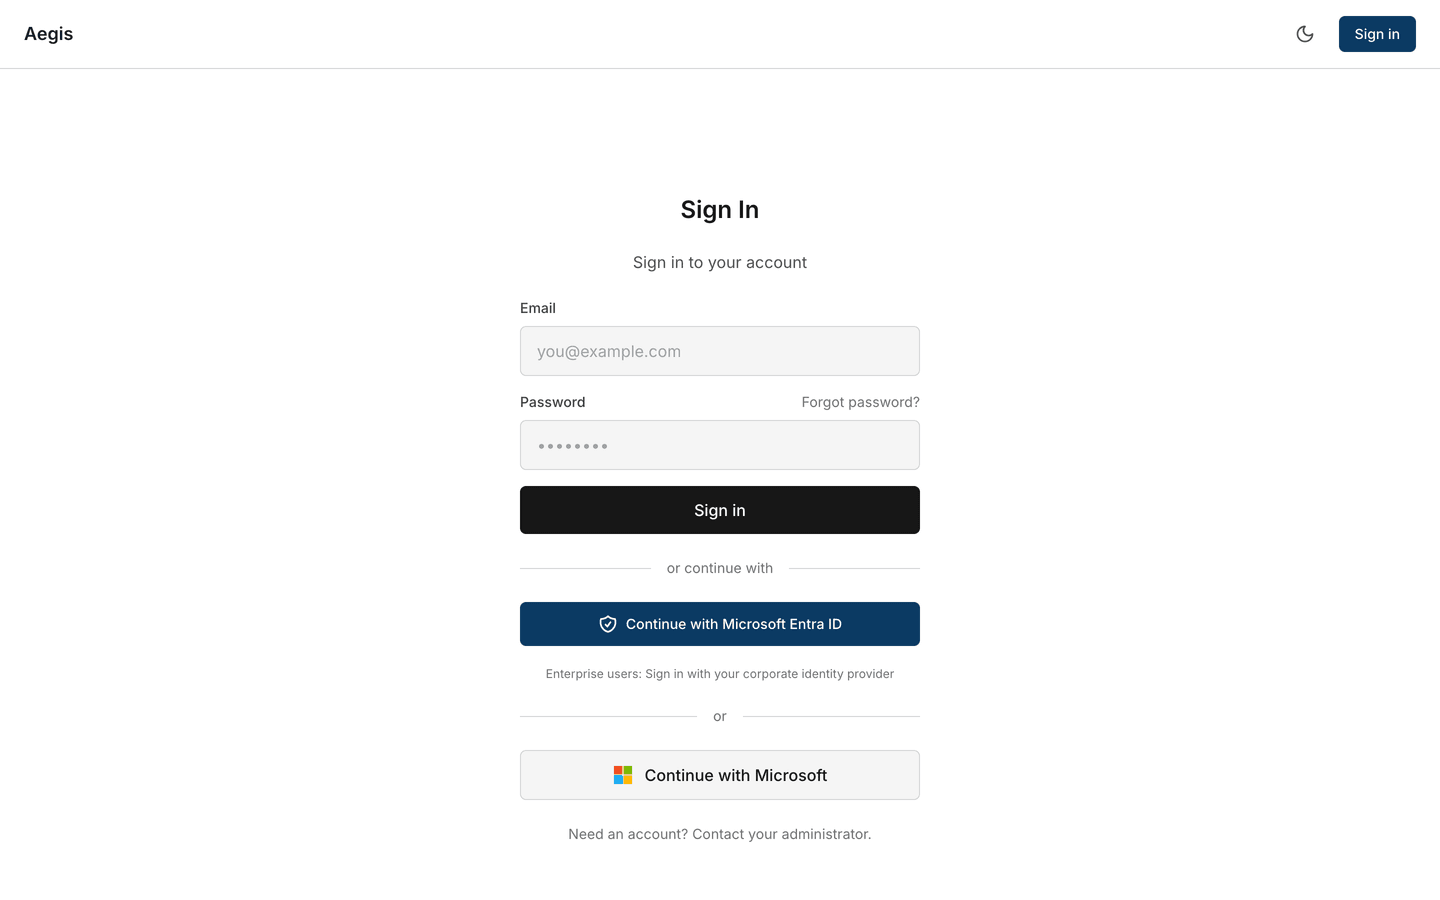
What's on this screen
The sign-in page is a single centred column. A thin header runs across the top:
the
Aegis wordmark on the left, and on the right a moon icon that
switches between light and dark appearance beside a
Sign in shortcut. Everything else sits in the column beneath, top
to bottom:
-
The heading
Sign In, with the sub-lineSign in to your account. -
An
Emailfield showing the placeholderyou@example.com. -
A
Passwordfield, with theForgot password?link on the same line as the label, over on the right. - A full-width
Sign inbutton. -
A divider reading
or continue with, then one button per configured provider — in the capture,Continue with Microsoft Entra ID, noted underneath asEnterprise users: Sign in with your corporate identity provider. -
A second divider reading
or, then the social buttons — hereContinue with Microsoft. -
The closing line
Need an account? Contact your administrator.
Those buttons and dividers appear only when an administrator has configured the provider, so a workspace without SSO shows the form and the closing line with nothing between them. The public page carries no instrumented controls, so the figure below has no numbered callouts — the labels in the steps match the words on screen exactly.
Signing in with email and password
-
Open
/signin. Opening the plain web address first shows the public Aegis landing page, whoseSign inbutton brings you here. If you already have a live session,/signinshowsRedirecting to dashboard...instead and takes you straight in. -
Type your work email into the
Emailfield and your password into thePasswordfield. -
Select
Sign in. The button readsSigning in...while it works, then your dashboard opens if the details are correct and your account has no second factor. An empty field or a bad password puts a red banner above the form —Email and password are requiredorInvalid email or password— and leaves you on the page to retry. -
To use single sign-on instead, leave the fields empty and select
Continue with Microsoft Entra ID. Your identity provider takes over, and once it is satisfied you return to Aegis already signed in.
If your account asks for a six-digit code
When an account with an
authenticator app (TOTP) enrolled — a
time-based one-time code app such as a password manager or an authenticator —
signs in with email and password, Aegis does not sign you in
yet. The form is replaced by a challenge headed
Two-factor authentication.
- Open your authenticator app and read the current six-digit code for Aegis.
-
Type it into the code box, which accepts digits only and keeps
Verifydisabled until six are entered. -
Select
Verify. Only a correct, unexpired code completes the sign-in; a wrong or stale one showsInvalid authentication code. Please try again., clears the box, and leaves you to enter the next code. -
On the wrong account, select
Use a different accountunderneath: the code and the password you typed are discarded and the email-and-password form returns, with the email still filled in for you to overtype.
The six-digit challenge belongs to the email-and-password route. If you sign in through SSO, your identity provider is responsible for any second factor, and Aegis does not ask again.
If you forget your password
-
On the sign-in page, select
Forgot password?beside the password label. A short page opens that asks only for your email address. - Type your email and request the reset link. The page confirms it has been sent whether or not the address is registered, so the form cannot be used to discover who has an account.
- Open the link from your inbox and enter a new password twice. Anything under 12 characters, or two entries that differ, is refused. The link is single-use — opening it again reports it is no longer valid and you request a fresh one.
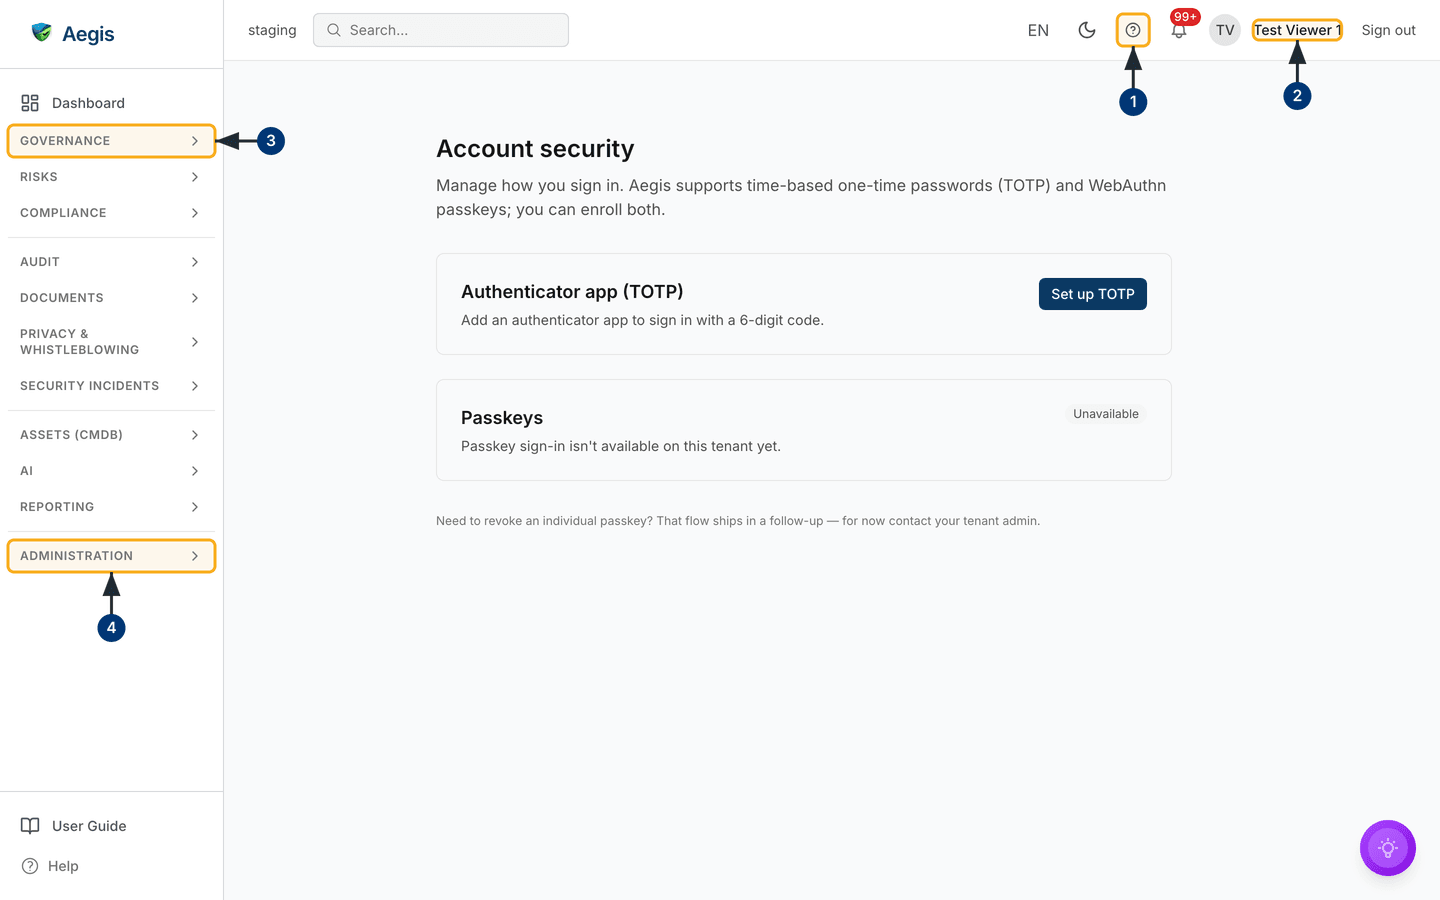
What's on the account security screen
Once you are signed in, you manage your own second factor at
/account/security. There is no menu entry for it: you arrive either
from the Set up MFA button on the
Add a second factor to your account banner, or by typing the
address. It is a normal application page, with the usual furniture around it:
the left sidebar with Dashboard and the collapsed module groups
from GOVERNANCE down to ADMINISTRATION (User Guide
and Help pinned at the foot), and a top bar carrying the
environment label (this capture reads staging), global search, the
language switch EN, the light/dark switch, a ? help
icon, the notification bell, and your avatar, your name, and
Sign out.
The page body itself is a narrow column with a heading, a sub-line, and two cards:
-
Authenticator app (TOTP) — here it reads
Add an authenticator app to sign in with a 6-digit code.beside aSet up TOTPbutton, because this account has not enrolled one. Once enrolled, the button gives way to anEnabledbadge, the date, and a control to turn it off again. -
Passkeys — here the card shows an
Unavailablebadge andPasskey sign-in isn't available on this tenant yet.Passkeys need an operator to configure them for your workspace; until that happens there is no enrolment button, and the card says so rather than dead-ending you.
A grey line beneath the cards is equally direct: revoking an individual passkey ships in a follow-up, and for now you ask your tenant administrator.
Finding your way around this screen
-
The
?in the top bar opens the in-app User Guide at the chapter for the screen you are on. It is a normal link, so it replaces the page — come back with your browser's back control. -
Your name sits at the far right, beside your avatar, with
Sign outafter it. None of the three is a menu, so read the name as a label: this page only ever edits the account named here. -
GOVERNANCEheads the working modules. Your security settings are not among them, and no group in the sidebar leads here —/account/securityis reached from the second-factor banner or by address. -
ADMINISTRATION, at the foot of the groups, holdsWorkflows,HR,Connectors,Settings,API KeysandWebhooks. Inviting people, setting roles and configuring single sign-on all sit underSettings. What opens depends on your role — a Viewer does not get the user-management pages.
Setting up an authenticator app
Enrolment happens on its own page, headed
Set up two-factor authentication. There is no sidebar link to it:
you reach it from the Set up TOTP button, or Aegis sends you there
itself if your organisation has made a second factor compulsory for your role.
That page is not captured in this guide, so follow the labels below.
-
Select
Set up TOTPon the first card. The enrolment page opens and asks for your current password first — this stops anyone who finds your unlocked screen from quietly adding their own second factor. -
Enter it and select
Continue. A QR code appears underAdd this account to your authenticator app, with the plainotpauthtext underneath for devices that cannot scan. -
Scan it, then type the six digits your app produces and select
Verify and enable. A code that does not match is rejected and you try the next. -
Aegis then shows your backup codes — single-use codes for the day you lose
your phone, displayed once. Take
Copy codes, store them safely, tickI have securely saved my backup codes, and selectDone. That button stays disabled until the box is ticked, and only pressing it records the factor as enabled.
The codes cannot be shown again. Navigate away before saving them and you can still sign in with your authenticator, but you have no fallback if the device is lost — an administrator would have to reset the factor for you.
Turning a second factor off
-
Return to
/account/security. With TOTP enabled the first card shows theEnabledbadge and aDisable two-factor authenticationcontrol. - Select it. The card expands and asks you to re-enter your account password, noting that your password alone will get you in until you set the factor up again.
-
Enter it and select
Disable two-factor. A wrong password is refused and the factor stays on; on success the card returns to itsSet up TOTPstate.
Signing out
Select Sign out at the top right of any page. Your session is ended
on the server and the cookie is removed from your browser, and you land on the
public Aegis landing page, whose Sign in button takes you back to
/signin. On a shared or public computer, sign out rather than only
closing the tab.
Tips and limits
- Provider buttons depend on configuration. Yours may show different providers from the capture, or none.
- The code challenge is fail-closed. Until a correct code is verified no session exists, so closing the tab at that point leaves you signed out.
- Passkeys need operator setup, and revoking one is a follow-up rather than a shipped feature — contact your tenant administrator meanwhile.
-
Your organisation may require a second factor. A banner
headed
Add a second factor to your accountprompts you until you have one; itsSet up MFAbutton opens/account/securityandRemind me laterhides it for now. Where a second factor is compulsory for your role the prompt becomes a redirect to the enrolment page. Keep at least one working factor, and keep the backup codes.
Where this connects
Once you are in, The screen layout and The left menu orient you to the sidebar and the top bar, and First-time setup covers the one-time onboarding that configures your workspace. What you can do next depends on your role — see Roles and what each can do. Administrators configuring Entra ID for the whole organisation should read Single sign-on with Microsoft Entra ID, and Getting help lists the common sign-in problems and how to reach support.