Security Standards
Record the concrete technical norms your organisation holds itself to, itemise each one as a requirement, and link the standard to the policies it underpins.
A security standard (a written set of concrete technical rules — minimum TLS version, encryption-at-rest requirement, key-management rule, and so on) sits one level below your policies. A policy says what the organisation requires; a standard says exactly how strong that requirement must be. This page keeps those norms in one place: each standard gets a version, an owner, a list of requirements, and links to the policies that rely on it. Aegis stores the definition; people write it and decide when it comes into force.
Who uses it
The page sits in the GOVERNANCE group of the left menu. Reading is
open to every role. Authoring is treated as a governance act and is reserved for
senior roles.
| Role | What they can do here |
|---|---|
| Admin | Everything — create, edit and delete standards; manage requirements; link and unlink policies; run the AI review. |
| Manager | The same authoring rights as an Admin. |
| Contributor |
Read only. Can browse, search, open a standard and run the AI
review, but sees no
New security standard button and no edit, delete or
link controls.
|
| Viewer | Read only, the same as a Contributor. |
The create button is therefore absent by design. With a Manager or Admin
role you also see a
New security standard button at the top right, and authoring
controls on each standard. The whole page belongs to the Compliance module —
if that module is switched off for your organisation, the menu entry does
not appear at all.
What's on this screen
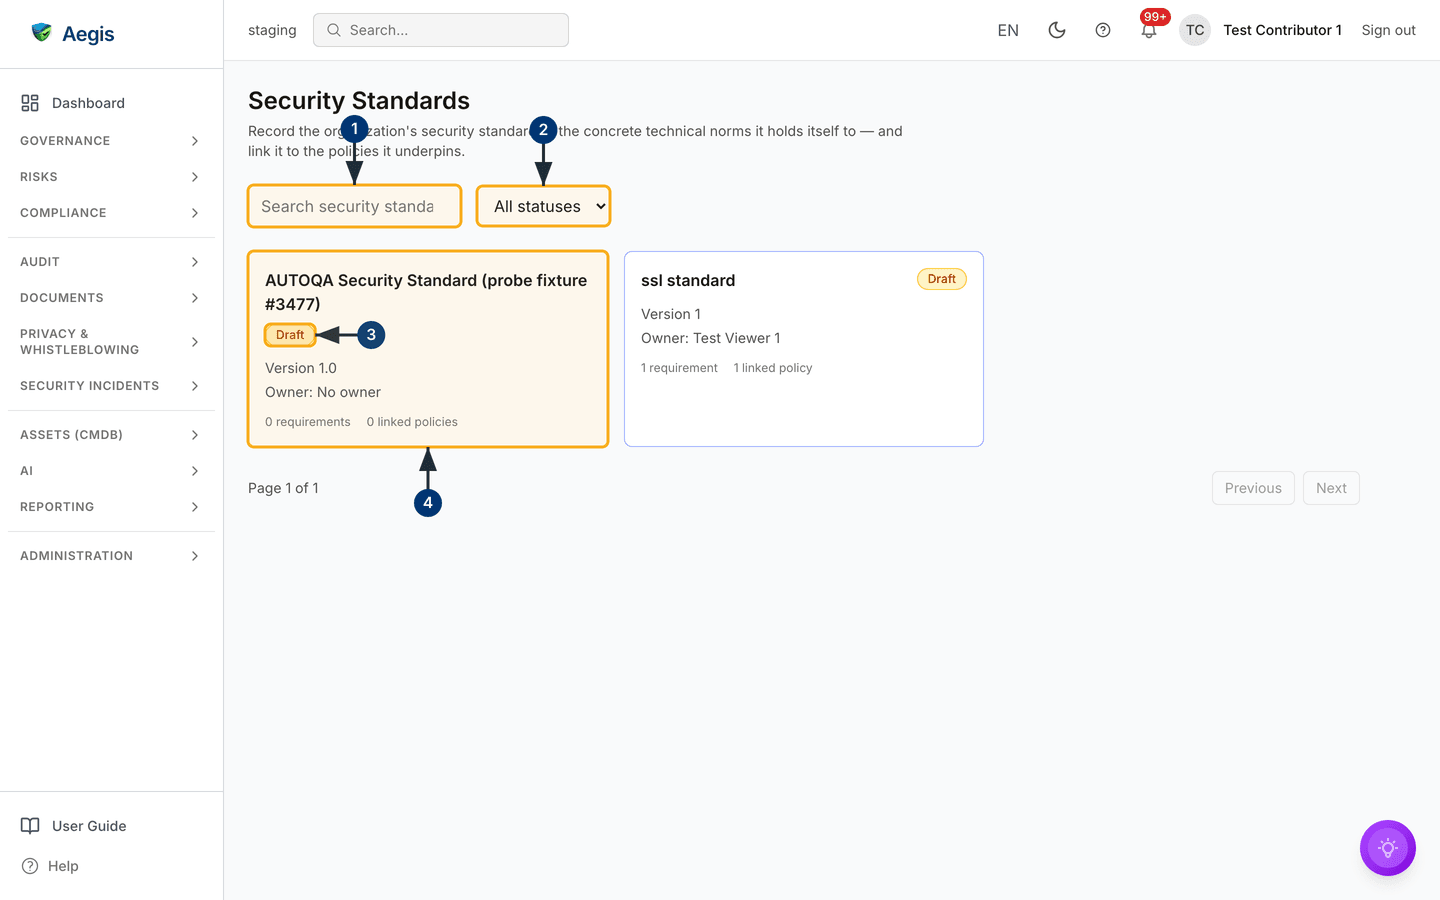
The page opens on the standards overview. At the top left is the heading
Security Standards with a one-line description of what the page is
for. Directly beneath it is a filter bar holding two controls: a
Search security standards... box on the left, and an
All statuses drop-down beside it.
Below the filter bar, each standard appears as a card in a grid. A card shows
the name at the top left with a coloured status badge at the top right, then a
Version line and an Owner line, and a footer counting
requirements and linked policies. The whole card is a link through to the detail
page. At the foot of the list is a page counter with Previous and
Next buttons, both greyed out when everything fits on one page.
In the capture below the organisation holds one standard:
ssl standard, badged Draft, at Version 1,
owned by Test Viewer 1, with 1 requirement and
1 linked policy. The counter reads Page 1 of 1. Before
you record anything, the page shows an empty state headed
No security standards yet instead of the grid.
Find a standard
-
Type part of a name into the
Search security standards...box. After a short pause the grid narrows to standards whose name contains what you typed, ignoring upper and lower case. The match looks at the name only, not at descriptions or requirement text, and the page counter resets to the first page. -
Choose a state from the
All statusesdrop-down to show one lifecycle stage at a time —Draft,ActiveorRetired. When a filter combination matches nothing, the grid is replaced byNo security standards match the current filters.and the filter bar stays in place so you can clear it again. - Read the status badge at the top right of a card to see where that standard stands. Draft is amber, Active green and Retired grey, and each badge carries its wording as text, so you never have to rely on the colour.
- Select the card to open that standard. Its detail page appears, with the requirements and linked policies underneath the header.
What the status values mean
A standard's status is chosen by hand when you edit it. There is no enforced order, so you move a standard between the three states as your own governance process requires.
| Status | What it means |
|---|---|
Draft |
Being written or revised. Every new standard starts here. |
Active |
In force — the norm the organisation currently holds itself to. |
Retired |
Superseded or withdrawn, kept for the record. |
Create a standard
This task needs a Manager or Admin role. The capture above was taken as a Contributor and so does not show the create form; the steps below describe the flow without a figure.
-
Select
New security standardat the top right. A dialogue headedDefine security standardopens over the list. -
Enter a
Name— for example, Encryption & Transport Security Standard. This is the only required field, and it accepts up to 200 characters. -
Fill in the optional fields: a
Versionlabel such as1.0, anOwnerfrom your user list, and aDescriptionsetting out scope and purpose. Leaving the version blank records1.0; leaving the owner blank showsNo owneron the card. -
Select
Create. The dialogue closes, aSecurity standard createdconfirmation appears, and the standard joins the grid as aDraft. Status is deliberately not offered while creating — every standard begins as a draft, and you move it on later by editing it.
Read a standard's detail page
Opening a standard shows a Back to security standards link, then a
header carrying the name, the status badge, the description, and the
Version and Owner lines. To the right of the header
sit the action buttons: Review & Map for everyone, plus
Edit and Delete for Managers and Admins. Beneath the
header are two sections, Requirements and
Linked policies.
Itemise the requirements
The requirements section is where the standard's definition actually lives — each row is one concrete norm. Managing requirements needs a Manager or Admin role; other roles see the table but no action controls.
-
In the
Requirementssection, use theAll categoriesdrop-down to narrow the table to one area — for exampleTLS Configuration,Encryption at RestorKey Management. If the filter matches nothing, the table is replaced byNo requirements match the current filter. -
Select
Add requirement. A dialogue opens with aCategorypicker, aRequirementbox for the norm itself (for example, TLS 1.2 minimum, TLS 1.3 preferred for all public endpoints), and an optionalRationalerecording why the norm exists. -
Select
Add. ARequirement addedconfirmation appears and the row joins the table, which listsCategory,Requirement,Rationaleand — for those who can edit — anActionscolumn. The requirement count on the standard's card goes up. Long lists are paged, with their ownPreviousandNextbuttons. -
Use
EditorDeletein theActionscolumn to revise or remove a row. Deleting asks you to confirm, then removes that norm from the standard's definition; the standard itself is untouched.
Before you add anything, the section shows the empty state
No requirements yet, with an Add requirement action
for those who can use it.
Link the policies it underpins
The Linked policies section ties the standard to the policies that
depend on it, so your policy framework points at concrete technical norms rather
than at intentions alone. Linking needs a Manager or Admin role, and the
Link policy button only appears when you can also read policies and
the Policies module is switched on — so a link can never lead somewhere you
cannot go.
-
Select
Link policy. A picker opens with aSearch policies...box and a list of your policies, each showing its title and lifecycle status. -
Find the policy you want and select
Link policybeside it. APolicy linkedconfirmation appears, the picker closes, and the policy joins the section. Policies already attached are markedAlready linkedand cannot be added twice. -
To remove a link, select
Unlinkon a linked row and confirm. Only the connection goes — the policy itself is untouched. Each linked title is a link through to its page in Policies.
Edit, retire or delete a standard
-
On the detail page, select
Edit. The same dialogue opens, now titledEdit security standardand carrying an extraStatusfield. -
Change what you need — including moving the standard to
Activeonce it is in force, or toRetiredwhen it is withdrawn — then selectSave. ASecurity standard updatedconfirmation appears and the header reflects the change at once. -
To remove a standard altogether, select
Deleteand confirm. Aegis warns that the standard's requirements and policy links will no longer be visible, then returns you to the overview. PreferRetiredover deletion whenever you want to keep a record of a norm you no longer enforce.
The AI assist
The Review & Map button on a standard's detail page opens the
AI Baseline & Requirement Review. It reads the standard, its
requirements and your real policy catalogue, then reports on four things:
baseline and version drift for the scope described, a requirement-by-requirement
review with tightened interpretations, the policies those requirements should
map to, and a drafted, tighter description you could adopt. Interpreted
requirements keep the language they were written in.
-
Select
Review & Map. A panel opens explaining what the review covers, with a note stating that it reasons over internal records only and is a proposal for the standard's owner to review and adjust — not a binding decision. -
Select
Run review. Progress is shown step by step as Aegis loads the record, checks for drift, reviews each requirement, matches requirements to your configured policies and drafts its findings. The text streams into the panel as it is written. -
Read the result. Beneath the text the panel shows a
Confidencereading and the evidence the review drew on, so you can judge how much weight it deserves. -
Take the output somewhere useful from the footer:
Copy,Export DOCXorExport PDFfor the text itself,Save as recordto keep the review against this standard, and — for roles that may create them —Create action itemorCreate work itemsto turn a finding into tracked work.Run againrepeats the review.
The analysis writes nothing back to the standard: no requirement is added or
reworded, no policy is linked, and the description is not replaced. If you
agree with a suggestion, you apply it yourself through Edit,
Add requirement or Link policy. The footer actions
do save things, but only when you choose them —
Save as record keeps a copy of the review alongside the
standard, and Create action item and
Create work items open a form you fill in and confirm first. A
person reviews and decides; the assistant never acts on its own.
Every role that can read a standard can run the review, provided your licence
includes the AI assist. Each run counts against your organisation's AI credits;
once they are exhausted the review stops with a plain
Action failed message, and you check the remaining balance on your
licence page rather than in this panel. Where your organisation has published an
AI transparency notice, the review is refused until you have acknowledged that
notice. Every run is recorded in the audit log.
Tips and limits
- The status field has no enforced workflow — you can move a standard between the three states in any direction. Treat the change as a governance decision to be minuted, not an automatic step.
-
Versionis plain text you maintain by hand, up to 50 characters. Aegis keeps no version history, so update the label whenever you revise a standard and record what changed in the description or your governance minutes. - Search looks at names only, so a consistent naming pattern repays itself once you hold more than a handful of standards.
-
A requirement's category comes from a fixed list: TLS configuration,
encryption at rest, encryption in transit, key management, authentication,
password policy, network security, logging and monitoring, hardening, and
other. Choose the closest fit, or
Otherwhen none applies. - Requirement text is capped at 2,000 characters and a description at 5,000. Where a norm needs more room, keep the requirement short and testable and hold the detail in a linked policy or procedure.
Where this connects
- Policies — the documents a standard underpins; link them from the standard's detail page.
-
Governance Bodies — the committees that
own standards and approve their move to
Active. - Security Processes — the operational routines that put standards into daily practice.
- Compliance Frameworks — the external obligations your internal standards help you meet.
- Vendors — a vendor's detail page has its own security-standards section, where you attach the standards that supplier must comply with. The link is made there, not here.
- Roles and permissions — the full picture of what each role may do across Aegis.