Scenario: handling a data-subject request
A former customer emails to ask for a copy of everything you hold about them, and the legal clock starts the moment the request arrives.
Under the GDPR (the European Union's data-protection law) people may ask to see, correct, delete, restrict, or take away the personal data an organisation holds about them. You then have one calendar month to respond, with a single two-month extension allowed for genuinely complex cases. This chapter follows one data-subject request (DSR — a formal request from an individual to exercise one of those rights) from the inbox to closure, across three screens: the DSR queue, the request's own page, and the audit log. The GDPR chapter is the full module reference; this one shows the order the screens come up in and who does what at each turn.
Who handles a DSR
Two people appear in the journey, because Aegis splits the work along real permission lines. Marta, a Manager and the organisation's privacy lead, logs the incoming request — creating one needs the compliance write permission that only Manager and Admin hold. Sofia, a Contributor on the privacy team, then works it: acknowledging, responding and refusing are covered by a separate DSR-handling permission that a Contributor does have.
One more rule shapes what each of them sees. A
Contributor or
Viewer sees only the requests
assigned to them plus the unassigned ones;
Manager and
Admin see every request. There is no
separate "DSR handler" role. Each request can carry an assignee — its page shows
an Assigned To line when one is set — but no Aegis screen sets it
today, so a request logged from the form arrives unassigned. The whole area
needs the GDPR module switched on for your organisation.
What's on this screen
The queue lives at /gdpr/dsr. The header reads
Data Subject Requests
above the reminder line "Track and respond to data subject requests within the
GDPR 30-day deadline".
Directly under it sits a filter bar with three controls: an
All Types dropdown, an All Statuses dropdown, and an
Overdue Only tick box. The filters combine, and changing any of
them returns you to the first page. The New Request button belongs
at the far right of that same row and leads to the full-page form at
/gdpr/dsr/new — but it is drawn only for someone who may create
requests. The screenshot below was captured as a Contributor, so that corner is
empty. That is exactly what Sofia sees.
The table beneath has six columns: Type (a coloured badge such as
Access, Erasure or Rectification),
Subject (the requester's email address), Status,
Requested (the date logged), Due Date (30 days later),
and Time Left. The countdown reads green while there is room — "21
days left" and "20 days left" in the capture — turns amber at seven days or
fewer, red once the deadline has passed, and shows a dash once a request is
Completed or Refused. Twenty requests fit on a page,
with Back and Next below the table when there are
more. Selecting any row opens that request's own page. The queue shown is a test
tenant, so the addresses are QA placeholders rather than real people.
Step 1 — Open the queue
-
Open the
Privacy & Whistleblowinggroup in the left menu and chooseGDPR. The GDPR overview appears with a row of metric cards. TheData Subject Requestscard carries the pending and overdue counts and links straight to/gdpr/dsr. -
Check who you are signed in as. Your name sits at the top
right of the header, between the notification bell and
Sign out. It decides both which requests the queue returns to you and whether theNew Requestbutton is drawn at all. -
Narrow the queue with the filter bar. Setting
All StatusestoPendingshows everything not yet acknowledged; tickingOverdue Onlyshows only requests past their due date. Both reload the table in place. -
Select the row for the request you are working. Aegis opens
that request's own page at
/gdpr/dsr/<id>, with a breadcrumb back toData Subject Requestsand a heading naming the request. Because it is a real page and not a pop-up, you can bookmark it or paste the link into a task.
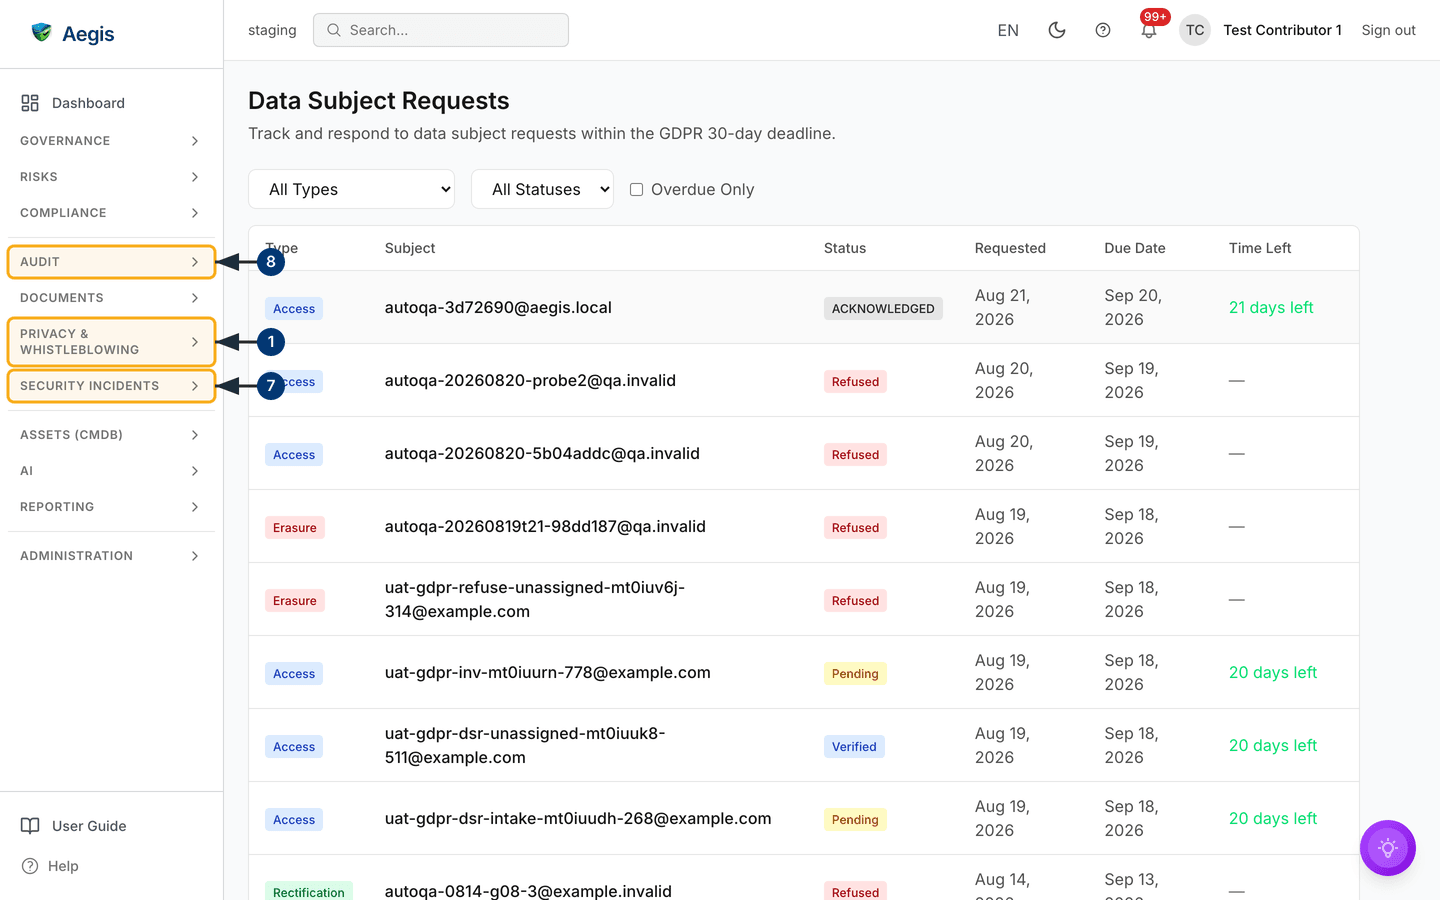
The queue's badge list predates the Acknowledged stage, so an
acknowledged request appears as a plain grey ACKNOWLEDGED badge
rather than a coloured one — the top row in the capture. The
All Statuses dropdown has the same gap: it offers
Pending, Verified, In Progress,
Completed, Refused and Expired, so
there is no way to filter the queue for acknowledged requests. The status
itself is correct and the request's own page shows it properly; this is a
display gap, not a data problem.
Step 2 — Log the request and start the clock
The email lands in the privacy mailbox. Marta records it, because a request that
is not in the queue carries no deadline. Selecting New Request in
the queue header opens a page of its own,
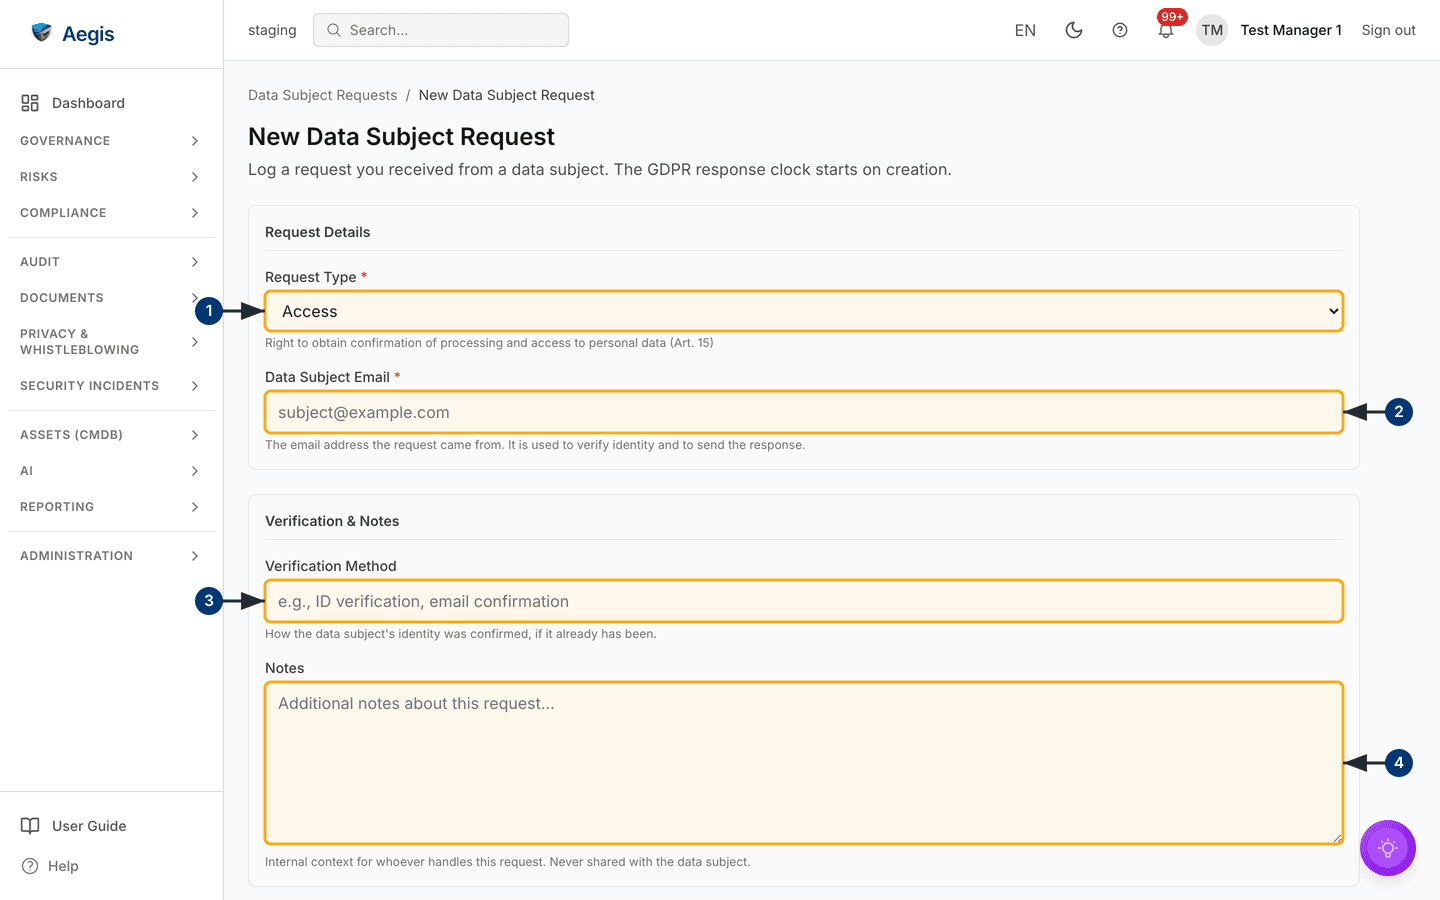
New Data Subject Request at /gdpr/dsr/new, with a
breadcrumb back to Data Subject Requests and the reminder "The GDPR
response clock starts on creation" under the heading. The form sits in two boxed
sections — Request Details and
Verification & Notes — with a short line of help under every
field. Opening the address as Sofia would end differently: a role without the
compliance write permission is turned away to an unauthorised page.
-
Choose the right the person is exercising in
Request Type. The dropdown starts onAccess; seven types are offered, listed below. The line under it explains the selected right — "Right to obtain confirmation of processing and access to personal data (Art. 15)" in the capture — and rewrites itself when you change the type, so you can confirm the choice before going further. -
Enter the requester's address in
Data Subject Email. This field is required and must be a valid address; as the help text under it says, it is used to verify identity and to send the response, and it is the identifier the request carries throughout. An invalid entry shows a message under the field and the form does not submit. -
Record how you checked identity in
Verification Method, if you have already checked it. Optional free text — "copy of passport", "video call with ID check". This form is the only place that writes the field: nothing on the request's page can add it afterwards, so if verification is still to come, keep your own record of how it was done. -
Add any context in
Notes. Also optional, and as the help line states, never shared with the data subject — it is internal context for whoever handles the request. A blue note further down the page restates the 30-day deadline rule. -
Select
Create Requestat the foot of the page. A confirmation appears and Aegis takes Marta straight to the new request's own page. The request starts inPendingwith aDue Date30 days out; back in the queue it shows a green countdown.Cancelbeside the button returns to the queue without saving anything.
| Type | What the person is asking for |
|---|---|
Access |
A copy of their personal data and how it is used (Article 15) |
Rectification |
Correction of data that is wrong or incomplete (Article 16) |
Erasure |
Deletion of their personal data (Article 17) |
Restriction |
A pause on using their data without deleting it (Article 18) |
Portability |
A machine-readable copy they can take elsewhere (Article 20) |
Object |
An objection to your processing of their data (Article 21) |
Automated Decision |
Human review of an automated decision about them (Article 22) |
Aegis counts the deadline from the moment you create the record, not from
the date the email arrived. If a request sat in a shared mailbox for four
days, write the real received date into Notes at creation and
manage the earlier legal deadline yourself. The Due Date column
will always be the slightly generous one.
Step 3 — Acknowledge receipt
Sofia opens the request. Under the details grid is a section headed
Fulfillment, with a stepper showing the stages
Pending → Acknowledged → Verified → In Progress, each stamped with
its timestamp once reached, and the actions available at the current stage below
it.
-
Select
Acknowledge Request. Aegis emails an acknowledgement to the requester with a reference number and the due date, stamps the time, appends a line toNotesnaming who acknowledged it and when, and moves the request toAcknowledged. The stepper advances and the button disappears — it is offered only while a request isPending, and only once. - Read any warning that follows. If the acknowledgement was recorded but the email could not be delivered, an amber panel says so and asks you to inform the requester another way. The note written into the record says the same, so the trail never claims a notification that did not go out.
If no mail server is configured for your organisation,
Acknowledge Request is refused outright with a message saying
so, and the request stays Pending. Ask an
Admin to set up email in
Settings before you rely on this step; until
then, acknowledge by hand and record that you did.
Step 4 — Verify the requester's identity
Aegis tracks this part of the work; it does not do it for you.
-
Confirm the requester is who they claim to be. Releasing
one person's data to another is itself a breach. The check happens outside
Aegis — an ID document, a video call, a confirmation from an existing
account. If the method was recorded in
Verification Methodat creation, the request's page shows it; if not, keep the evidence of how you checked in your own files, because the page cannot add it afterwards. -
Watch the stepper rather than hunting for buttons.
VerifiedandIn Progressare stages the stepper is built to show, but the page offers no button for either and no other screen sets them. Its two actions areAcknowledge RequestandRefuse.
Step 5 — Gather what the organisation holds
- Collect the data and its context — the categories held, why each is processed, who it is shared with, and how long it is kept. Your records of processing activities are the map for this work.
- Assemble the reply outside Aegis. The request page has no editor for the response and no field for working notes after creation, so the export or letter lives in your own systems. Aegis holds the record, the deadline and the trail.
Step 6 — Respond, or refuse
A request ends one of two ways, and both are final: once it reads
Completed or Refused, the fulfilment actions vanish
and the status cannot move again. Refuse is always on the page; the
route to Completed runs through an AI draft, so it is not always
offered — see The AI assist below. Either way, a
Contributor can only carry a
closing action through on a request assigned to them; see
Tips and limits.
-
To fulfil the request, approve the response. Where an
AI-Drafted Responsepanel is present,Approve & Sendsaves that text against the record, marks the requestCompleted, stops the countdown, and shows the text in a greenResponsepanel. Aegis stores the response; sending it to the requester through your normal channel remains your job. -
To decline, select
Refuse. A red confirmation panel opens with the warning that refusing is final and a requiredRefusal Reasonbox.Confirm Refusalstays disabled until you type something;Cancelcloses the panel and changes nothing. -
Select
Confirm Refusal. The request moves toRefused, the reason is saved permanently and shown in a red panel on the page, and the countdown column switches to a dash.
A manifestly unfounded or excessive request may be declined. You must still tell the person you are declining, give your reasons, and point them to their right to complain to a supervisory authority — within the same one-month window. Aegis records the refusal; the letter is yours to send.
Step 7 — Consider whether it is also a breach
Some requests surface something worse than they asked about: data that should
have been deleted years ago, or an address sitting in a system nobody knew
about. If the work uncovers a personal-data breach, open
Incidents in the Security Incidents group of the left
menu and log it there, on its own 72-hour clock. The
incident-response scenario picks the story
up from that point.
Step 8 — Keep the record
Months later a supervisory authority may ask how the request was handled. Open
Audit Log in the Audit group, at /log.
There is no filter for a single request, and the
Search description... box matches only an entry's description —
which for a DSR action reads UPDATE on dsr for an acknowledgement,
DSR_REFUSE on dsr for a refusal and
DSR_COMPLETE on dsr for a response, never the requester's address —
so narrow with Filter by action or by date instead. Opening an
entry shows the timestamp, the person who acted, and the recorded detail: the
request type, the subject's address, and whether the acknowledgement email was
delivered. The queue itself has no bulk export. The
audit log has one where the licence includes audit
export, and it is the record to rely on for an inspection.
The AI assist
When a request is logged, and where the licence includes GDPR automation and AI
is configured, Aegis queues a data-mapping job that chains into a drafted reply.
The draft is stored as an AI suggestion for a person to review. The panel built
to show it, AI-Drafted Response, carries a confidence percentage
and counts of the systems and records the draft drew on, above three buttons:
Reject Draft, Edit Draft and
Approve & Send. Nothing is ever recorded as the answer until a
person approves it — the AI proposes, Sofia decides.
The draft panel is groundwork rather than a step you can work through today.
It renders only when the request page is handed an AI suggestion
and the status is In Progress, and neither
holds at present: the request page's data does not include the stored
suggestion, and no control on any Aegis screen moves a request to
In Progress. In practice the fulfilment section shows the
stepper with Refuse as its only closing action: you write and
send the response outside Aegis, and the record cannot be moved to
Completed from the screen. Edit Draft has no
editing screen behind it either.
Tips and limits
-
The two-month extension for complex cases is not a status in Aegis, and
Notescan only be written when the request is created — nothing on the request page edits it afterwards. Track an extension outside Aegis and watch theDue Datecolumn yourself; it will not move. - To correct a response after a request is locked, log a fresh request for the same person and note that it supersedes the earlier one.
-
Expiredis a final status a request can reach once its deadline passes. Where the licence includes GDPR automation, a background job checks every fifteen minutes, raises escalating deadline alerts, and expires overdue requests still sitting inPendingorVerified. Without that automation nothing expires by itself — work theOverdue Onlyfilter instead. - A Contributor who cannot find a request they expect to see is probably outside its assignment — it is assigned to someone else, so the queue does not return it to them. A Manager or Admin sees every request and can work it instead.
-
Assignment also gates the closing actions. A
Contributor may open and
acknowledge an unassigned request, but
Confirm RefusalandApprove & Sendsucceed only on requests assigned to them — on an unassigned one the panel returns an error and the status does not move. Manager and Admin may close any request. Because no screen sets the assignee today, in practice the closing action on an unassigned request falls to a Manager or Admin. - Logging by hand is not the only intake route. Where the licence includes GDPR automation, an Admin or Manager can point Aegis at a privacy mailbox from Connectors. This chapter follows the manual path, which every licence has.
Where this connects
The full module reference — all seven request types, every status, and the rest of the privacy area — is in the GDPR chapter, and Incidents covers the breach path. The permanent record of every change lives in the audit log, which an assessor will also ask for during an external audit. For who may log, work and close requests, see What each role can do; for the sidebar groups used here, see The left menu. Terms glossed in brackets are collected in the glossary.